Nissan Maxima Owners Manual: Battery
- Keep the battery surface clean and dry.
Clean the battery with a solution of baking soda and water.
- Make certain the terminal connections are clean and securely tightened.
- If the vehicle is not to be used for 30 days or longer, disconnect the negative (-) battery terminal cable to prevent discharge.
NOTE:
Care should be taken to avoid situations that can lead to potential battery discharge and potential no-start conditions such as: 1. Installation or extended use of electronic accessories that consume battery power when the engine is not running (Phone chargers, GPS, DVD players, etc.) 2. Vehicle is not driven regularly and/or only driven short distances. In these cases, the battery may need to be charged to maintain battery health.
WARNING
- Do not expose the battery to flames, an
electrical spark or a cigarette. Hydrogen
gas generated by the battery is explosive.
Explosive gases can cause blindness or injury. Do not allow battery fluid to contact your skin, eyes, fabrics or painted surfaces. Sulfuric acid can cause blindness or injury. After touching a battery or battery cap, do not touch or rub your eyes. Thoroughly wash your hands. If the acid contacts your eyes, skin or clothing, immediately flush with water for at least 15 minutes and seek medical attention.
- Do not operate the vehicle if the fluid in the battery is low. Low battery fluid can cause a higher load on the battery which can generate heat, reduce battery life, and in some cases lead to an explosion.
- When working on or near a battery, always wear suitable eye protection and remove all jewelry.
- Battery posts, terminals and related accessories
contain lead and lead compounds.
Wash hands after handling.
- Keep battery out of the reach of children.
- Do not tip the battery. Keep the vent caps tight and the battery level.
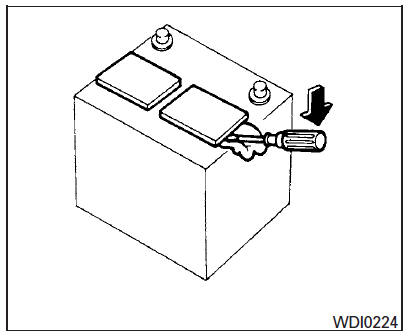
1. Remove the vent caps with a screwdriver as shown. Use a cloth to protect the battery case.
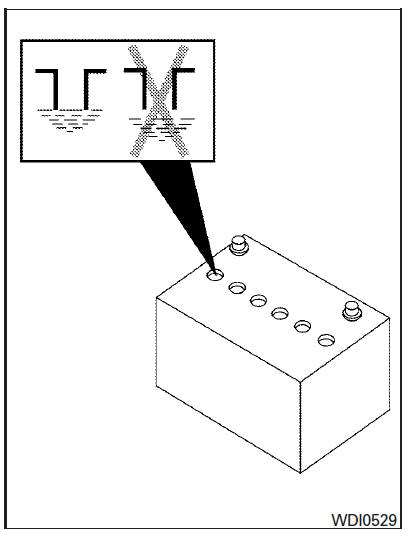
2. Check the fluid level in each cell. If it is necessary to add fluid, add only distilled water to bring the level up to the bottom of the filler opening. Do not overfill. Reinstall the vent caps.
Vehicles operated in high temperatures or under severe conditions require frequent checks of the battery fluid level.
Jump starting
If jump starting is necessary, refer to "Jump starting" in the "In case of emergency" section of this manual. If the engine does not start by jump starting, the battery may have to be replaced. It is recommended that you visit a NISSAN dealer for this service.
 Windshield-washer fluid
Windshield-washer fluid reservoir
Fill the windshield-washer fluid reservoir periodically.
Add windshield-washer fluid when the low
windshield-washer fluid warning light comes on.
To fill ...
 Variable voltage control system
CAUTION
Do not ground accessories directly to
the battery terminal. Doing so will bypass
the variable voltage control system
and the vehicle battery may not
charge completely.
Use el ...
Other materials:
Harness
Harness Layout
HOW TO READ HARNESS LAYOUT
The following Harness Layouts use a map style grid to help locate
connectors on the drawings:
Main Harness, Console Sub-harness and Console Switch Subharness
Engine Room Harness and Front End Module Harness
Engine Room Harness (Passenger Comp ...
Sunload sensor
Removal and Installation
REMOVAL
Remove the front LH speaker grille from the instrument panel.
Refer to IP-10, "Exploded View".
Disconnect the harness connector from the sunload sensor.
Release the sunload sensor tabs and remove the sunload sensor
(1) from the front LH speake ...
Diagnosis system (HVAC)
CONSULT Function
CONSULT can display each diagnosis item using the diagnosis test modes as
shown.
CONSULT application items
SELF DIAGNOSTIC RESULT
Display Item List
*: Perform self-diagnosis under sunshine. When performing indoors, aim a
light (more than 60 W) at sunload sensor, ...
Nissan Maxima Owners Manual
- Illustrated table of contents
- Safety-Seats, seat belts and supplemental restraint system
- Instruments and controls
- Pre-driving checks and adjustments
- Monitor, climate, audio, phone and voice recognition systems
- Starting and driving
- In case of emergency
- Appearance and care
- Do-it-yourself
- Maintenance and schedules
- Technical and consumer information
Nissan Maxima Service and Repair Manual

0.005