
Nissan Maxima Service and Repair Manual: Sliding motor
Description
- The sliding motor LH is installed to the seat frame.
- The sliding motor LH is activated with the driver seat control unit.
- The seat is slid forward/backward by changing the rotation direction of sliding motor LH.
Component Function Check
1. CHECK FUNCTION
- Select "SEAT SLIDE" in "ACTIVE TEST" mode with CONSULT.
- Check the sliding motor LH operation.

Diagnosis Procedure
1. CHECK SLIDING MOTOR LH POWER SUPPLY
- Turn the ignition switch to ACC.
- Perform "ACTIVE TEST" ("SEAT SLIDE") with CONSULT.
- Check voltage between driver seat control unit harness connector and ground.
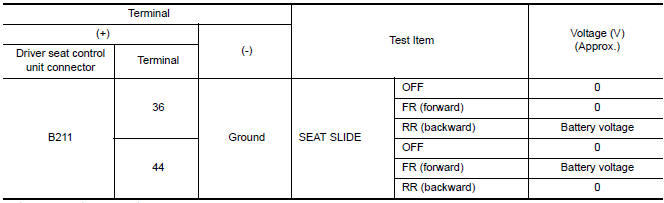
2. CHECK SLIDING MOTOR LH CIRCUIT
- Turn ignition switch OFF.
- Disconnect driver seat control unit and front power seat LH [sliding motor].
- Check continuity between driver seat control unit harness connector and front power seat LH [sliding motor] harness connector.

- Check continuity between driver seat control unit harness connector and ground.

3. CHECK INTERMITTENT INCIDENT
 Mirror sensor
DRIVER SIDE
DRIVER SIDE : Description
The mirror sensor LH is installed to the door mirror LH.
The resistance of 2 sensors (horizontal and vertical) is changed
when the door mirror LH is ope ...
 Reclining motor
Description
The reclining motor is installed to the seatback assembly.
The reclining motor is activated with the driver seat control unit.
The seatback is reclined forward/backward by changing ...
Other materials:
ICC system operation
The ICC system maintains a selected distance
from the vehicle in front of you within the speed
range 0 to 90 mph (0 to 144km/h) up to the set
speed. The set speed can be selected by the
driver between 20 to 90 mph (32 to 144 km/h),
based on road conditions.
The vehicle travels at the set ...
Larger children
Children should remain in a forward-facing child
restraint with a harness until they reach the maximum
height or weight limit allowed by the child
restraint manufacturer.
Once a child outgrows the height or weight limit
of the harness-equipped forward-facing child restraint,
NISSAN recommends ...
B1065 - B1068, B1070 - B1073 passenger airbag module
Description
DTC B1065 - B1068, B1070 - B1073 PASSENGER AIR BAG MODULE
The passenger air bag module is dual stage and wired to the air bag diagnosis
sensor unit. The air bag diagnosissensor unit will monitor for opens and
shorts in detected lines to the passenger air bag module.
PART LOCATION
...
Nissan Maxima Owners Manual
- Illustrated table of contents
- Safety-Seats, seat belts and supplemental restraint system
- Instruments and controls
- Pre-driving checks and adjustments
- Monitor, climate, audio, phone and voice recognition systems
- Starting and driving
- In case of emergency
- Appearance and care
- Do-it-yourself
- Maintenance and schedules
- Technical and consumer information
Nissan Maxima Service and Repair Manual

0.0227