Nissan Maxima Owners Manual: Outside mirrors
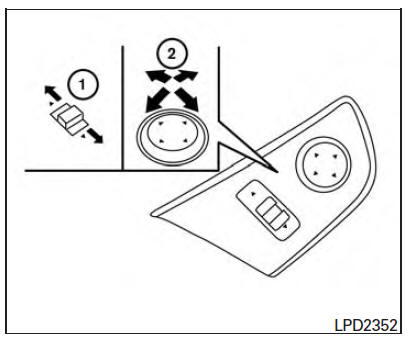
The outside mirror remote control will operate only when the ignition switch is in the ACC or ON position.
Move the small switch 1 to select the right or left mirror. Adjust each mirror to the desired position using the large switch 2 .
WARNING
- Objects viewed in the outside mirror on the passenger side are closer than they appear. Be careful when moving to the right. Using only this mirror could cause an accident. Use the inside mirror or glance over your shoulder to properly judge distances to other objects.
- Do not adjust the mirrors while driving.
You could lose control of your vehicle and cause an accident.
Reverse tilt-down feature (if so equipped)
The reverse tilt-down feature will turn both outside mirror surfaces downward to provide better rear visibility close to the vehicle when the mirror control switch is in either the L or R position.
The mirrors automatically returns to their original position when you shift out of R (Reverse).
The outside mirror surfaces will return to their original position when one of the following has occurred:
- The shift lever is moved to any position other than R (Reverse).
- The outside mirror control switch is set to the neutral or center position.
- The ignition switch is placed in the OFF position.
NOTE:
If the outside mirror control switch is in the Center position, mirror surface will NOT turn downward when the shift lever is moved to R (Reverse).
For additional information regarding this feature, refer to "Automatic drive positioner" in this section.
Foldable outside mirrors
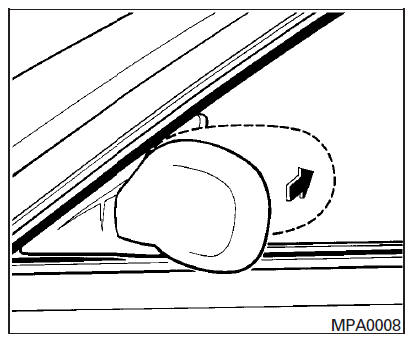
Pull the outside mirror toward the door to fold it.
Heated mirrors (if so equipped)
The electric control type outside mirrors can be heated to defrost, defog, or de-ice for improved visibility. Push the rear window defroster switch to activate the heating function. Push the switch again to deactivate, or the heating function will automatically turn off after approximately 15 minutes.
 Automatic anti-glare rearview mirror
The inside mirror is designed so that it automatically
dims during night time conditions and according
to the intensity of the headlights of the
vehicle following you. The automatic anti-glare
...
 Automatic drive positioner (if so equipped)
The automatic drive positioner system has three
features:
Memory storage function (Key-link)
Memory storage function (Switch)
Entry/exit function
Key-link, when enabled, automatically reta ...
Other materials:
TCS
System Diagram
System Description
Traction Control System is a function that electronically controls
engine torque and brake fluid pressure to
ensure the optimum slippage ratio at drive wheels by computing wheel speed
signals from 4 wheel sensors.
When ABS actuator and electric u ...
P0137, P0157 HO2S2
Description
The heated oxygen sensor 2, after three way catalyst (manifold),
monitors the oxygen level in the exhaust gas on each bank.
Even if switching characteristics of the air fuel ratio (A/F) sensor 1
are shifted, the air-fuel ratio is controlled to stoichiometric, by the signal
...
Diagnosis and repair workflow
Work Flow
OVERALL SEQUENCE
DETAILED FLOW
1. GET INFORMATION FOR SYMPTOM
Get the detailed information from the customer about the symptom (the
condition and the environment when
the incident/malfunction occurred).
2. CHECK DTC
Check DTC.
Perform the following procedure if DTC is di ...
Nissan Maxima Owners Manual
- Illustrated table of contents
- Safety-Seats, seat belts and supplemental restraint system
- Instruments and controls
- Pre-driving checks and adjustments
- Monitor, climate, audio, phone and voice recognition systems
- Starting and driving
- In case of emergency
- Appearance and care
- Do-it-yourself
- Maintenance and schedules
- Technical and consumer information
Nissan Maxima Service and Repair Manual

0.0051