Nissan Maxima Service and Repair Manual: Interior room lamp
Removal and Installation
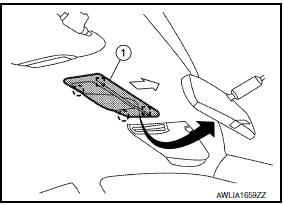
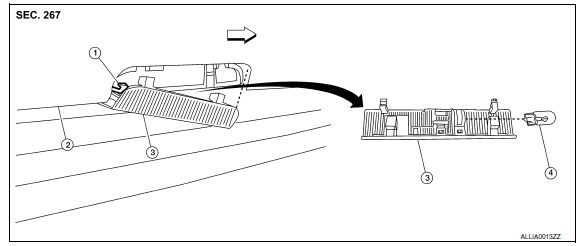
FRONT ROOM/MAP LAMP ASSEMBLY
Removal
- Release the metal clips and drop front edge of front room/map lamp assembly (1) away from headlining. Slide front room/map lamp assembly forward in vehicle to clear pawls at rear.
 : Front
 :
Pawl
:
Pawl
 : Metal clip
- Disconnect the connectors, then remove the front room/map lamp assembly.
Installation
Installation is in the reverse order of removal.
Bulb or Lens Replacement
WARNING: Do not touch bulb while it is lit or right after being turned OFF. Burning may result.Caution: -Do not touch glass surface of the bulb with bare hands or allow oil or grease to get on it to prevent damage to bulb.
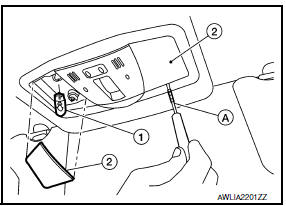
- Using a suitable tool (A), remove the front room/map lamp lens (2).
- Pull bulb (1) straight out to remove.
- Install the new bulb to front room/map lamp.
- Install the front room/map lamp lens (2).
VANITY MIRROR LAMP
Removal
The vanity mirror lamp is replaced as part of the sun visor assembly. Refer to INT-33, "Removal and Installation".
Installation
Installation is in the reverse order of removal.
Bulb or Lens Replacement
WARNING: Do not touch bulb while it is lit or right after being turned OFF. Burning may result.Caution: -Do not attempt to separate the vanity mirror lamp from the sun visor or damage to the components may occur. -Do not touch glass surface of the bulb with bare hands or allow oil or grease to get on it to prevent damage to bulb.
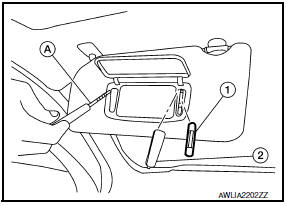
- Using a suitable tool (A), remove the vanity mirror lamp lens (2).
- Pull bulb (1) straight out to remove.
- Install the new bulb to vanity mirror lamp.
- Install the vanity mirror lamp lens (2).
GLOVE BOX LAMP
Removal
- Remove the glove box assembly (1). Refer to IP-20, "Removal and Installation".
- Rotate glove box lamp socket (3) and bulb (2) counterclockwise and then pull out to remove.
Installation
Installation is in the reverse order of removal.
Bulb Replacement
WARNING: Do not touch bulb while it is lit or right after being turned OFF. Burning may result.Caution: -Do not touch glass surface of the bulb with bare hands or allow oil or grease to get on it to prevent damage to bulb.
- Remove the glove box lamp. Refer to GLOVE BOX LAMP.
- Pull bulb straight out to remove.
- Install the new bulb to glove box lamp.
- Install the glove box lamp lens (2).
STEP LAMP
Removal
- Step lamp connector
- Door finisher
- Step lamp lens/socket
- Step lamp bulb
 Front
Front
- Insert a suitable tool between door finisher and step lamp lens/socket to release the pawls.
- Disconnect the step lamp connector, then remove step lamp.
Installation
Installation is in the reverse order of removal.
Bulb Replacement
WARNING: Do not touch bulb while it is lit or right after being turned OFF. Burning may result.Caution: -Do not touch glass surface of the bulb with bare hands or allow oil or grease to get on it to prevent damage to bulb.
- Remove the step lamp lens/socket.
- Pull the bulb straight out to remove.
- Install the new bulb to step lamp.
- Install the step lamp lens (2).
FOOT LAMP
Removal - LH
- Using a suitable tool, release the foot lamp pawls and remove the foot lamp from the instrument lower panel LH.
- Disconnect the harness connector and remove the foot lamp.
Installation - LH
Installation is in the reverse order of removal.
Removal - RH
- Rotate foot lamp socket counterclockwise to release from the substrate.
- Disconnect the harness connector and remove the foot lamp.
Installation - RH
Installation is in the reverse order of removal.
Bulb Replacement
WARNING: Do not touch bulb while it is lit or right after being turned OFF. Burning may result.Caution: -Do not touch glass surface of the bulb with bare hands or allow oil or grease to get on it to prevent damage to bulb.
- Remove the foot lamp. Refer to FOOT LAMP.
- Pull bulb straight out to remove.
- Install the new bulb to foot lamp.
- Install the foot lamp lens (2).
PERSONAL LAMP
Removal
The personal lamp is replaced as part of the headlining assembly. Refer to INT-33, "Removal and Installation".
Installation
Installation is in the reverse order of removal.
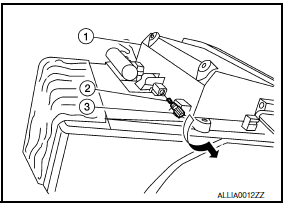
Bulb or Lens Replacement
WARNING: Do not touch bulb while it is lit or right after being turned OFF. Burning may result.Caution: -Do not touch glass surface of the bulb with bare hands or allow oil or grease to get on it to prevent damage to bulb.
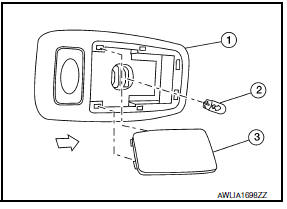
- Using a suitable tool, release the pawls and remove personal lamp
lens (3) from the personal lamp (1).
 :
Front
:
Front - Pull bulb (2) straight out to remove.
- Install the new bulb to foot lamp.
- Install the foot lamp lens (2).

 Illumination
Removal and Installation
TRUNK ROOM LAMP
Removal
Release the tab (A), then swing open the lens.
: Front
Remove the bulb (3).
Release the tab (B), then pull trunk room lamp (2) away from ...
Other materials:
Precaution
Precaution for Supplemental Restraint System (SRS) "AIR BAG" and "SEAT
BELT
PRE-TENSIONER"
The Supplemental Restraint System such as "AIR BAG" and "SEAT BELT PRE-TENSIONER",
used along
with a front seat belt, helps to reduce the risk or severity of injury to the
driver ...
Precaution
Precaution for Supplemental Restraint System (SRS) "AIR BAG" and
"SEAT BELT PRE-TENSIONER"
The Supplemental Restraint System such as "AIR BAG" and "SEAT BELT
PRE-TENSIONER", used along with a front seat belt, helps to reduce the risk
or severity of injury to the driver and front passenger for ...
System maintenance
The two radar sensors 1 for the BSW and
RCTA systems are located near the rear bumper.
Always keep the area near the radar sensors
clean.
The radar sensors may be blocked by temporary
ambient conditions such as splashing water, mist
or fog.
The blocked condition may also be caused b ...
Nissan Maxima Owners Manual
- Illustrated table of contents
- Safety-Seats, seat belts and supplemental restraint system
- Instruments and controls
- Pre-driving checks and adjustments
- Monitor, climate, audio, phone and voice recognition systems
- Starting and driving
- In case of emergency
- Appearance and care
- Do-it-yourself
- Maintenance and schedules
- Technical and consumer information
Nissan Maxima Service and Repair Manual

0.0058