Nissan Maxima Service and Repair Manual: Radiator
Exploded View
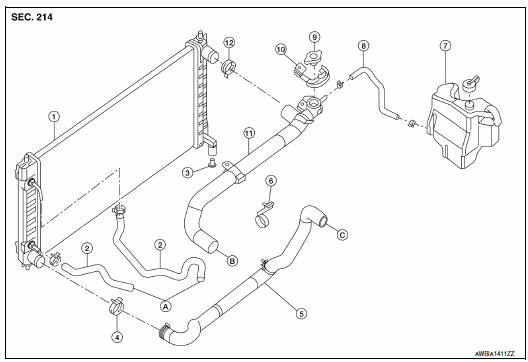
- Radiator
- CVT oil cooler hose
- Radiator drain plug
- Radiator hose (lower) clamp
- Radiator hose (lower)
- Radiator hose (lower) bracket
- Reservoir tank
- Reservoir hose
- Radiator cap
- Radiator cap adaptor
- Radiator hose (upper)
- Radiator hose (upper) clamp
- To CVT
- To water outlet
- To water inlet
Removal and Installation
WARNING: Do not remove the radiator cap when the engine is hot. Serious burns could occur from high pressure coolant escaping from the radiator. Wrap a thick cloth around the radiator cap. Slowly turn it a quarter turn to allow built-up pressure to escape. Carefully remove the radiator cap by turning it all the way.
NOTE: When removing components such as hoses, tubes/lines, etc., cap or plug openings to prevent fluid from spilling.
REMOVAL
- Drain coolant from radiator. Refer to CO-11, "Changing Engine Coolant".
- Remove hoodledge covers (LH/RH).
- Remove front bumper fascia. Refer to EXT-16, "Removal and Installation".
- Remove battery tray. Refer to PG-68, "Removal and Installation (Battery Tray)".
- Disconnect reservoir hose.
- Disconnect radiator hose (upper) and radiator hose (lower).
- Remove A/C condenser. Refer to HA-45, "CONDENSER : Removal and Installation".
- Disconnect the CVT oil cooler hoses
- Remove radiator.
CAUTION: Do not damage or scratch the radiator core when removing.
INSTALLATION
Installation is in the reverse order of removal.
- After installation refill engine coolant and check for leaks. Refer to and CO-10, "System Inspection".
CAUTION: Do not spill coolant in engine compartment. Use a shop cloth to absorb coolant.
INSPECTION
Radiator
- Check radiator for mud or clogging. If necessary, clean radiator as follows.
CAUTION:
- Be careful not to bend or damage the radiator fins.
- When radiator is cleaned on-vehicle, remove surrounding parts in order to access the radiator core. Tape the harness and electrical connectors to prevent water from entering.
- Spray water to the back side of the radiator core using a side to side motion from the top down.
- Stop spraying when debris no longer flows from radiator core.
- Blow air into the back side of radiator core using a side to side motion from the top down.
- Use compressed air lower than 490 kPa (5 kg/cm2, 71 psi) and keep distance more than 30 cm (11.8 in).
- Continue to blow air until no water sprays out.
- Inspect radiator for leaks as follows:
- Apply pressure using Tool.
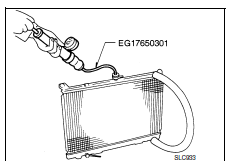
Tool number : EG17650301 (J-33984-A)
Leakage test pressure : Refer to CO-27, "Radiator".
WARNING: To prevent the risk of the hose coming undone while under pressure, securely fasten it down with a hose clamp.
Attach a hose to the oil cooler as well.
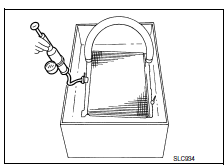
- Check for leaks.

 Cooling fan
Removal and Installation
Radiator cooling fan assembly
WARNING:
Do not remove the radiator cap when the engine is hot. Serious burns could occur
from high pressure
coolant escaping from ...
Other materials:
U1255 satellite radio tuner
Description
DTC Logic
Diagnosis Procedure
1.CHECK SATELLITE RADIO TUNER POWER SUPPLY AND GROUND CIRCUIT
Check satellite radio tuner power supply and ground circuit.
2.CHECK CONTINUITY COMMUNICATION CIRCUIT AND REQUEST SIGNAL CIRCUIT
Turn ignition switch OFF.
Disconnect AV cont ...
B1145 - B1148 side curtain air bag module RH
Description
DTC B1145 - B1148 RH SIDE CURTAIN AIR BAG MODULE
The RH side curtain air bag module is wired to the air bag diagnosis sensor
unit. The air bag diagnosis sensorunit will monitor for opens and shorts in
detected lines to the RH side curtain air bag module.
PART LOCATION
DTC Logic
...
Forward-facing child restraint installation using the seat belts
WARNING
The three-point seat belt with Automatic
Locking Retractor (ALR) must be used
when installing a child restraint. Failure to
use the ALR mode will result in the child
restraint not being properly secured. The
restraint could tip over or be loose and
cause injury to a child in a sudden ...
Nissan Maxima Owners Manual
- Illustrated table of contents
- Safety-Seats, seat belts and supplemental restraint system
- Instruments and controls
- Pre-driving checks and adjustments
- Monitor, climate, audio, phone and voice recognition systems
- Starting and driving
- In case of emergency
- Appearance and care
- Do-it-yourself
- Maintenance and schedules
- Technical and consumer information
Nissan Maxima Service and Repair Manual

0.0055