Nissan Maxima Service and Repair Manual: Front door finisher
Exploded View
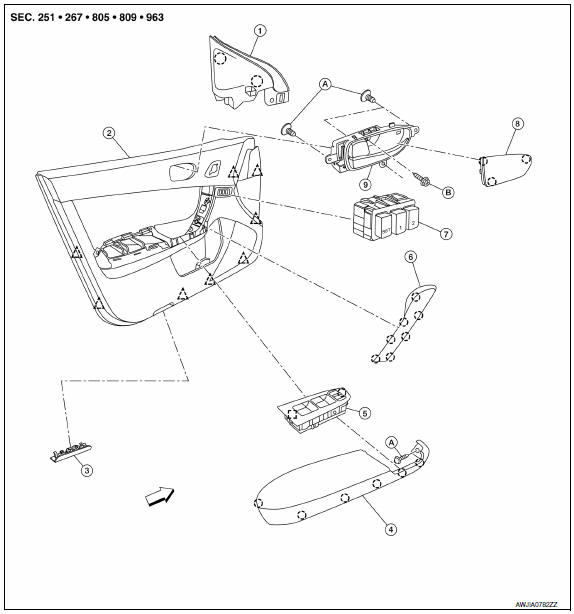
- Mirror cover
- Front door finisher
- Step lamp
- Arm rest finisher
- Main power window and door lock/ unlock switch finisher
- Front door grip cover
- Seat memory switch (if equipped)
- Inside release handle escutcheon
- Inside release handle
- Flat head screws
- Screws
 Front
Front
 Metal clip
 Pawl
Pawl
 Clip
Clip
Removal and Installation
REMOVAL
- Remove the step lamp
- Release the pawls at the rear edge and remove the inside release handle escutcheon, then remove the screw.
- Remove the front door grip cover (1) by using a suitable tool to release the pawls.
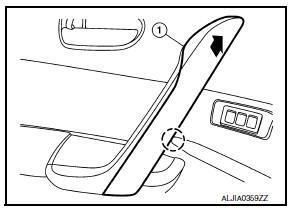
CAUTION:
- Use suitable tool to release at the point shown or damage may occur to the pawls.
- Lift upward on front door grip cover to release pawls and remove.
- Wrap the tip of a suitable tool with a cloth when removing metal clips from finisher.
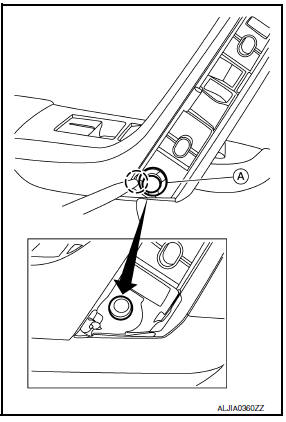
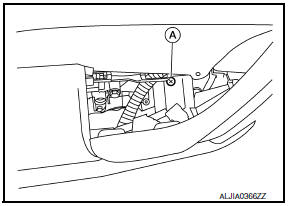
- Remove the front door grip clip (A).
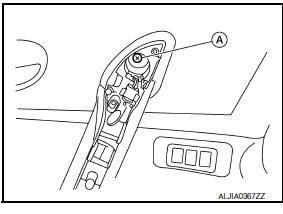
- Remove the front door grip screw (A).
- Remove the power window and door lock/unlock switch and finisher as an assembl
- Remove the front door finisher screw (A) under power window and door lock/unlock switch finisher.
- Release the front door finisher clips using a suitable tool (A)
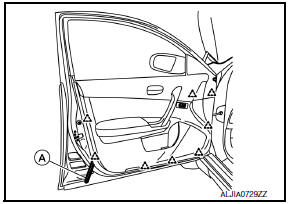
 : Clip
- Disconnect the harness connector from the seat memory switch (if equipped).
- Disconnect inside handle and lock knob cables from front door finisher.
- Disconnect the harness connector from the power window and door lock/unlock switch lamp.
- Remove the front door finisher.
INSTALLATION
Installation is in the reverse order of removal.
- If installing a new front door finisher, transfer all the necessary parts to the new front door finisher.

 Rear door finisher
Exploded View
Rear door finisher
Step lamp
Armrest finisher
Rear power window switch finisher
Inside release handle escutcheon
Inside release handle
Flat head screws
&nb ...
Other materials:
Meter buzzer circuit
Description
The buzzer for warning chime system is installed in the
combination meter.
The combination meter sounds the alarm buzzer based on the signals
transmitted from various units.
Component Function Check
1. CHECK OPERATION OF METER BUZZER
Select "BUZZER" of "BCM" on CONSUL ...
How to enable/disable the BSW system
Perform the following steps to enable or disable
the BSW system.
1. Press the button until
"Settings" displays
in the vehicle information display and
then press OK. Use the button
to
select "Driver Assistance". Then press the
OK button.
2. Select "Blind Spot" and press the ...
Shoulder belt height adjustment (front seats)
The shoulder belt anchor height should be adjusted
to the position best for you. For additional
information, refer to "Precautions on seat belt
usage" in this section. To adjust, pull out the
adjustment button 1 and move the shoulder belt
anchor to the desired position 2 , so the belt
pass ...
Nissan Maxima Owners Manual
- Illustrated table of contents
- Safety-Seats, seat belts and supplemental restraint system
- Instruments and controls
- Pre-driving checks and adjustments
- Monitor, climate, audio, phone and voice recognition systems
- Starting and driving
- In case of emergency
- Appearance and care
- Do-it-yourself
- Maintenance and schedules
- Technical and consumer information
Nissan Maxima Service and Repair Manual

0.0061