Nissan Maxima Service and Repair Manual: Rear parcel shelf finisher
Exploded View
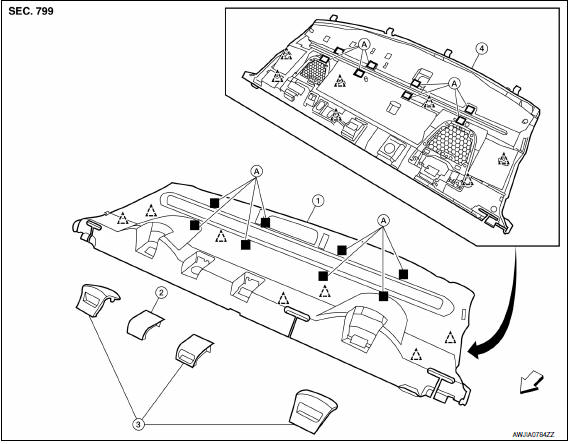
With Sunshade
- Rear parcel shelf finisher
- Cover
- Child anchor cover
- Rear parcel shelf finisher (under side)
- Dual lock fasteners
 Clip
Clip
 Front
Front
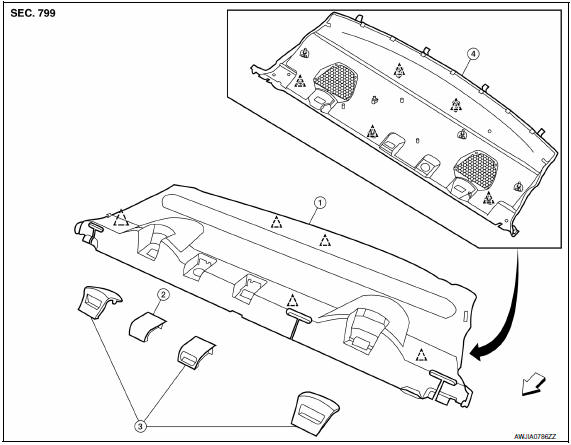
Without Sunshade
- Rear parcel shelf finisher
- Cover
- Child anchor cover
- Rear parcel shelf finisher (under side)
 Clip
Clip
 Front
Front
Removal and Installation
REMOVAL
- Remove the halo upper frame assembly. Refer to SE-70, "Removal and Installation" (with fixed seatback, WITH CLIMATE CONTROLLED SEATS), SE-73, "Removal and Installation" (with split seatback, WITH CLIMATE CONTROLLED SEATS), SE-128, "Removal and Installation" (with fixed seatback, W/O CLIMATE CONTROLLED SEATS) SE-131, "Removal and Installation" (with split seatback, W/O CLIMATE CONTROLLED SEATS).
- Remove high mounted stop lamp (if equipped). Refer to EXL-164, "Removal and Installation".
- Remove rear pillar finishers (RH/LH). Refer to INT-24, "Removal and Installation".
- Thread the rear seat belts (RH/LH/center) through vertical opening and release from rear parcel shelf finisher.
- Remove rear parcel shelf finisher using a suitable tool.
INSTALLATION
Installation is in the reverse order of removal.
CAUTION: Make sure that clips are fully aligned with panel holes on body when installing, then press them in completely.
 Body side trim
Exploded View
Front pillar finisher
Dash side lower finisher
Front kicking plate
Front sill cover
Center pillar lower finisher
Rear sill cover
Rear kicking plate
Rear body sid ...
 Rear sunshade
Removal and Installation
Rear sunshade unit Front
REMOVAL
Remove the rear parcel shelf finisher. Refer to INT-24, "Removal
and Installation".
Remove the rear sunshade unit.
...
Other materials:
IPDM E/R (intelligent power distribution module engine room)
Reference Value
VALUES ON THE DIAGNOSIS TOOL
TERMINAL LAYOUT
Fail Safe
CAN COMMUNICATION CONTROL
When CAN communication with ECM and BCM is impossible, IPDM E/R performs
fail-safe control. After CAN
communication recovers normally, it also returns to normal control.
If No ...
Microphone
Removal and Installation
REMOVAL
Remove the front room/map lamp assembly. Refer to INL-84, "Removal
and Installation".
Detach the microphone connector (A).
Remove the front room/map lamp covers (1), then remove the map lamp
assembly cover (2).
Release the microphone tab ...
Cooling system
Cooling Circuit
Cylinder block (RH)
Oil cooler
Cylinder head (RH)
Water pump
Radiator
Water inlet
Thermostat
Cylinder head (LH)
Cylinder block (LH)
To heater
To electric throttle control actuator
From heater
From electric throttle control act ...
Nissan Maxima Owners Manual
- Illustrated table of contents
- Safety-Seats, seat belts and supplemental restraint system
- Instruments and controls
- Pre-driving checks and adjustments
- Monitor, climate, audio, phone and voice recognition systems
- Starting and driving
- In case of emergency
- Appearance and care
- Do-it-yourself
- Maintenance and schedules
- Technical and consumer information
Nissan Maxima Service and Repair Manual

0.0059