Nissan Maxima Service and Repair Manual: Trunk room trim & trunk lid finisher
Exploded View
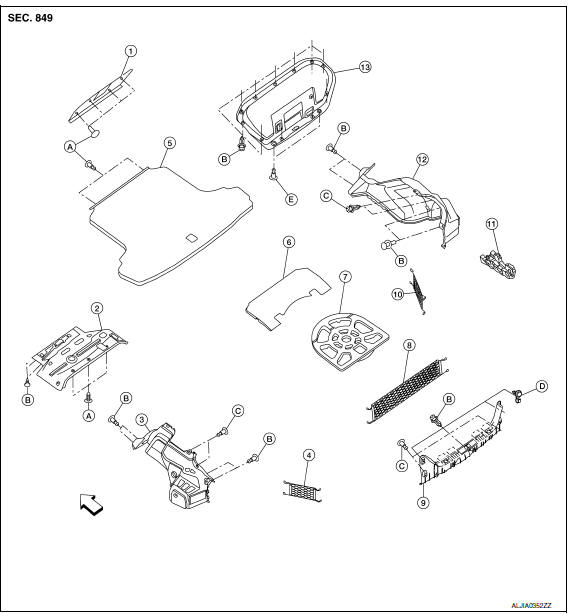
- Trunk forward carpet (if equipped)
- Upper trunk finisher
- Trunk side finisher (LH)
- Trunk net side
- Trunk floor carpet
- Spacer
- Spare tire cover
- Trunk net rear (if equipped)
- Trunk rear finisher
- Trunk net side
- Box assembly
- Trunk side finisher (RH)
- Trunk lid finisher
- Clip C103
- Clip C205
- Clip C101
- Trunk net hooks
- Trunk lid rubber bumper
 Metal clip
 Front
Front
Removal and Installation
REMOVAL
TRUNK ROOM TRIM
- Release the latch, then position rear seatback (RH/LH) to the folded down position (if equipped).
- Remove trunk floor carpet clips (if equipped) and the trunk floor carpet.
- Remove the trunk net rear and the trunk net side (if installed).
- Remove the clips and the trunk rear finisher.
- Remove the clips and the upper trunk finisher.
- Remove the clips and the trunk forward carpet (if equipped).
- Release the clips and remove trunk side finishers (RH/LH).
- Remove spare tire foam board cover and the forward floor foam board spacer.
- Remove the trunk lid rubber bumpers (RH/LH), detach the trunk pull handle release and remove the clips and the trunk lid finisher.
INSTALLATION
Installation is in the reverse order of removal.
 Headlining
Exploded View
Rear assist grip
Front assist grip
Front room/map lamp assembly (dual panel- sunroof)
Sun visor (RH)
Sun visor (LH)
Mirror harness cover
Sun visor cover
Front roo ...
 Instrument panel
...
Other materials:
Combination switch reading system
System Diagram
System Description
OUTLINE
BCM reads the status of the combination switch (light, turn
signal, wiper and washer) and recognizes the
status of each switch.
BCM has a combination of 5 output terminals (OUTPUT 1 - 5) and 5
input terminals (INPUT 1 - 5) and reads
a ...
Diagnosis system (BCM)
COMMON ITEM
COMMON ITEM : CONSULT Function (BCM - COMMON ITEM)
APPLICATION ITEM
CONSULT performs the following functions via CAN communication with BCM.
SYSTEM APPLICATION
BCM can perform the following functions.
WIPER
WIPER : CONSULT Function (BCM - WIPER)
DATA MONITOR
ACTIVE TEST
...
Telescopic switch
Description
ADP steering switch (telescopic switch) is equipped to the steering column.
The operation signal is input to the automatic drive positioner control unit
when the telescopic switch is operated.
Component Function Check
1. CHECK FUNCTION
Select "TELESCO SW-FR", "TELESCO SW-RR" i ...
Nissan Maxima Owners Manual
- Illustrated table of contents
- Safety-Seats, seat belts and supplemental restraint system
- Instruments and controls
- Pre-driving checks and adjustments
- Monitor, climate, audio, phone and voice recognition systems
- Starting and driving
- In case of emergency
- Appearance and care
- Do-it-yourself
- Maintenance and schedules
- Technical and consumer information
Nissan Maxima Service and Repair Manual

0.0098