
Nissan Maxima Service and Repair Manual: Power supply and ground circuit
POWER SUPPLY AND GROUND CIRCUIT AUDIO UNIT
AUDIO UNIT : Diagnosis Procedure
1.CHECK FUSES
Check that the following fuses are not blown.

2.POWER SUPPLY CIRCUIT CHECK
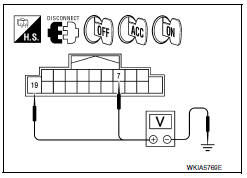
- Disconnect audio unit connector M133.
- Check voltage between the audio unit connector M133 and ground.
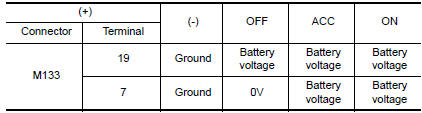
3.GROUND CIRCUIT CHECK
Inspect audio unit case ground.
SUBWOOFER AMP
SUBWOOFER AMP : Diagnosis Procedure
1.CHECK FUSE
Check for blown fuses.

2.CHECK POWER SUPPLY CIRCUIT
- Turn ignition switch OFF.
- Disconnect subwoofer amp connector.
- Check voltage between subwoofer amp harness connector and ground.

3.CHECK GROUND CIRCUIT
Check continuity between subwoofer amp harness connector and ground.

DISPLAY UNIT
DISPLAY UNIT : Diagnosis Procedure
1.CHECK FUSES
Check that the following fuses are not blown.

2.POWER SUPPLY CIRCUIT CHECK
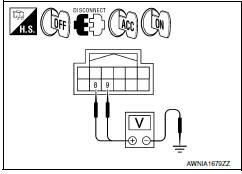
- Turn ignition switch OFF.
- Disconnect display unit connector.
- Check voltage between the display unit and ground.
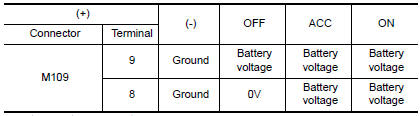
3.GROUND CIRCUIT CHECK
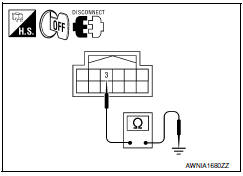
- Turn ignition switch OFF.
- Check continuity between display unit harness connector and ground.

BLUETOOTH CONTROL UNIT
BLUETOOTH CONTROL UNIT : Diagnosis Procedure
1.CHECK FUSE
Check that the following fuses of the Bluetooth control unit are not blown.

2.CHECK POWER SUPPLY CIRCUIT
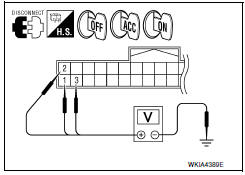
Check voltage between Bluetooth control unit harness connector and ground.
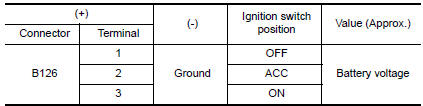
3.CHECK GROUND CIRCUIT
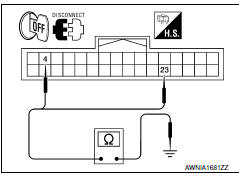
- Turn ignition switch OFF.
- Disconnect Bluetooth control unit connector B126.
- Check continuity between Bluetooth control unit harness connector and ground.
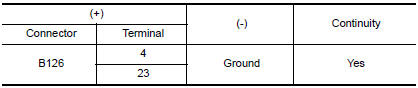
MICROPHONE
MICROPHONE : Diagnosis Procedure
1.CHECK POWER SUPPLY CIRCUIT (MICROPHONE SIDE)
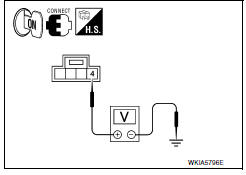
Check voltage between microphone harness connector and ground.

2.CHECK POWER SUPPLY CIRCUIT (CONTINUITY)
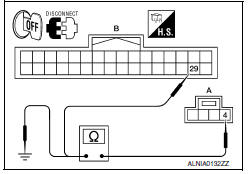
- Turn ignition switch OFF.
- Disconnect Bluetooth control unit and microphone connectors.
- Check continuity between microphone harness connector R7 (A) terminal 4 and Bluetooth control unit harness connector B126 (B) terminal 29.

- Check continuity between microphone harness connector R7 (A) terminal 4 and ground.

3.CHECK GROUND CIRCUIT
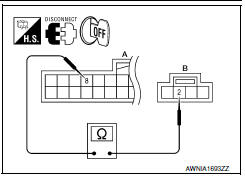
- Turn ignition switch OFF.
- Disconnect Bluetooth control unit and microphone connectors.
- Check continuity between Bluetooth control unit harness connector B126 (A) terminal 8 and microphone harness connector R7 (B) terminal 2.


 Front door speaker
Description
The audio unit sends audio signals to the front door speakers using the front
door speaker circuits.
Diagnosis Procedure
1.CONNECTOR CHECK
Check the audio unit and speake ...
Other materials:
Audio system
System Diagram
System Description
AUDIO SYSTEM
The audio system consists of the following components
AV control unit
Display unit
BOSE speaker amp.
Window antenna
Steering wheel audio control switches
A/C and AV switch assembly
Front door speakers
Tweeters
Center speaker
R ...
ECU diagnosis information
DIAGNOSIS SENSOR UNIT
Trouble Diagnosis with CONSULT
DIAGNOSTIC CODE CHART
NOTE:Follow the procedures in numerical
order when repairing malfunctioning parts. Confirm whether malfunction is
eliminated using air bag warning lamp or CONSULT each time repair is finished.
If malfunction is stillo ...
Types of tires
WARNING
When changing or replacing tires, be
sure all four tires are of the same type
(i.e., Summer, All Season or Snow) and
construction. A NISSAN dealer may be
able to help you with information about
tire type, size, speed rating and
availability.
Replacement tires may have a low ...
Nissan Maxima Owners Manual
- Illustrated table of contents
- Safety-Seats, seat belts and supplemental restraint system
- Instruments and controls
- Pre-driving checks and adjustments
- Monitor, climate, audio, phone and voice recognition systems
- Starting and driving
- In case of emergency
- Appearance and care
- Do-it-yourself
- Maintenance and schedules
- Technical and consumer information
Nissan Maxima Service and Repair Manual

0.0125