Nissan Maxima Owners Manual: Booster seat installation
WARNING
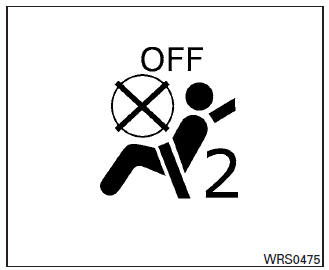
To avoid injury to child, do not use the lap/shoulder belt in the Automatic Locking Retractor (ALR) mode when using a booster seat with the seat belts.
For additional information, refer to all Warnings and Cautions in the "Child safety," "Child restraint" and "Booster seats" sections of this manual before installing a child restraint.
Follow these steps to install a booster seat in the rear seats or in the front passenger seat:
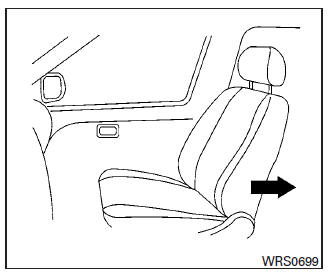
1. If you must install a booster seat in the front seat, move the seat to the rearmost position.
2. Position the booster seat on the seat. Only place it in a front-facing direction. Always follow the booster seat manufacturer's instructions.
Front passenger position
3. The booster seat should be positioned on the vehicle seat so that it is stable.
If necessary, adjust or remove the head restraint/headrest to obtain the correct booster seat fit. If the head restraint/headrest is removed, store it in a secure place. Be sure to reinstall the head restraint/headrest when the booster seat is removed. For additional information about head restraint/headrest adjustment, removal and installation, refer to "Head restraints/headrests" in this section.
If the seating position does not have an adjustable head restraint/headrest and it is interfering with the proper booster seat fit, try another seating position or a different booster seat.
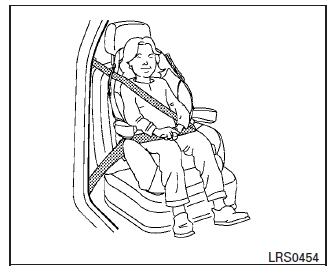
4. Position the lap portion of the seat belt low and snug on the child's hips. Be sure to follow the booster seat manufacturer's instructions for adjusting the seat belt routing.
5. Pull the shoulder belt portion of the seat belt toward the retractor to take up extra slack.
Be sure the shoulder belt is positioned across the top, middle portion of the child's shoulder. Be sure to follow the booster seat manufacturer's instructions for adjusting the seat belt routing.
6. Follow the warnings, cautions and instructions for properly fastening a seat belt shown in "Three-point type seat belt with retractor" in this section.
7. If the booster seat is installed in the front
passenger seat, place the ignition switch in
the ON position. The front passenger air bag
status light  may or may not
illuminate,
depending on the size of the child and the
type of booster seat being used. For additional
information, refer to "Front passenger
air bag and status light" in this section.
may or may not
illuminate,
depending on the size of the child and the
type of booster seat being used. For additional
information, refer to "Front passenger
air bag and status light" in this section.
 Precautions on booster seats
WARNING
If a booster seat and seat belt are not used
properly, the risk of a child being injured
or killed in a sudden stop or collision
greatly increases:
Make sure the shoulder portion of
...

Other materials:
P0461 fuel level sensor
Description
The fuel level sensor is mounted in the fuel level sensor unit.
The sensor detects a fuel level in the fuel tank and transmits a signal to the
combination meter. The combination
meter sends the fuel level sensor signal to the ECM via the CAN communication
line.
It consists o ...
P1217 engine over temperature
DTC Logic
DTC DETECTION LOGIC
NOTE:
If DTC P1217 is displayed with DTC UXXXX, first perform the
trouble diagnosis for DTC UXXXX.
Refer to EC-161, "DTC Logic".
If DTC P1217 is displayed with DTC P0607, first perform the
trouble diagnosis for DTC P0607. Refer
t ...
Diagnosis system (BCM)
COMMON ITEM
COMMON ITEM: CONSULT Function (BCM - COMMON ITEM)
APPLICATION ITEM
CONSULT performs the following functions via CAN communication with BCM.
Direct Diagnostic Mode
Description
Ecu Identification
The BCM part number is displayed
Self Diagnostic Re ...
Nissan Maxima Owners Manual
- Illustrated table of contents
- Safety-Seats, seat belts and supplemental restraint system
- Instruments and controls
- Pre-driving checks and adjustments
- Monitor, climate, audio, phone and voice recognition systems
- Starting and driving
- In case of emergency
- Appearance and care
- Do-it-yourself
- Maintenance and schedules
- Technical and consumer information
Nissan Maxima Service and Repair Manual

0.0071