
Nissan Maxima Service and Repair Manual: Inspection and adjustment
ADDITIONAL SERVICE WHEN REPLACING CONTROL UNIT
ADDITIONAL SERVICE WHEN REPLACING CONTROL UNIT : Description
After replacing the ABS actuator and electric unit (control unit), perform the neutral position adjustment for the steering angle sensor.
ADDITIONAL SERVICE WHEN REPLACING CONTROL UNIT : Special Repair Requirement
1.PERFORM THE NEUTRAL POSITION ADJUSTMENT FOR THE STEERING ANGLE SENSOR
Perform the neutral position adjustment for the steering angle sensor.
ADJUSTMENT OF STEERING ANGLE SENSOR NEUTRAL POSITION
ADJUSTMENT OF STEERING ANGLE SENSOR NEUTRAL POSITION : Description
When performing work that applies to the list below, make sure to adjust neutral position of steering angle sensor before operating vehicle.
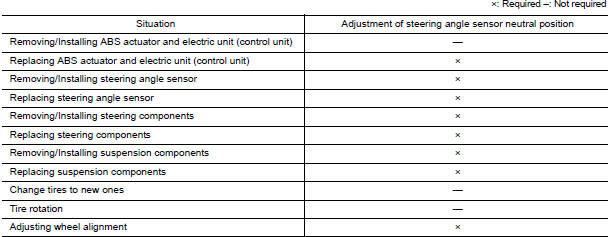
ADJUSTMENT OF STEERING ANGLE SENSOR NEUTRAL POSITION : Special Repair Requirement
ADJUSTMENT OF STEERING ANGLE SENSOR NEUTRAL POSITION
CAUTION: To adjust neutral position of steering angle sensor, make sure to use CONSULT (Adjustment cannot be done without CONSULT)
1.ALIGN THE VEHICLE STATUS
Stop vehicle with front wheels in straight-ahead position
2.PERFORM THE NEUTRAL POSITION ADJUSTMENT FOR THE STEERING ANGLE SENSOR
- On the CONSULT screen, touch "WORK SUPPORT", then "ST ANGLE SENSOR ADJUSTMENT".
- Touch "START CAUTION: Do not touch steering wheel while adjusting steering angle sensor.
- After approximately 10 seconds, touch "END". NOTE: After approximately 60 seconds, the adjustment ends automatically.
- Turn ignition switch OFF, then turn it ON again. CAUTION: Be sure to perform above operation.
3.CHECK DATA MONITOR
- Run vehicle with front wheels in straight-ahead position, then stop.
- Select "DATA MONITOR". Then make sure "STR ANGLE SIG" is within 0+-2.5.
4.ERASE THE SELF-DIAGNOSIS MEMORY
Erase the self-diagnosis memories of the ABS actuator and electric unit (control unit) and ECM.
- ABS actuator and electric unit (control unit): Refer to BRC-21, "CONSULT Function (ABS)".
- ECM: Refer to EC-138, "CONSULT Function".
 Diagnosis and repair workflow
Work Flow
PRECAUTIONS FOR DIAGNOSIS
If steering angle sensor, steering system parts, suspension system parts, ABS
actuator and electric unit (control
unit) or if wheel alignment has been adjuste ...

Other materials:
Headlamp
Wiring Diagram
...
Spark Plug
Exploded View
Ignition coil
Spark plug
Rocker cover (RH)
Rocker cover (LH)
Removal and Installation
REMOVAL
Remove the ignition coil. Refer to EM-42, "Removal and
Installation (LH)" and EM-42, "Removal and Installation (RH)".
Remove the spark plug with a suitable spark p ...
Precaution
PRECAUTIONS
Precaution for Supplemental Restraint System (SRS) "AIR BAG" and "SEAT
BELT
PRE-TENSIONER"
The Supplemental Restraint System such as "AIR BAG" and "SEAT BELT PRE-TENSIONER",
used along
with a front seat belt, helps to reduce the risk or severity of injury to ...
Nissan Maxima Owners Manual
- Illustrated table of contents
- Safety-Seats, seat belts and supplemental restraint system
- Instruments and controls
- Pre-driving checks and adjustments
- Monitor, climate, audio, phone and voice recognition systems
- Starting and driving
- In case of emergency
- Appearance and care
- Do-it-yourself
- Maintenance and schedules
- Technical and consumer information
Nissan Maxima Service and Repair Manual

0.0087