Nissan Maxima Owners Manual: Programming HomeLink
If you have any questions or are having difficulty programming your HomeLink buttons, refer to the HomeLink web site at: www.homelink.com or call 1-800-355-3515.
NOTE:
Place the ignition switch in the ACC position when programming HomeLink. It is also recommended that a new battery be placed in the hand-held transmitter of the device being programmed to HomeLink for quicker programming and accurate transmission of the radio frequency.
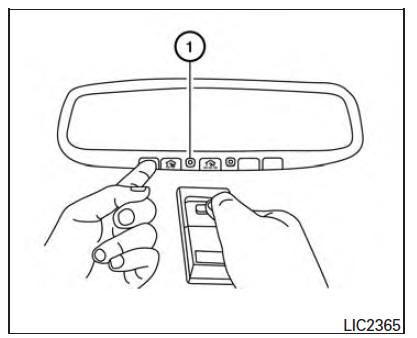
1. Position the end of your hand-held transmitter 1-3 in (2-8 cm) away from the HomeLink surface, keeping the HomeLink indicator light 1 in view.
2. Using both hands, simultaneously press and hold the desired HomeLink button and hand-held transmitter button. DO NOT release until the HomeLink indicator light 1 flashes slowly and then rapidly. When the indicator light flashes rapidly, both buttons may be released. (The rapid flashing indicates successful programming.)
NOTE:
Some devices may require you to replace Step 2 with the cycling procedure noted in "Programming HomeLink for Canadian customers and gate openers" in this section.
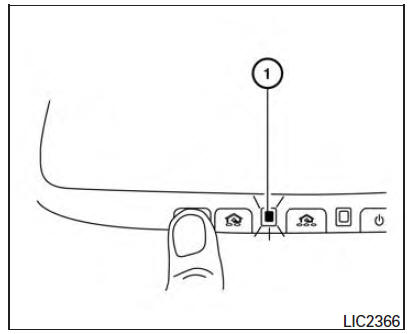
3. Press and hold the programmed HomeLink button and observe the indicator light.
- If the indicator light 1 is solid/continuous, programming is complete and your device should activate when the HomeLink button is pressed and released.
- If the indicator light 1 blinks rapidly for
2 seconds and then turns to a
solid/continuous light, continue
with Steps 4-6 for a rolling code device.
A second person may make the following steps easier. Use a ladder or other device.
Do not stand on your vehicle to perform the next steps.
4. At the receiver located on the garage door opener motor in the garage, locate the "learn" or "smart" button (the name and color of the button may vary by manufacturer but it is usually located near where the hanging antenna wire is attached to the unit). If there is difficulty locating the button, reference the garage door opener's manual.
5. Press and release the "learn" or "smart" button.
6. Return to the vehicle and firmly press and hold the trained HomeLink button for 2 seconds and release. Repeat the "press/hold/release" sequence up to three times to complete the training process.
HomeLink should now activate your rolling code equipped device.
7. If you have any questions or are having difficulty programming your HomeLink buttons, refer to the HomeLink web site at: www.homelink.com or call 1-800-355- 3515.
 HomeLink Universal Transceiver
The HomeLink Universal Transceiver provides
a convenient way to consolidate the functions of
up to three individual hand-held transmitters into
one built-in device.
HomeLink Universal Transceive ...
 Programming HomeLink for Canadian customers and gate openers
Canadian radio-frequency laws require transmitter
signals to "time-out" (or quit) after several
seconds of transmission - which may not be long
enough for HomeLink to pick up the signal
during tra ...
Other materials:
Cooling and/or dehumidified heating
(AUTO)
This mode may be used all year round as the
system automatically works to keep a constant
temperature. Air flow distribution and fan speed
are also controlled automatically.
1. Press the AUTO button on.
2. Turn the temperature control dial to the left
or right to set the desired temperatur ...
Seatback pockets
The seatback pockets are located on the back of
the driver's and passenger's seats. The pockets
can be used to store maps.
WARNING
To ensure proper operation of the passenger's
NISSAN Advanced Air Bag System,
please observe the following items:
Do not allow a passenger in the rear
se ...
Cluster lid A
Removal and Installation
REMOVAL
Using a suitable tool, gently remove the instrument side finisher
LH (1).
Remove the instrument lower panel LH (1).
Open the fuse block cover and remove the instrument lower panel
screw (A).
Disconnect the harness connectors and aspirator hose. ...
Nissan Maxima Owners Manual
- Illustrated table of contents
- Safety-Seats, seat belts and supplemental restraint system
- Instruments and controls
- Pre-driving checks and adjustments
- Monitor, climate, audio, phone and voice recognition systems
- Starting and driving
- In case of emergency
- Appearance and care
- Do-it-yourself
- Maintenance and schedules
- Technical and consumer information
Nissan Maxima Service and Repair Manual

0.0066