
Nissan Maxima Service and Repair Manual: In-vehicle sensor
Removal and Installation
REMOVAL
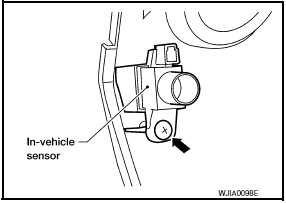
- Remove the instrument lower panel LH. Refer to IP-19, "Removal and Installation".
- Remove the in-vehicle sensor screw and the in-vehicle sensor.
INSTALLATION
Installation is in the reverse order of removal.
CAUTION: Make sure that the aspirator hose is securely attached to the in-vehicle sensor when installing the instrument lower panel LH.
 Ambient sensor
Removal and Installation
REMOVAL
From under the vehicle, disconnect the harness connector from the
ambient sensor.
Release the ambient sensor clip and remove the ambient sensor
(1).
I ...
 Sunload sensor
Removal and Installation
REMOVAL
Remove the front LH speaker grille from the instrument panel.
Refer to IP-10, "Exploded View".
Disconnect the harness connector from the sunload se ...
Other materials:
Intake sensor
Removal and Installation
REMOVAL
Remove the evaporator (2). Refer to HA-48, "EVAPORATOR:
Removal and Installation".
Release the intake sensor clip (A), then remove the intake sensor
(1).
CAUTION:
Mark the mounting position of the intake sensor.
Do not damage the evapo ...
Locking doors
1. Place the ignition switch in the LOCK position.
2. Close all doors.
3. Press the button on the
Intelligent
Key.
4. The hazard warning lights flash twice, the
horn beeps once, and the front and tail lights
will turn on for 10 seconds.
5. All doors will be locked.
CAUTION
Af ...
Removal and installation
HORN
Removal and Installation
REMOVAL
Remove the engine under cover. Refer to EXT-16, "Removal and
Installation".
Position aside the front fender protector (LH). Refer to EXT-24,
"Removal and Installation".
Disconnect the harness connectors (A) from the horns.
Remove the horn brack ...
Nissan Maxima Owners Manual
- Illustrated table of contents
- Safety-Seats, seat belts and supplemental restraint system
- Instruments and controls
- Pre-driving checks and adjustments
- Monitor, climate, audio, phone and voice recognition systems
- Starting and driving
- In case of emergency
- Appearance and care
- Do-it-yourself
- Maintenance and schedules
- Technical and consumer information
Nissan Maxima Service and Repair Manual

0.0108