Nissan Maxima Service and Repair Manual: Floor trim
Exploded View
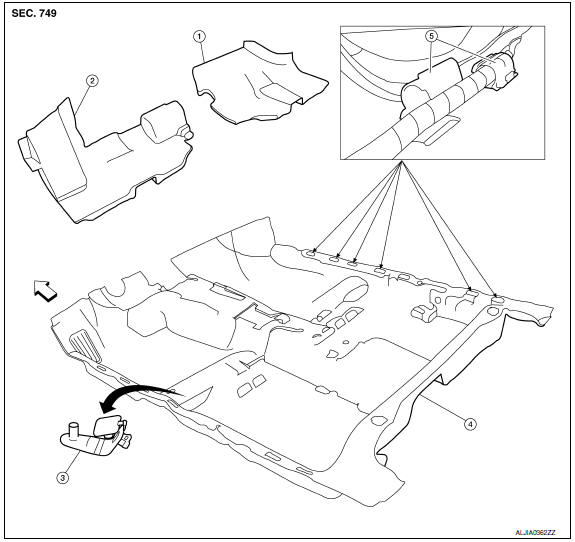
- Spacer (RH)
- Spacer (LH)
- Floor mat hook
- Floor carpet
- Harness clamp
 Front
Front
Removal and Installation
REMOVAL
- Disconnect the negative and positive battery terminals. Refer to PG-68, "Removal and Installation (Battery Tray)".
- Remove front seat (RH/LH). Refer to SE-68, "Removal and Installation" (w/o climate controlled seats) or SE-126, "Removal and Installation" (with climate controlled seats).
- Remove the rear seat cushion. Refer to SE-70, "Removal and Installation" (with fixed seatback, W/O CLIMATE CONTROLLED SEATS), or SE-73, "Removal and Installation" (with split seatback, W/O CLIMATE CONTROL CONTROLLED SEATS), or SE-128, "Removal and Installation" (with fixed seatback, WITH CLIMATE CONTROLLED SEATS) SE-131, "Removal and Installation" (with split seatback, WITH CLIMATE CONTROLLED SEATS).
- Remove dash side lower finishers (RH/LH), front inner kick plates (RH/LH), rear inner kick plates (RH/LH) and the center pillar lower garnishes (RH/LH). Refer to INT-24, "Removal and Installation".
- Remove center console assembly. Refer to IP-14, "Removal and Installation".
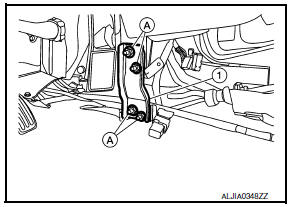
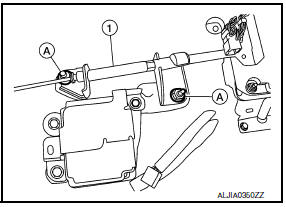
- Remove the instrument stay bracket nuts (A), and the instrument stay bracket (1).
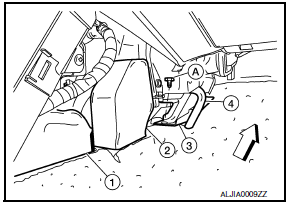
- Remove the connector duct (RH/LH) (2) and the center connector duct
(1) from heater and cooling unit. Refer to VTL-12, "CENTER VENTILATOR
GRILLES : Removal and Installation".
- :
Front
:
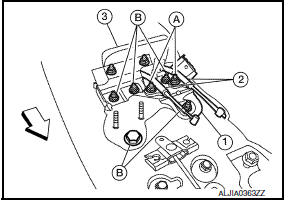
Front - Disconnect the drain hose (4) from the heater and cooling unit and set drain hose aside.
- Remove the bracket bolts (A) and nut and the bracket (3).
- Detach the center console harness clips (A), then disconnect the center console harness electrical connectors (B) and position the center console harness (1) aside.
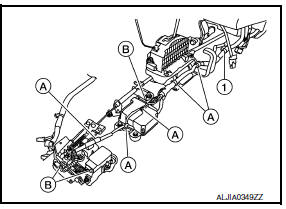
- Remove the parking brake cable nuts (A) and bolt and remove the parking brake cable. Position the parking brake cable aside.
- Remove the yaw rate/side/decel G sensor. Refer to BRC-108, "Removal and Installation".
- Remove the drivers air bag module. Refer to SR-12, "Removal and Installation".
- Remove the passenger air bag module. Refer to SR-17, "Removal and Installation".
- Remove the diagnosis sensor unit.
- Remove the parking brake cable nuts (A). Position the parking brake cables (2) aside.
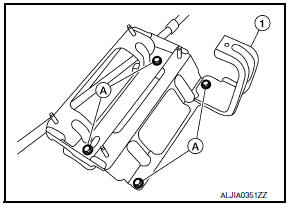
- Remove the bracket nuts (B), and remove extension bracket (1)
and center console rear bracket (3).
- Front
Front
- Remove the CVT shift selector. Refer to TM-170, "Removal and Installation".
- Remove the CVT shift selector bracket bolts (A), and remove the CVT shift selector bracket (1).
- Remove front seat belt floor anchor bolt (RH/LH). Refer to SB-6, "Removal and Installation".
- Release the tab and remove the floor mat hook.
- Release the tabs and open harness clamps (six R/H and six L/H). Position harness and floor carpet cutout areas outside of harness clamps.
- Fold corners toward center, then remove floor carpet.
INSTALLATION
Installation is in the reverse order of removal.
 Rear sunshade
Removal and Installation
Rear sunshade unit Front
REMOVAL
Remove the rear parcel shelf finisher. Refer to INT-24, "Removal
and Installation".
Remove the rear sunshade unit.
...
 Headlining
Exploded View
Rear assist grip
Front assist grip
Front room/map lamp assembly (dual panel- sunroof)
Sun visor (RH)
Sun visor (LH)
Mirror harness cover
Sun visor cover
Front roo ...
Other materials:
Diagnosis and repair workflow
Work Flow
OVERALL SEQUENCE
DETAILED FLOW
1. GET INFORMATION FOR SYMPTOM
Get the detailed information from the customer about the symptom (the
condition and the environment when
the incident/malfunction occurred).
2. CHECK DTC
Check DTC.
Perform the following procedure if DTC is ...
Auto light system
System Diagram
System Description
BCM (Body Control Module) controls auto light operation according to
signals from optical sensor, lighting switch and ignition switch.
IPDM E/R (Intelligent Power Distribution Module Engine Room) operates
parking, license plate, tail, front fog lamps ...
Main line between HVAC and A-bag circuit
Diagnosis Procedure
1.CHECK HARNESS CONTINUITY (OPEN CIRCUIT)
Turn the ignition switch OFF.
Disconnect the battery cable from the negative terminal.
Disconnect the following harness connectors.
A/C auto amp.
Harness connectors M1 and E30
Check the continuity between the A/C au ...
Nissan Maxima Owners Manual
- Illustrated table of contents
- Safety-Seats, seat belts and supplemental restraint system
- Instruments and controls
- Pre-driving checks and adjustments
- Monitor, climate, audio, phone and voice recognition systems
- Starting and driving
- In case of emergency
- Appearance and care
- Do-it-yourself
- Maintenance and schedules
- Technical and consumer information
Nissan Maxima Service and Repair Manual

0.0056