Nissan Maxima Owners Manual: Front power seat adjustment
Operating tips
- The power seat motor has an auto-reset overload protection circuit. If the motor stops during operation, wait 30 seconds then reactivate the switch.
- Do not operate the power seat switch for a
long period of time when the engine is off.
This will discharge the battery.
For additional information, refer to "Automatic drive positioner" in the "Pre-driving checks and adjustments" section of this manual.
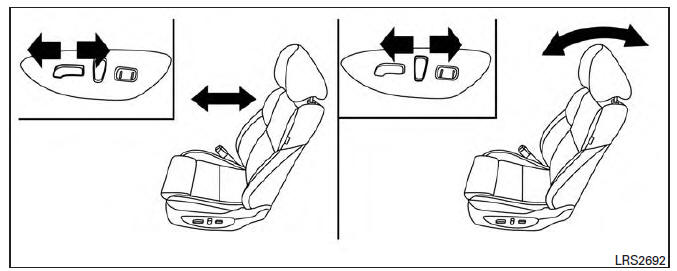
Forward and backward
Moving the switch forward or backward will slide the seat forward or backward to the desired position.
Reclining
Move the recline switch backward until the desired angle is obtained. To bring the seatback forward again, move the switch forward and move your body forward. The seatback will move forward.
The reclining feature allows adjustment of the seatback for occupants of different sizes for added comfort and to help obtain proper seat belt fit. For additional information, refer to "Precautions on seat belt usage" in this section. Also, the seatback can be reclined to allow occupants to rest when the vehicle is stopped and the shift lever is in P (Park).
Seat lifter (driver's seat)
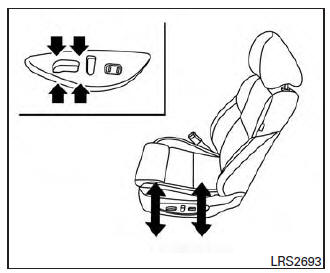
Push the front or rear end of the switch up or down to adjust the angle and height of the seat cushion.
Lumbar support (if so equipped for driver's seat)
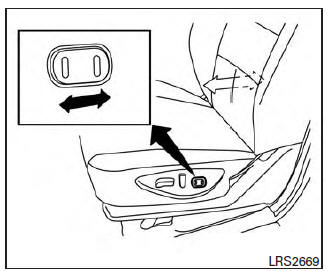
The lumbar support feature provides adjustable lower back support to the driver. Push the front or back end of the switch to adjust the seat lumbar area.
Thigh extension (if so equipped for driver's seat)

Pull up and hold the lever to extend the front portion to the desired position.
 Seats
Seats
WARNING
Do not ride in a moving vehicle when
the seatback is reclined. This can be
dangerous. The shoulder belt will not
be against your body. In an accident,
you could be thrown into it ...
 Folding rear seat
Interior trunk access
The trunk can be accessed from the passenger
side of the rear seat for loading and unloading, as
shown.
1. Move the front passenger seat to the most
forward position.
...
Other materials:
C1105, C1106, C1107, C1108 wheel sensor
DTC Logic
DTC DETECTION LOGIC
DTC CONFIRMATION PROCEDURE
1.CHECK SELF DIAGNOSTIC RESULT
With CONSULT.
Start engine and drive vehicle at approximately 21 km/h (13 MPH)
or more for approximately 5 minutes.
Perform self diagnostic result
Diagnosis Procedure
CAUTION:
Do not check ...
Headlamp (HI) circuit
Description
The IPDM E/R (intelligent power distribution module engine room) controls the
headlamp high relay based on inputs from the BCM over the CAN communication
lines. When the headlamp high relay is energized, power flows through fuses
48 and 49, located in the IPDM E/R. Power then flow ...
Turning the FEB system on/off
Perform the following steps to turn the FEB systems
ON or OFF.
1. Press the button until
"Settings" displays
in the vehicle information display and
then press OK button. Use the
button
to select "Driver Assistance". Then press the
OK button.
2. Select "Emergency Brake" ...
Nissan Maxima Owners Manual
- Illustrated table of contents
- Safety-Seats, seat belts and supplemental restraint system
- Instruments and controls
- Pre-driving checks and adjustments
- Monitor, climate, audio, phone and voice recognition systems
- Starting and driving
- In case of emergency
- Appearance and care
- Do-it-yourself
- Maintenance and schedules
- Technical and consumer information
Nissan Maxima Service and Repair Manual

0.007