Nissan Maxima Service and Repair Manual: Sunroof motor assembly
Removal and Installation
REMOVAL
CAUTION:
- Before removing sunroof motor, check that glass lid is fully closed.
- After removing sunroof motor, do not attempt to rotate sunroof motor assembly as a single unit.
- Close glass lid.
- Remove the headlining. Refer to INT-33, "Removal and Installation".
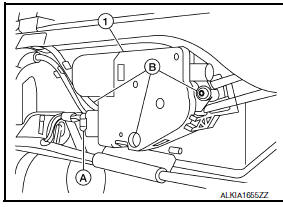
- Disconnect the harness connector (A) from the sunroof motor assembly.
- Remove sunroof motor assembly screws (B), then remove sunroof motor assembly (1) from sunroof unit assembly frame.
INSTALLATION
CAUTION: Before installing the sunroof motor assembly, be sure to the place the link and wire assembly in the symmetrical and fully closed position.
- Move the sunroof motor assembly laterally so that the gear is completely engaged into the wire on the sunroof unit assembly frame, and mounting surface becomes parallel.
- Install and tighten sunroof motor assembly screws.
- Connect the harness connector to the sunroof motor assembly.
- Install the headlining. Refer to INT-33, "Removal and Installation".
- Perform initilization procedure.
 Glass lid
Removal and Installation
REMOVAL
CAUTION:
Always work with a helper.
Handle glass lid with care to prevent damage.
NOTE: For easier and more accurate
installation, always mark each point ...
 Sunshade motor assembly
Removal and Installation
REMOVAL
CAUTION:
Before removing sunshade motor, check that glass lid is fully
closed.
After removing sunshade motor, do not attempt to rotate
sunshade motor ass ...
Other materials:
Audio display unit
Removal and Installation
Audio display unit bracket
Audio display unit
Cluster lid D
Multifunction switch
Audio display unit bracket screws
Audio display unit screws
Metal Clip
REMOVAL
Remove cluster lid D. Refer to IP-18, "Removal and Installation".
Remov ...
Precautions on booster seats
WARNING
If a booster seat and seat belt are not used
properly, the risk of a child being injured
or killed in a sudden stop or collision
greatly increases:
Make sure the shoulder portion of
the belt is away from the child's face
and neck and the lap portion of the
belt does not cross t ...
Rear power window switch
Removal and Installation
REMOVAL
Remove the rear door armrest finisher. Refer to INT-21,
"Removal and Installation".
Release the pawls on each side to separate the switch finisher
(1) from the rear power window switch (2) using a suitable tool
(A).
: Pawl
INSTALLA ...
Nissan Maxima Owners Manual
- Illustrated table of contents
- Safety-Seats, seat belts and supplemental restraint system
- Instruments and controls
- Pre-driving checks and adjustments
- Monitor, climate, audio, phone and voice recognition systems
- Starting and driving
- In case of emergency
- Appearance and care
- Do-it-yourself
- Maintenance and schedules
- Technical and consumer information
Nissan Maxima Service and Repair Manual

0.0053