Nissan Maxima Service and Repair Manual: Sunshade
Exploded View
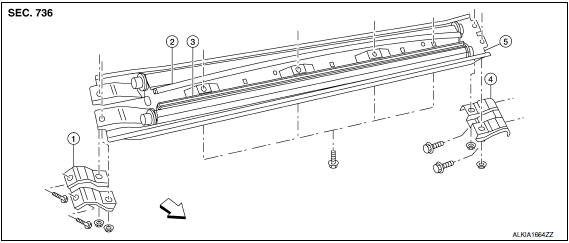
- Center bracket (RH)
- Rear sunshade
- Front sunshade
- Center bracket (LH)
- Sunshade carrier assembly
 Front
Front
Removal and Installation
REMOVAL
- Open glass lid and sunshades.
- Remove the headlining. Refer to INT-33, "Removal and Installation".
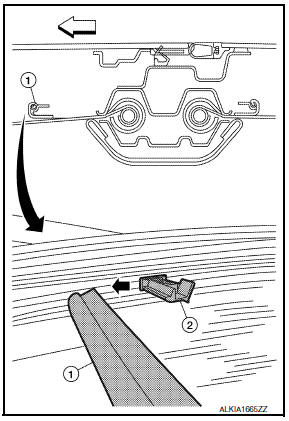
- Release front sunshade rail (1) from sunshade drive post (2).
: Front - Repeat sunshade drive post release for the rear sunshade.
- Remove side curtain air bag module bolts (two on each (LH/RH) sides) for access.
- Release harness clips from sunshade carrier assembly.
- Remove the center bracket nuts and bolts, then remove the center brackets (LH/RH).
- Remove the sunshade carrier assembly bolts, then lower sunshade and remove from vehicle.
- Release the end key slot from the sunshades.
INSTALLATION
CAUTION: Be careful not to release the spring when installing the sunshade.
- Wind the shade around the core post.
- Insert the round end of the shade (front - black curved rail) into the sunshade carrier assembly.
- Using a suitable tool, wind the double-D tang end 20 turns counter-clockwise (when viewed from the end).
- Insert the double-d tang end into the slot and lock it into the carrier.
- Position the sunshade carrier assembly and install the bolts.
- Position the center brackets (LH/RH) and install the bolts and nuts.
- Install the side curtain air bag module bolts.
- Install the headliner.
 Wind deflector
Removal and Installation
REMOVAL
Open the glass lid.
Remove the side screw (A) to release the wind deflector side
arms (1). : Front
Disconnect and release the inner blind (1) slide c ...
 Sunroof switch
Removal and Installation
The sunroof switch (1) is an integrated part of the front room/map lamp
(2), and therefore serviced as an assembly. For front room/map lamp removal
and installation pro ...
Other materials:
Subwoofer
Description
The audio unit sends audio signals to the subwoofer amp. The subwoofer amp.
amplifies the audio signals before sending them to the subwoofers using the
audio signal circuits.
Diagnosis Procedure
1.CONNECTOR CHECK
Check the audio unit, subwoofer amp. and subwoofer connectors for t ...
Entry assist function
ENTRY ASSIST FUNCTION : System Diagram
ENTRY ASSIST FUNCTION : System Description
OUTLINE
The seat is in the exiting position when either following condition is
satisfied, the seat returns from exiting position to the previous driving
position.
NOTE:
This function is set to OFF befor ...
Harness connector
Description
HARNESS CONNECTOR (TAB-LOCKING TYPE)
The tab-locking type connectors help prevent accidental looseness
or disconnection.
The tab-locking type connectors are disconnected by pushing or
lifting the locking tab(s). Refer to the figure
below.
Refer to the next page for desc ...
Nissan Maxima Owners Manual
- Illustrated table of contents
- Safety-Seats, seat belts and supplemental restraint system
- Instruments and controls
- Pre-driving checks and adjustments
- Monitor, climate, audio, phone and voice recognition systems
- Starting and driving
- In case of emergency
- Appearance and care
- Do-it-yourself
- Maintenance and schedules
- Technical and consumer information
Nissan Maxima Service and Repair Manual

0.0056