Nissan Maxima Service and Repair Manual: Front wiper
Exploded View
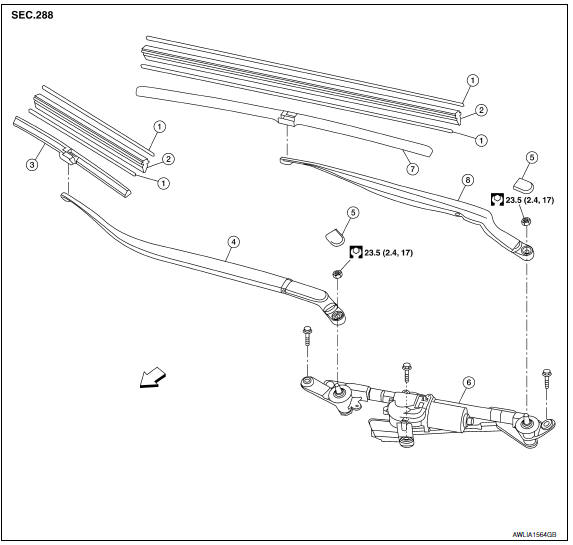
- Rib (part of wiper blade refill)
- Wiper blade refill
- Front RH wiper blade assembly (includes
wiper blade refill) - Front RH wiper arm
- Wiper arm cap
- Front wiper drive assembly
- Front LH wiper blade assembly (includes
wiper blade refill) - Front LH wiper arm <>
 Front
Front
FRONT WIPER BLADE REFILL
FRONT WIPER BLADE REFILL : Removal and Installation
REMOVAL
- Remove the front wiper blade.
- Hold the wiper blade refill lip at the end (A) of the front wiper
blade (1) with a suitable tool (B) as shown, and pull it firmly in
the direction (C).
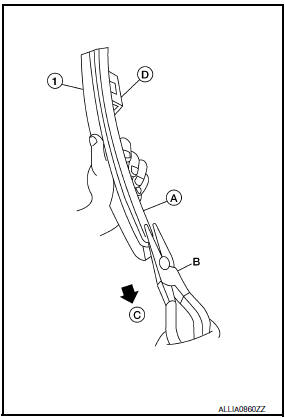
- U clip (part of the front wiper blade assembly) (D)
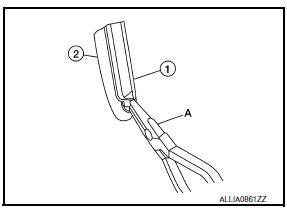
- If the wiper blade refill lip is torn due to wear, insert a suitable
tool (A) into the space between the end of the wiper blade refill
(1) and the front wiper blade (2) and pull the wiper blade refill
(1) out as shown.
INSTALLATION
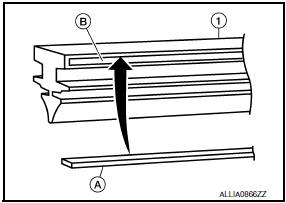
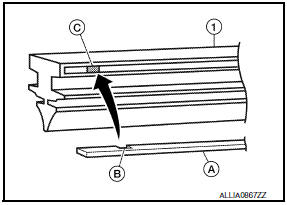
- If the rib (A) has become detached from the wiper blade refill (1),
check that the curve of the rib (A) is in the same direction as the
curve of the wiper blade refill (1) and insert the rib (A) into the slit
(B) in the wiper blade refill (1) as shown.
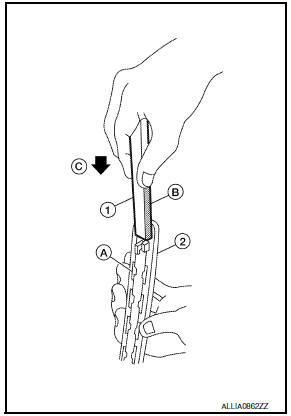
- If the rib (A) has a notch (B), insert the rib (A) into the wiper
blade refill (1) so the notch (B) fits over the protrusion (C) in
the wiper blade refill (1) as shown.
- Insert the wiper blade refill (1) tip into the end of the front wiper
blade (2) in the direction (C). Push the wiper blade refill (1) in
while pressing it into the end of the front wiper blade (2) as
shown. After the wiper blade refill is fully inserted, remove the
holder (B).
- Tab [part of front wiper blade (2)] (A)
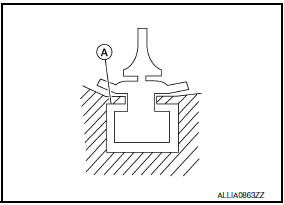
- Make sure to slide the refill into the front wiper blade so that
the wiper blade refill is held by the tabs (A) on the front wiper
blade as shown.
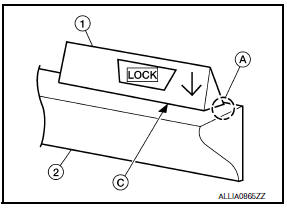
- Push the wiper blade refill (1) until the tabs on the front wiper
blade (2) fit into the stoppers (A) in the end of the wiper blade
refill (1). Make sure the LOCK mark (B) on the wiper blade refill
(1) is aligned with the lock point symbol (C) on the front wiper
blade (2) as shown.
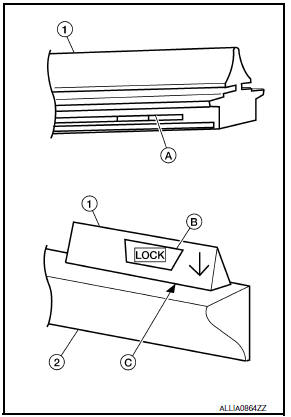
- Before installing the front wiper blade assembly, make sure that
the wiper blade refill (1) end is fully covered by the front wiper
blade (2) in area (A) as shown. - Install the front wiper blade
FRONT WIPER BLADE
FRONT WIPER BLADE : Removal and Installation
REMOVAL
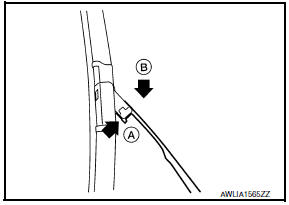
- Lift the front wiper arm and wiper blade assembly away from the windshield.
- Rotate the front wiper blade assembly and push the release tab
(A), then move the front wiper blade assembly down (B) the
front wiper arm. - Remove the front wiper blade assembly.
INSTALLATION
CAUTION:
- After the front wiper blade assembly installation, return the
front wiper arm to the original position
on the windshield to prevent damage when the hood is opened. - Check that the front wiper blade assembly contacts the windshield
properly; otherwise the front
wiper arm may be damaged from wind pressure while driving.
- Insert the front wiper blade assembly onto the front wiper arm and slide it up until it clicks into place.
- Rotate the front wiper blade assembly so the dimple is in the groove.
- Lay the front wiper arm and front wiper blade assembly back down on the windshield.
FRONT WIPER ARMS
FRONT WIPER ARMS : Removal and Installation
REMOVAL
- Turn wiper switch ON to operate wiper motor and then turn wiper switch OFF (auto stop).
- Open hood, remove arm caps, and remove wiper arm nuts.
- Raise wiper arm, and remove wiper arm from the vehicle.
INSTALLATION
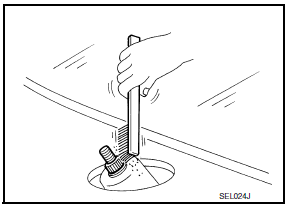
- Clean up the pivot area as shown. This will reduce the possibility
of wiper arm looseness. - Prior to wiper arm installation, turn wiper switch ON to operate wiper
motor and then turn wiper switch
OFF (auto stop). - Push wiper arm onto pivot shaft, paying attention to blind spline.
- Lift the blade up and then set it down onto glass surface to set
the blade center immediately before temporarily
tightening the wiper arm nuts. - Spray washer fluid. Turn wiper switch ON to operate wiper motor
and then turn wiper switch OFF (auto
stop). - Make sure that wiper blades stop within clearance (A), (B), (C)
and (D).
- Windshield glass (1)
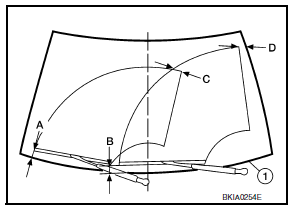
Clearance (A) : 62.5 +- 7.5 mm (2.461 +- 0.295 in)<>
Clearance (B) : 67.8 +-
7.5 mm (2.669 +- 0.295 in)<>
Clearance (C) : 29.2 mm (1.150 in)<>
Clearance
(D) : 57.7 mm (2.272 in)
- Tighten wiper arm nuts to specification. Refer to WW-74,
"Exploded View". - Attach wiper arm caps.
ADJUSTMENT
To adjust the wiper arm stop location, the wiper arm must be removed and
installed. Follow the FRONT
WIPER ARM removal and installation procedure.
FRONT WIPER DRIVE ASSEMBLY
FRONT WIPER DRIVE ASSEMBLY : Removal and Installation
REMOVAL
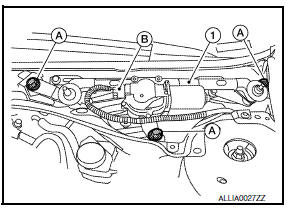
- Turn wiper switch ON to operate wiper motor and then turn wiper switch OFF (auto stop).
- Remove wiper arms. Refer to WW-78, "FRONT WIPER ARMS : Removal and Installation".
- Remove hood ledge covers.
- Remove the cowl top grille. Refer to EXT-20, "Exploded View".
- Disconnect washer hose from the lower cowl top extension brace.
- Remove the lower cowl top extension brace. Refer to EXT-21, "Removal and Installation".
- Detach the wiper drive harness clip from the wiper drive assembly frame.
- Remove the front wiper drive assembly bolts (A), disconnect the
wiper drive motor connector (B) and remove the front wiper drive
assembly (1).
INSTALLATION
Installation is in the reverse order of removal.
- Adjust wiper arm stop location as necessary.
 Front washer
WASHER TUBE
WASHER TUBE : Layout
Washer nozzle (LH)
Washer nozzle hose (LH)
Washer nozzle (RH)
Washer nozzle hose (RH)
Y-tube connector
Washer tank hose
Washer tank
Tube conne ...
Other materials:
Starting the engine
1. Apply the parking brake.
2. Move the shift lever to P (Park) or N (Neutral).
P (Park) is recommended.
The starter is designed not to operate if
the shift lever is in any of the driving
positions.
3. Push the ignition switch to the ON position.
Depress the brake pedal and push the ign ...
Power steering oil pump
Inspection
CAUTION: Make sure that belt tension is
normal before starting the following procedure.
Connect the Tool between oil pump discharge connector and
high-pressure hose. Bleed air from the hydraulic circuit while opening
the shut-off valve fully. Refer to ST-12, "Inspection".
...
Diagnosis and repair workflow
Work Flow
WORK FLOW
DETAILED FLOW
1. GET INFORMATION FOR SYMPTOM
Get the detailed information from the customer about the symptom (the
condition and the environment when the incident/malfunction occurred).
2. CHECK DTC
Check DTC.
Perform the following procedure if DTC is displayed.
...
Nissan Maxima Owners Manual
- Illustrated table of contents
- Safety-Seats, seat belts and supplemental restraint system
- Instruments and controls
- Pre-driving checks and adjustments
- Monitor, climate, audio, phone and voice recognition systems
- Starting and driving
- In case of emergency
- Appearance and care
- Do-it-yourself
- Maintenance and schedules
- Technical and consumer information
Nissan Maxima Service and Repair Manual
0.0106

