Nissan Maxima Service and Repair Manual: Front washer
WASHER TUBE
WASHER TUBE : Layout
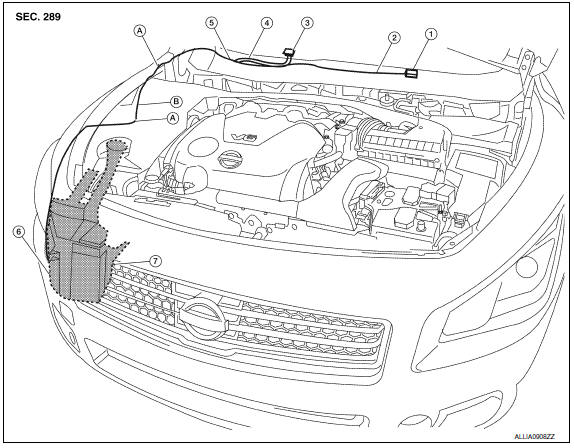
- Washer nozzle (LH)
- Washer nozzle hose (LH)
- Washer nozzle (RH)
- Washer nozzle hose (RH)
- Y-tube connector
- Washer tank hose
- Washer tank
- Tube connectors
- Clip
FRONT WASHER NOZZLE
FRONT WASHER NOZZLE : Removal and Installation
REMOVAL
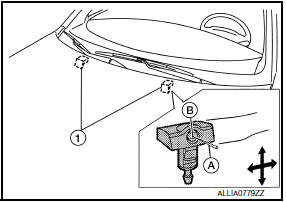
- Remove the cowl top grille. Refer to EXT-21, "Removal and Installation".
- Push washer nozzle tab (A) to release the washer nozzle (1)
from the cowl top grille, then disconnect the washer nozzle hose
(2).
INSTALLATION
Installation is in the reverse order of removal.
- Adjust nozzle spray location.
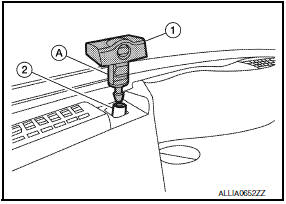
FRONT WASHER NOZZLE : Adjustment
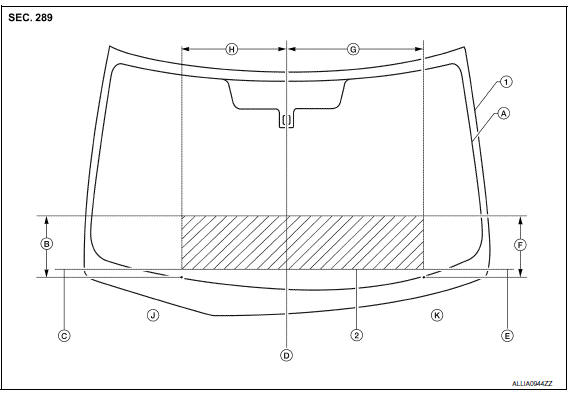
- Windshield
- Spray zone
- Black printed frame line
- 301.6 mm (11.87 in)
- 24.7 mm (0.97 in)
- Windshield vertical center line
- 24.4 mm (0.96 in)
- 301.3 mm (11.86 in)
- 502.3 mm (19.78 in)
- 501.4 mm (19.74 in)
- RH side of windshield
- LH side of windshield
- To adjust the front washer nozzles (1), insert a suitable tool (A) into
the nozzle hole (B) and move it up or down and left or right to
adjust the spray into the specified spray zone.
WASHER TANK
WASHER TANK : Removal and Installation
REMOVAL
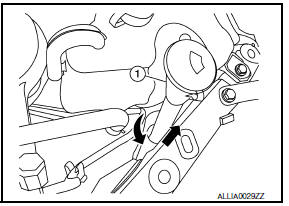
- Remove the washer tank filler tube (1).
- Remove RH front tire. Refer to WT-60, "Adjustment".
- Position the RH fender protector back. Refer to EXT-23, "Exploded View".
- Remove engine under cover.
- Remove side under cover.
- Disconnect the washer pump and washer fluid level sensor
connectors
(C), then detach the connector harness clip (B). - Remove the washer tank bolts (A), disconnect the washer pump
hose and remove the washer tank (1).
INSTALLATION
Installation is in the reverse order of removal.
- After installation, add NISSAN specified fluid up to the upper
level of washer tank inlet, and check for leaks.
Refer to MA-15, "FOR USA AND CANADA : Fluids and Lubricants" (for United States and Canada), MA-16,
"FOR MEXICO : Fluids and Lubricants" (for Mexico).
FRONT WASHER PUMP
FRONT WASHER PUMP : Removal and Installation
REMOVAL
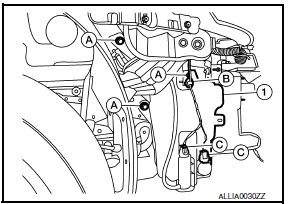
- Position the RH front fender protector back. Refer to EXT-24, "Removal and Installation".
- Remove the engine under cover.
- Remove the RH front fender protector side cover. Refer to EXT-24, "Removal and Installation".
- Disconnect the front washer pump connector (A), and washer
pump hose (B). - Remove the front washer pump (1).
- Remove the front washer pump grommet.
INSTALLATION
Installation is in the reverse order of removal.
- After installation, add NISSAN specified fluid up to the upper level of washer tank inlet, and check for leaks
 Front wiper
Exploded View
Rib (part of wiper blade refill)
Wiper blade refill
Front RH wiper blade assembly (includeswiper blade refill)
Front RH wiper arm
Wiper arm cap
Front wiper drive asse ...
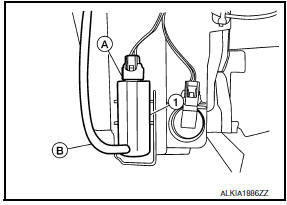
 Washer level switch
Removal and Installation
REMOVAL
Position the RH front fender protector back. Refer to EXT-24,
"Removal and Installation".
Remove the engine under cover.
Remove the RH front fender prote ...
Other materials:
P1705 TP sensor
Description
The electric throttle control actuator consists of
throttle control motor, accelerator pedal position sensor, throttle
position sensor, etc. The actuator sends a signal to the ECM, and ECM sends the
signal to TCM via CAN
communication.
DTC Logic
DTC DETECTION LOGIC
DTC CONF ...
Radius rod
Removal and Installation
Removal
Remove the rear wheel and tire using power tool. Refer to WT-60,
"Adjustment".
Remove the radius rod nut and bolt from the rear axle housing
using power tools.
Remove the radius rod bolt from the rear suspension member using power
tools.
Remove th ...
P0116 ECT sensor
Description
The engine coolant temperature sensor is used to detect the engine
coolant temperature. The sensor modifies a voltage signal from the
ECM. The modified signal returns to the ECM as the engine coolant
temperature input. The sensor uses a thermistor which is sensitive to
the c ...
Nissan Maxima Owners Manual
- Illustrated table of contents
- Safety-Seats, seat belts and supplemental restraint system
- Instruments and controls
- Pre-driving checks and adjustments
- Monitor, climate, audio, phone and voice recognition systems
- Starting and driving
- In case of emergency
- Appearance and care
- Do-it-yourself
- Maintenance and schedules
- Technical and consumer information
Nissan Maxima Service and Repair Manual

0.0053