Nissan Maxima Service and Repair Manual: Audio display unit
Removal and Installation
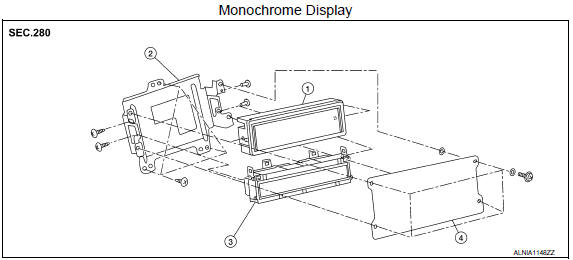
- Audio display unit
- Audio & A/C display unit bracket
- A/C display unit
- Front cover
REMOVAL
- Disconnect the battery negative terminal. Refer to PG-68, "Removal and Installation (Battery Tray)".
- Remove the cluster lid D. Refer to IP-11, "Removal and Installation".
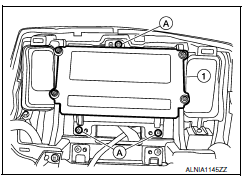
- Remove the audio & A/C display unit bracket screws (A).
- Pull out the audio & A/C display unit assembly (1), disconnect the harness connectors from the audio display unit and remove.
- Remove the front cover, then disconnect the audio display unit connectors and remove the audio display unit from the audio/A/C display unit brackets.
INSTALLATION
Installation is in the reverse order of removal.
 Audio unit
Removal and Installation
Audio unit brackets (LH/RH)
A/C auto amp.
Cluster lid C lower
Audio unit Clip
Pawl
REMOVAL
Disconnect the battery negative terminal. Refer to PG-67 ...
 Front tweeter
Removal and Installation
REMOVAL
Remove the front pillar finisher. Refer to INT-24, "Removal and
Installation".
Remove the front tweeter speaker grille. Refer to IP-10, "Exploded
View". ...
Other materials:
Normal operating condition
Description
The majority of the audio concerns are the result of outside causes (bad CD,
electromagnetic interference, etc.).
NOISE
The following noise results from variations in field strength, such as fading
noise and multi-path noise, or external noise from trains and other sources.
It i ...
Spark plugs
Replacing spark plugs
Iridium-tipped spark plugs
It is not necessary to replace iridium-tipped A
spark plugs as frequently as conventional type
spark plugs because they last much longer. Follow
the maintenance log shown in the "Maintenance
and schedules" section of this manual. Do
not ser ...
B2190 nats antenna AMP.
Description
Performs ID verification through BCM and Intelligent Key
when push-button ignition switch is pressed.
Prohibits the start of engine when an unregistered ID of Intelligent Key is
used.
DTC Logic
DTC DETECTION LOGIC
DTC CONFIRMATION PROCEDURE
1.PERFORM DTC CONFIRMATION PROCED ...
Nissan Maxima Owners Manual
- Illustrated table of contents
- Safety-Seats, seat belts and supplemental restraint system
- Instruments and controls
- Pre-driving checks and adjustments
- Monitor, climate, audio, phone and voice recognition systems
- Starting and driving
- In case of emergency
- Appearance and care
- Do-it-yourself
- Maintenance and schedules
- Technical and consumer information
Nissan Maxima Service and Repair Manual

0.0065