Nissan Maxima Owners Manual: Forward-facing child restraint installation using the seat belts
WARNING
The three-point seat belt with Automatic Locking Retractor (ALR) must be used when installing a child restraint. Failure to use the ALR mode will result in the child restraint not being properly secured. The restraint could tip over or be loose and cause injury to a child in a sudden stop or collision. Also, it can change the operation of the front passenger air bag. For additional information, refer to "Front passenger air bag and status light" in this section.
Forward-facing (front passenger seat) - step 1
For additional information, refer to all Warnings and Cautions in the "Child safety" and "Child restraints" sections of this manual before installing a child restraint.
Do not use the lower anchors if the combined weight of the child and the child restraint exceeds 65 lbs. (29.5 kg). If the combined weight of the child and the child restraint is greater than 65 lbs, (29.5 kg) use the vehicle's seat belt (not the lower anchors) to install the child restraint. Be sure to follow the child restraint manufacturer's instructions for installation.
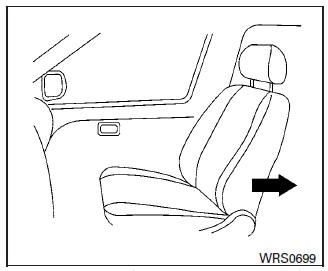
Follow these steps to install a forward-facing child restraint using the vehicle seat belt in the rear seats or in the front passenger seat: 1. If you must install a child restraint in the front seat, it should be placed in a forward-facing direction only. Move the seat to the rearmost position. Child restraints for infants must be used in the rear-facing direction and therefore must not be used in the front seat.
2. Position the child restraint on the seat. Always follow the child restraint manufacturer's instructions.
The back of the child restraint should be secured against the vehicle seatback.
If necessary, adjust or remove the head restraint/headrest to obtain the correct child restraint fit. If the head restraint/headrest is removed, store it in a secure place. Be sure to reinstall the head restraint/headrest when the child restraint is removed. For additional information about head restraint/headrest adjustment, removal and installation, refer to "Head restraints/headrests" in this section.
If the seating position does not have an adjustable head restraint/headrest and it is interfering with the proper child restraint fit, try another seating position or a different child restraint.
Forward-facing - step 3
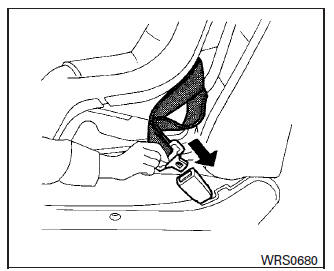
3. Route the seat belt tongue through the child restraint and insert it into the buckle until you hear and feel the latch engage. Be sure to follow the child restraint manufacturer's instructions for belt routing.
If the child restraint is equipped with a top tether strap, route the top tether strap and secure the tether strap to the tether anchor point (rear seat installation only). For additional information, refer to "Installing top tether strap" in this section.
Do not install child restraints that require the use of a top tether strap in seating positions that do not have a top tether anchor.
Forward-facing - step 4
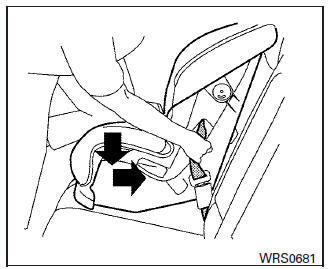
4. Pull the shoulder belt until the belt is fully extended. At this time, the seat belt retractor is in the ALR mode (child restraint mode). It reverts to ELR mode when the seat belt is fully retracted.
Forward-facing - step 5
5. Allow the seat belt to retract. Pull up on the shoulder belt to remove any slack in the belt.
Forward-facing - step 6
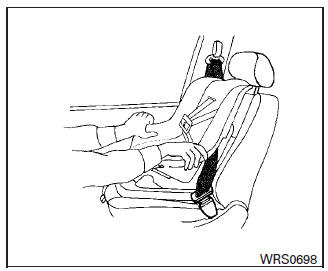
6. Remove any additional slack from the seat belt; press downward and rearward firmly in the center of the child restraint with your knee to compress the vehicle seat cushion and seatback while pulling up on the seat belt.
7. Tighten the tether strap according to the manufacturer's instructions to remove any slack.
Forward-facing - step 8
8. After attaching the child restraint, test it before you place the child in it. Push it from side to side while holding the child restraint near the seat belt path. The child restraint should not move more than 1 inch (25 mm), from side to side. Try to tug it forward and check to see if the belt holds the restraint in place.
If the restraint is not secure, tighten the seat belt as necessary, or put the restraint in another seat and test it again. You may need to try a different child restraint. Not all child restraints fit in all types of vehicles.
9. Check to make sure the child restraint is properly secured prior to each use. If the seat belt is not locked, repeat steps 2 through 8.
Forward-facing - step 10
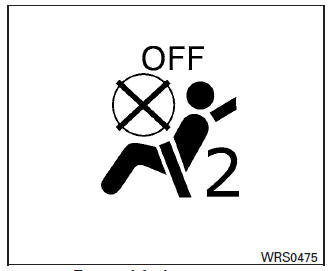
10. If the child restraint is installed in the front
passenger seat, place the ignition switch in
the ON position. The front passenger air bag
status light  should illuminate. If
this
light is not illuminated, refer to Front passenger
air bag and status light in this section.
should illuminate. If
this
light is not illuminated, refer to Front passenger
air bag and status light in this section.
Move the child restraint to another seating position. Have the system checked. It is recommended that you visit a NISSAN dealer for this service.
After the child restraint is removed and the seat belt is fully retracted, the ALR mode (child restraint mode) is canceled.
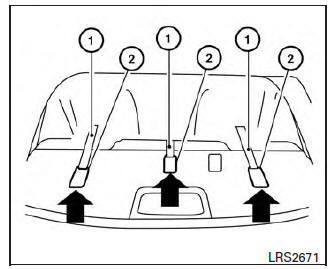
Rear seats
- Top tether strap
- Anchor point
Installing top tether strap
The child restraint top tether strap must be used when installing the child restraint with seat belts.
First, secure the child restraint with the seat belt.
Rear bench seat
1. Remove the head restraint/headrest and store it in a secure place. Be sure to reinstall the head restraint/headrest when the child restraint is removed. For additional information about head restraint/headrest adjustment, removal and installation, refer to "Head restraints/headrests" in this section.
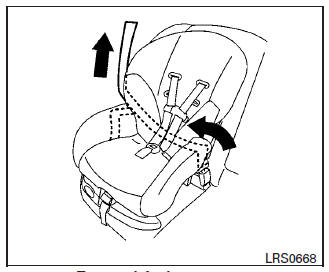
2. Position the top tether strap 1 over the seatback.
3. Secure the tether strap to the tether anchor point 2 on the rear-parcel shelf behind the child restraint.
4. Tighten the tether strap according to the manufacturer's instructions to remove any slack.
If you have any questions when installing a top tether strap, it is recommended that you visit a NISSAN dealer for details.
WARNING
Child restraint anchorages are designed to withstand only those loads imposed by correctly fitted child restraints. Under no circumstances are they to be used to attach adult seat belts, or other items or equipment to the vehicle. Doing so could damage the child restraint anchorages.
The child restraint will not be properly installed using the damaged anchorage, and a child could be seriously injured or killed in a collision.
 Forward-facing child restraint installation using LATCH
For additional information, refer to all Warnings
and Cautions in the "Child safety" and "Child
restraints" sections of this manual before installing
a child restraint.
Do not use the lower anch ...
 Booster seats
For additional information on installing a booster
seat in your vehicle, follow the instructions outlined
in this section. ...
Other materials:
Rear door speaker
Removal and Installation
REMOVAL
Remove the rear door finisher. Refer to INT-21, "Removal and
Installation".
Remove the rear door speaker screws (A).
Disconnect the harness connector (B) from the rear door speaker
(1) and remove.
INSTALLATION
Installation is in the reverse order ...
Heated steering wheel switch (if so equipped)
The heated steering wheel system is designed to
operate only when the surface temperature of the
steering wheel is below 68F (20C).
Push the heated steering wheel switch to warm
the steering wheel after the engine starts. The
indicator light will come on.
If the surface temperature of ...
P0461 fuel level sensor
Description
The fuel level sensor is mounted in the fuel level sensor unit.
The sensor detects a fuel level in the fuel tank and transmits a signal to the
combination meter. The combination
meter sends the fuel level sensor signal to the ECM via the CAN communication
line.
It consists o ...
Nissan Maxima Owners Manual
- Illustrated table of contents
- Safety-Seats, seat belts and supplemental restraint system
- Instruments and controls
- Pre-driving checks and adjustments
- Monitor, climate, audio, phone and voice recognition systems
- Starting and driving
- In case of emergency
- Appearance and care
- Do-it-yourself
- Maintenance and schedules
- Technical and consumer information
Nissan Maxima Service and Repair Manual

0.0076