Nissan Maxima Owners Manual: Forward-facing child restraint installation using LATCH
For additional information, refer to all Warnings and Cautions in the "Child safety" and "Child restraints" sections of this manual before installing a child restraint.
Do not use the lower anchors if the combined weight of the child and the child restraint exceeds 65 lbs (29.5 kg). If the combined weight of the child and the child restraint is greater than 65 lbs (29.5 kg), use the vehicle's seat belt (not the lower anchors) to install the child restraint. Be sure to follow the child restraint manufacturer's instructions for installation.
Follow these steps to install a forward-facing child restraint using the LATCH system: 1. Position the child restraint on the seat. Always follow the child restraint manufacturer's instructions.
Forward-facing webbing-mounted - step 2
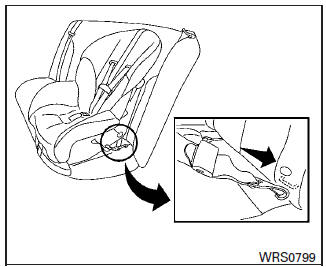
2. Secure the child restraint anchor attachments to the LATCH lower anchors. Check to make sure the LATCH attachment is properly attached to the lower anchors.
If the child restraint is equipped with a top tether strap, route the top tether strap and secure the tether strap to the tether anchor point. For additional information, refer to "Installing top tether strap" in this section.
Do not install child restraints that require the use of a top tether strap in seating positions that do not have a top tether anchor.
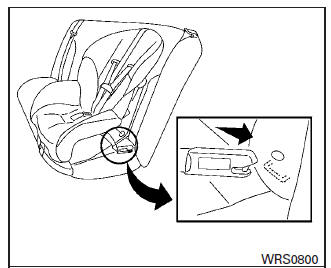
Forward-facing rigid-mounted - step 2
3. The back of the child restraint should be secured against the vehicle seatback.
If necessary, adjust or remove the head restraint/headrest to obtain the correct child restraint fit. If the head restraint/headrest is removed, store it in a secure place. Be sure to reinstall the head restraint/headrest when the child restraint is removed. For additional information about head restraint/headrest adjustment, refer to "Head restraints/headrests" in this section.
If the seating position does not have an adjustable head restraint/headrest and it is interfering with the proper child restraint fit, try another seating position or a different child restraint.

Forward-facing - step 4
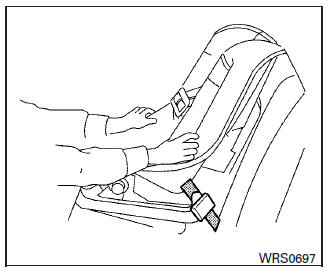
4. For child restraints that are equipped with webbing-mounted attachments, remove any additional slack from the anchor attachments.
Press downward and rearward firmly in the center of the child restraint with your knee to compress the vehicle seat cushion and seatback while tightening the webbing of the anchor attachments.
5. Tighten the tether strap according to the manufacturer's instructions to remove any slack.
Forward-facing - step 6
6. After attaching the child restraint, test it before you place the child in it. Push it from side to side while holding the child restraint near the LATCH attachment path. The child restraint should not move more than 1 inch (25 mm), from side to side. Try to tug it forward and check to see if the LATCH attachment holds the restraint in place. If the restraint is not secure, tighten the LATCH attachment as necessary, or put the restraint in another seat and test it again. You may need to try a different child restraint. Not all child restraints fit in all types of vehicles.
7. Check to make sure the child restraint is properly secured prior to each use. If the child restraint is loose, repeat steps 1 through 6.
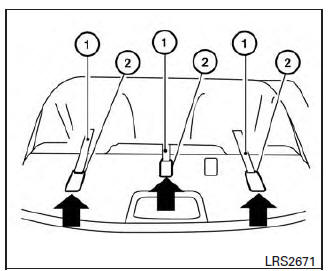
Rear seats
- Top tether strap
- Anchor point
Installing top tether strap
The child restraint top tether strap must be used when installing the child restraint with the LATCH lower anchor attachments.
First, secure the child restraint with the LATCH lower anchors (rear outboard positions only).
Rear bench seat
1. Remove the head restraint/headrest and store it in a secure place. Be sure to reinstall the head restraint/headrest when the child restraint is removed. For additional information about head restraint/headrest adjustment, removal and installation, refer to "Head restraints/headrests" in this section.
2. Position the top tether strap 1 over the seatback.
3. Secure the tether strap to the tether anchor point 2 on the rear-parcel shelf behind the child restraint.
4. Tighten the tether strap according to the manufacturer's instructions to remove any slack.
If you have any questions when installing a top tether strap, it is recommended that you visit a NISSAN dealer for details.
WARNING
Child restraint anchorages are designed to withstand only those loads imposed by correctly fitted child restraints. Under no circumstances are they to be used to attach adult seat belts, or other items or equipment to the vehicle. Doing so could damage the child restraint anchorages.
The child restraint will not be properly installed using the damaged anchorage, and a child could be seriously injured or killed in a collision.
 Rear-facing child restraint installation using the seat belts
WARNING
The three-point seat belt with Automatic
Locking Retractor (ALR) must be used when
installing a child restraint. Failure to use the
ALR mode will result in the child restraint
not being p ...
 Forward-facing child restraint installation using the seat belts
WARNING
The three-point seat belt with Automatic
Locking Retractor (ALR) must be used
when installing a child restraint. Failure to
use the ALR mode will result in the child
restraint not being p ...
Other materials:
Basic inspection
DIAGNOSIS AND REPAIR WORKFLOW
Work Flow
OVERALL SEQUENCE
DETAILED FLOW
1.INTERVIEW FOR MALFUNCTION
Find out what the customer's concerns are.
2.SYMPTOM CHECK
Verify the symptom from the customer's information.
3.BASIC INSPECTION
Check the operation of each part. Check if any concerns occu ...
The fuel gauge pointer does not move to "F" when refueling
Description
The fuel gauge needle will not move to "F" position when
refueling.
Diagnosis Procedure
1.OBSERVE FUEL GAUGE
Does it take a long time for the pointer to move to FULL
position?
2.IDENTIFY FUELING CONDITION
Was the vehicle fueled with the ignition switch ON?
3.OBSERVE VEHICLE PO ...
Rear combination lamp
Exploded View
Slide clip
Grommets
Rear combination lamp
Removal and Installation
REAR COMBINATION LAMP
Removal
Remove the trunk side finisher. Refer to INT-36, "Exploded View".
Remove the rear combination lamp nuts.
Pull the rear combination lamp toward the rear of the vehic ...
Nissan Maxima Owners Manual
- Illustrated table of contents
- Safety-Seats, seat belts and supplemental restraint system
- Instruments and controls
- Pre-driving checks and adjustments
- Monitor, climate, audio, phone and voice recognition systems
- Starting and driving
- In case of emergency
- Appearance and care
- Do-it-yourself
- Maintenance and schedules
- Technical and consumer information
Nissan Maxima Service and Repair Manual

0.0067