Nissan Maxima Service and Repair Manual: Thermostat and thermostat housing
Removal and Installation
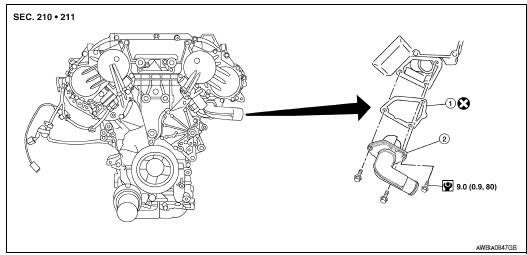
- Gasket
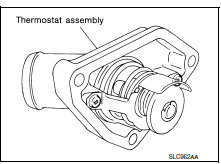
- Thermostat assembly (water inlet)
WARNING: Do not remove the radiator cap when the engine is hot. Serious burns could occur from high pressure engine coolant escaping from the radiator. Wrap a thick cloth around the radiator cap. Slowly turn it a quarter of a turn to release built-up pressure. Carefully remove radiator cap by turning it all the way.
CAUTION: Perform when engine is cool.
NOTE: When removing components such as hoses, tubes/lines, etc., cap or plug openings to prevent fluid from spilling.
REMOVAL
- Drain coolant from radiator. Refer to CO-11, "Changing Engine Coolant".
- Disconnect reservoir hose and remove reservoir tank.
- Disconnect the harness connector from the VTC solenoid (LH).
- Disconnect lower radiator hose from thermostat assembly.
- Remove thermostat assembly (water inlet).
CAUTION: Do not disassemble thermostat assembly (water inlet).
Replace them as a unit, if necessary.
INSPECTION AFTER REMOVAL
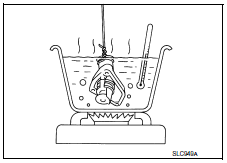
- Place a thread so that it is caught in the valves of the thermostat.
Immerse fully in a container filled with water. Heat while stirring.
- The valve opening temperature is the temperature at which the valve opens and the thermostat falls from the thread.
- Continue heating. Check the full-open lift amount. NOTE: The full-open lift amount standard temperature for the thermostat is the reference value.
- After checking the full-open lift amount, lower the water temperature and check the valve closing temperature.

- If valve seating at measured values are out of standard range, replace water inlet and thermostat assembly.
INSTALLATION
Installation is in the reverse order of removal.
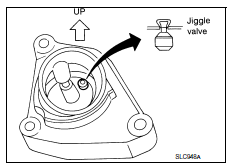
- Install thermostat with jiggle valve facing upward.
- After installation refill engine coolant and check for leaks. Refer to CO-11, "Changing Engine Coolant" and CO-10, "System Inspection".
CAUTION: Do not spill coolant in engine compartment. Use a shop cloth to absorb coolant.
 Water pump
Exploded View
Water pump
O-rings
Timing chain tensioner
Intake valve timing control solenoid
valve cover (RH) (bank 1)
Water pump cover
Removal and Installation
WARNING:
Do no ...
 Water outlet and water piping
Removal and Installation
Heater hose
Clamp
Water hose
Clamp
Water outlet
Gasket
Gasket
Water connector
O-ring
Water bypass pipe
Clamp
Water hose
Heater pipe
...
Other materials:
Manual operation (if so equipped)
Tilt and telescopic operation
Pull the lock lever 1 down:
Adjust the steering wheel up or down in
direction 2 to the desired position.
Adjust the steering wheel forward or backward
in direction 3 to the desired position.
Push the lock lever 1 up firmly to lock the
steering wheel i ...
Auto light system
System Diagram
System Description
BCM (Body Control Module) controls auto light operation according to
signals from optical sensor, lighting switch and ignition switch.
IPDM E/R (Intelligent Power Distribution Module Engine Room)
operates parking, license plate, tail, front fog lamps ...
Front stabilizer
Removal and Installation
REMOVAL
Remove the steering gear and linkage. Refer to ST-26, "Removal and
Installation".
Remove the nuts on the upper portion of stabilizer connecting
rod
Remove the stabilizer clamp bolts.
Remove the front stabilizer from the vehicle
INSPECTION AFTER ...
Nissan Maxima Owners Manual
- Illustrated table of contents
- Safety-Seats, seat belts and supplemental restraint system
- Instruments and controls
- Pre-driving checks and adjustments
- Monitor, climate, audio, phone and voice recognition systems
- Starting and driving
- In case of emergency
- Appearance and care
- Do-it-yourself
- Maintenance and schedules
- Technical and consumer information
Nissan Maxima Service and Repair Manual

0.0058