Nissan Maxima Service and Repair Manual: Control cable
Exploded View

-
CVT shift selector assembly
-
Control cable
-
Retainer grommet
-
Lock plate
-
Bracket
-
Transaxle assembly
Removal and Installation
REMOVAL
CAUTION: Make sure that parking brake is applied before removal/installation.
-
Remove front air duct. Refer to EM-24, "Removal and Installation".
-
Remove air cleaner case assembly. Refer to EM-24, "Removal and Installation".
-
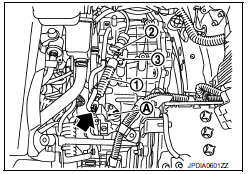
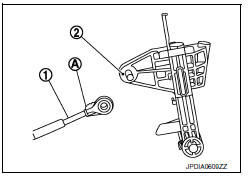
Remove control cable nut (
 ).
). -
Remove control cable (1) from manual lever (A).
-
Remove lock plate (2) from control cable.
-
Remove control cable from bracket (3).
-
Remove center console. Refer to IP-14, "Removal and Installation".
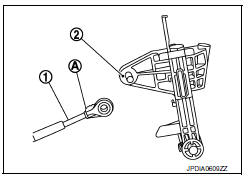
8. Remove control cable (1) from CVT shift selector assembly (2).
- (A): Ribbed surface
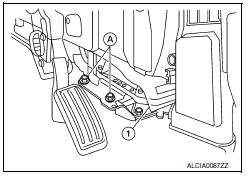
9. Remove the bolts (A) from the support bracket (1) (if equipped).
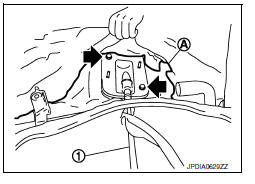
10. Remove bracket covering the retainer grommet.
11. Remove the retainer grommet bolts ( )
and the retainer grommet.
)
and the retainer grommet.
12. Remove the control cable (1) from the vehicle.
(A) : Dash trim
INSTALLATION
Installation is in the reverse order of removal.
-
When installing control cable (1) to CVT shift selector assembly (2), make sure that control cable is fully pressed in with the ribbed surface (A) facing upward.
Inspection and Adjustment
ADJUSTMENT AFTER INSTALLATION
Adjust the CVT positions after installing control cable. Refer to TM-171, "Inspection and Adjustment".
INSPECTION AFTER INSTALLATION
Check the CVT positions after adjusting the CVT positions. Refer to TM-171, "Inspection and Adjustment".
 CVT shift selector
Exploded View
CVT shift selector handle
Shift selector handle clip
Shift selector handle cover
CVT shift selector assembly
Shi ...
 Paddle shifter
Exploded View
Steering column assembly
Paddle shifter (shift-down)
Paddle shifter (shift-up)
Removal and Installation
REMOVAL
Park the ...
Other materials:
B2578, B2579 in-vehicle sensor
Description
In-vehicle Sensor
The in-vehicle sensor (1) is located on instrument lower cover
(LH).
It converts variations in compartment air temperature drawn from
the aspirator into a resistance value. It is then input into the A/C
auto amp.
In-vehicle Sensor Circuit
Aspira ...
U122A AV control unit
DTC Logic
Diagnosis Procedure
1.PERFORM THE SELF-DIAGNOSIS
When U122A is detected, write configuration data with "MULTI AV" of CONSULT.
U122E AV CONTROL UNIT
DTC Logic
DTC DETECTION LOGIC
...
B2098 ignition relay on stuck
DTC Logic
DTC DETECTION LOGIC
1.PERFORM DTC CONFIRMATION PROCEDURE
Turn the power supply position to start under the following
conditions and wait for at least 1 second.
CVT selector lever is in the P (Park) or N (Neutral) position.
Depress the brake pedal
Check "Self-diag ...
Nissan Maxima Owners Manual
- Illustrated table of contents
- Safety-Seats, seat belts and supplemental restraint system
- Instruments and controls
- Pre-driving checks and adjustments
- Monitor, climate, audio, phone and voice recognition systems
- Starting and driving
- In case of emergency
- Appearance and care
- Do-it-yourself
- Maintenance and schedules
- Technical and consumer information
Nissan Maxima Service and Repair Manual

0.0055