Nissan Maxima Service and Repair Manual: Brake pedal
Inspection and Adjustment
INSPECTION
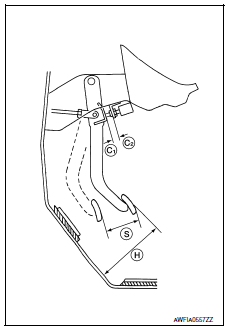
- Inspect the brake pedal free height (H) from the floor using Tool at a 90 angle to the floor as shown.
- Adjust the brake pedal free height (H) to specifications.
- Brake pedal free height (H)
- Brake pedal full stroke (S)
- Clearance between brake pedal bracket (C1) and threaded end of stop lamp switch and ASCD cancel switch (C2)
ADJUSTMENT
- Loosen the stop lamp switch and ASCD cancel switch by turning 45 counterclockwise.
- Loosen lock nut (A) on the input rod, then turn input rod to adjust the brake pedal to specified height. When finished adjusting, tighten lock nut (A) to specification.
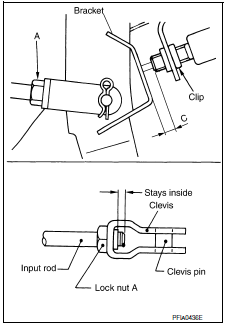
Lock nut (A) : 18.7 N*m (1.9 kg-m, 14 ft-lb)
CAUTION: Make sure that the screw portion of the end of input rod is located inside the clevis.
- With the brake pedal pulled up and held by hand, press the stop lamp switch and the ASCD cancel switch in until threaded ends contact the brake pedal bracket.
- With the threaded ends of the stop lamp switch and ASCD cancel
switch contacting the pedal bracket, turn the switches 45
clockwise to lock in place. Check that the stop lamp switch and
ASCD cancel switch threaded end to brake pedal bracket gap
(C) is within specifications.
CAUTION: Make sure that the gap (C) between the brake pedal bracket and stop lamp switch and ASCD cancel switch threaded ends are within specification. - Check the brake pedal for smooth operation.
CAUTION: Make sure that the stop lamp goes off when the brake pedal is released.

 Brake fluid
Inspection
LEVEL CHECK
Make sure that a brake fluid level in reservoir tank is between
MAX
and MIN lines as shown.
Visually check around reservoir tank for fluid leakage.
If the lev ...
Other materials:
Diagnosis system (BCM)
COMMON ITEM
COMMON ITEM : CONSULT Function (BCM - COMMON ITEM)
APPLICATION ITEM
CONSULT performs the following functions via CAN communication with BCM.
SYSTEM APPLICATION
BCM can perform the following functions.
WIPER
WIPER : CONSULT Function (BCM - WIPER)
DATA MONITOR
ACTIVE TEST
...
Microphone
Removal and Installation
REMOVAL
Remove the front room/map lamp assembly. Refer to INL-84, "Removal and
Installation".
Detach the microphone connector (A).
Remove the front room/map lamp covers (1), then remove the
map lamp assembly cover (2).
Release t ...
B1118 - B1120 satellite sensor LH
Description
DTC B1118 - B1120 SATELLITE SENSOR LH
The satellite sensor LH is wired to the air bag diagnosis sensor unit. The
air bag diagnosis sensor unit willmonitor the satellite sensor LH for
internal failures and its circuits for communication errors.
PART LOCATION
DTC Logic
DTC DETECTI ...
Nissan Maxima Owners Manual
- Illustrated table of contents
- Safety-Seats, seat belts and supplemental restraint system
- Instruments and controls
- Pre-driving checks and adjustments
- Monitor, climate, audio, phone and voice recognition systems
- Starting and driving
- In case of emergency
- Appearance and care
- Do-it-yourself
- Maintenance and schedules
- Technical and consumer information
Nissan Maxima Service and Repair Manual

0.0078