Nissan Maxima Service and Repair Manual: Parking brake system
On-Vehicle Service
PEDAL STROKE
- When parking brake pedal is operated with the specified force, make sure the stroke is within the specified number of notches. Check by listening and counting the ratchet clicks.
Pedal stroke : Refer to PB-11, "Parking Brake Control".
INSPECTION
- Make sure the components are attached properly, checking for looseness or backlash.
- Check parking brake pedal assembly for bends, damage and cracks, and replace if necessary.
- Check cable for wear and damage, and replace if necessary.
- Check parking brake warning lamp switch for malfunction, and replace if necessary. Refer to BRC-68, "Diagnosis Procedure".
ADJUSTMENT
- Remove the instrument lower panel LH. Refer to IP-19, "Removal and Installation".
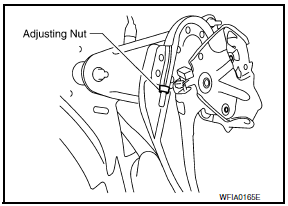
- Partially engage parking brake pedal to access adjusting nut.
- Insert a deep socket wrench to rotate adjusting nut and loosen cable sufficiently. Then, disengage the parking brake pedal.
- Remove the wheel and tire using power tool. Using at least two wheel nuts, secure the disc rotor to the hub to prevent it from tilting.
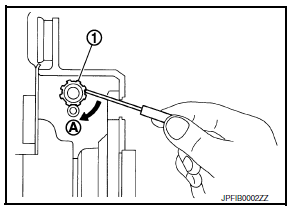
- Remove the adjusting hole plug from the disc rotor. Turn the adjuster (1) in the direction (A) as shown using a suitable tool until the disc rotor is locked.
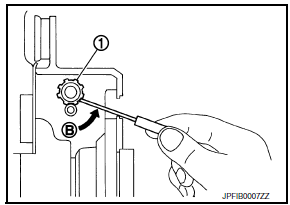
- Turn the adjuster (1) back 5 or 6 notches from the locked position in the direction (B) as shown using a suitable tool.
- Rotate the disc rotor to make sure there is no drag.
- Adjust cable as follows:
- Operate pedal 10 or more times with a force of 490 N (50 kg, 110 lb).
- Rotate adjusting nut with deep socket to adjust pedal
stroke to specification.
CAUTION: Do not reuse the adjusting nut if it is removed.
- With parking brake pedal completely disengaged, make sure there is no drag on the parking brake.
- Install the wheel and tire using power tool. Refer to WT-60, "Adjustment".
- Install the instrument lower panel LH. Refer to IP-19, "Removal and Installation".


Other materials:
P0603 ECM power supply
Description
Battery voltage is supplied to the ECM even when the ignition switch
is turned OFF for the ECM memory function of the DTC memory, the
air-fuel ratio feedback compensation value memory, the idle air volume
learning value memory, etc.
DTC Logic
DTC DETECTION LOGIC
DTC CON ...
Fuel pump
Description
*: ECM determines the start signal status by the signals of engine speed and
battery voltage.
The ECM activates the fuel pump for several seconds after the ignition switch is
turned ON to improve engine
start ability. If the ECM receives a engine speed signal from the camsh ...
Both side front fog lamps are not turned on
Description
The front fog lamps do not turn ON in any setting.
Diagnosis Procedure
1.COMBINATION SWITCH (LIGHTING AND TURN SIGNAL SWITCH) INSPECTION
Check the combination switch (lighting and turn signal switch).
2.CHECK FRONT FOG LAMP REQUEST SIGNAL INPUT
CONSULT DATA MONITOR
Select "FR F ...
Nissan Maxima Owners Manual
- Illustrated table of contents
- Safety-Seats, seat belts and supplemental restraint system
- Instruments and controls
- Pre-driving checks and adjustments
- Monitor, climate, audio, phone and voice recognition systems
- Starting and driving
- In case of emergency
- Appearance and care
- Do-it-yourself
- Maintenance and schedules
- Technical and consumer information
Nissan Maxima Service and Repair Manual

0.0048