Nissan Maxima Service and Repair Manual: B1086 - B1089 seat belt pre-tensioner LH
Description
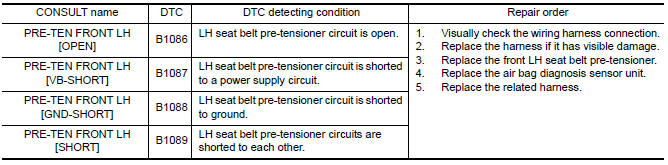
DTC B1086 - B1089 SEAT BELT PRE-TENSIONER LH
The seat belt pre-tensioner LH is wired to the air bag diagnosis sensor unit.
The air bag diagnosis sensor unit
will monitor for opens and shorts in
detected lines to the seat belt pre-tensioner LH.
PART LOCATION
DTC Logic
DTC DETECTION LOGIC
With CONSULT
DTC CONFIRMATION PROCEDURE (With CONSULT)
1.CHECK SELF-DIAG RESULT
- Turn ignition switch ON.
- Check for DTC using CONSULT.
2.ERASE SELF-DIAG RESULT
Erase the DTC using CONSULT.
DTC CONFIRMATION PROCEDURE (Without CONSULT)
1.CHECK SELF-DIAG RESULT
- Turn ignition switch ON.
- Check the air bag warning lamp status. Refer to SRC-14, "Trouble Diagnosis without CONSULT".
NOTE:
SRS will not enter diagnosis mode if
no malfunction is detected in user mode.
Diagnosis Procedure
1.HARNESS CONNECTOR
Visually inspect all applicable harness connectors for the following:
- Visible damage to connector or terminal
- Loose terminal
- Poor connection
NOTE:
All harness connectors should be
inspected from the air bag diagnosis sensor unit to the end component
(including any in-line connectors).
2.CONFIRM DTC
- Reconnect all harness connectors.
- Turn ignition switch ON.
- Check for DTC using CONSULT.
3.WIRING HARNESS
Check the wiring harness for visible damage.
NOTE:
The entire wiring harness should be
inspected from the air bag diagnosis sensor unit to the end component
(including any in-line connectors).
4.CONFIRM DTC
- Reconnect all harness connectors.
- Turn ignition switch ON.
- Check for DTC using CONSULT.
5.AIR BAG DIAGNOSIS SENSOR UNIT
- Replace the air bag diagnosis sensor unit. Refer to SR-31, "Removal and Installation".
- Turn ignition switch ON.
- Check for DTC using CONSULT.
6.SEAT BELT PRE-TENSIONER LH
- Replace the seat belt pre-tensioner LH. Refer to SB-6, "Removal and Installation".
- Turn ignition switch ON.
- Check for DTC using CONSULT.
7.RELATED HARNESS
Replace the related harness.
 B1145 - B1148 side curtain air bag module RH
Description
DTC B1145 - B1148 RH SIDE CURTAIN AIR BAG MODULE
The RH side curtain air bag module is wired to the air bag diagnosis sensor
unit. The air bag diagnosis sensorunit will monitor for ope ...
 B1081 - B1084 seat belt pre-tensioner RH
Description
DTC B1081 - B1084 SEAT BELT PRE-TENSIONER RH
The seat belt pre-tensioner RH is wired to the air bag diagnosis sensor unit.
The air bag diagnosis sensor unitwill monitor for opens and s ...
Other materials:
Service data and specifications (SDS)
Idle Speed
Ignition Timing
Calculated Load Value
Mass Air Flow Sensor
*: Engine is warmed up to normal operating temperature and running under no
load. ...
Vehicle Dynamic Control (VDC) off switch
The vehicle should be driven with the VDC system
on for most driving conditions.
If the vehicle is stuck in mud or snow, the VDC
system reduces the engine output to reduce
wheel spin. The engine speed will be reduced
even if the accelerator is depressed to the floor. If
maximum engine po ...
Head restraints/headrests
WARNING
Head restraints/headrests supplement
the other vehicle safety systems. They may
provide additional protection against injury
in certain rear end collisions. Adjustable
head restraints/headrests must be
adjusted properly, as specified in this section.
Check the adjustment after someo ...
Nissan Maxima Owners Manual
- Illustrated table of contents
- Safety-Seats, seat belts and supplemental restraint system
- Instruments and controls
- Pre-driving checks and adjustments
- Monitor, climate, audio, phone and voice recognition systems
- Starting and driving
- In case of emergency
- Appearance and care
- Do-it-yourself
- Maintenance and schedules
- Technical and consumer information
Nissan Maxima Service and Repair Manual

0.0056