
Nissan Maxima Service and Repair Manual: Diagnosis system (driver seat C/U)
Diagnosis Description
The auto drive positioner system can be checked and diagnosed for component operation with CONSULT.
DIAGNOSTIC MODE
| Diagnostic mode [AUTO DRIVE POS.] | Description |
| WORK SUPPORT | Changes the setting of each function |
| SELF DIAGNOSTIC RESULT | Performs self-diagnosis for the auto drive positioner system and displays the re |
| DATA MONITOR | Displays input signals transmitted from various switches and sensors to driver seat control unit in real time |
| CAN DIAG SUPPORT MNTR | The result of transmit/receive diagnosis of CAN communication can be read. |
| ACTIVE TEST | Drive each output device |
| ECU IDENTIFICATI | Displays part numbers of driver seat control unit parts |
CONSULT Function (AUTO DRIVE POS.)
SELF-DIAGNOSIS RESULTS
Refer to ADP-119, "DTC Index".
DATA MONITOR
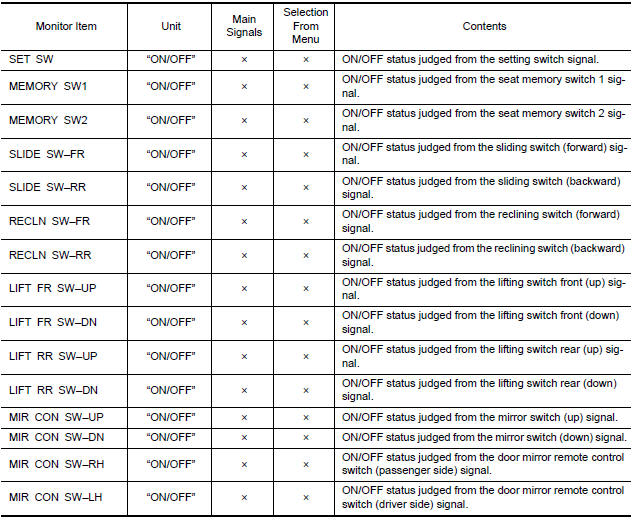
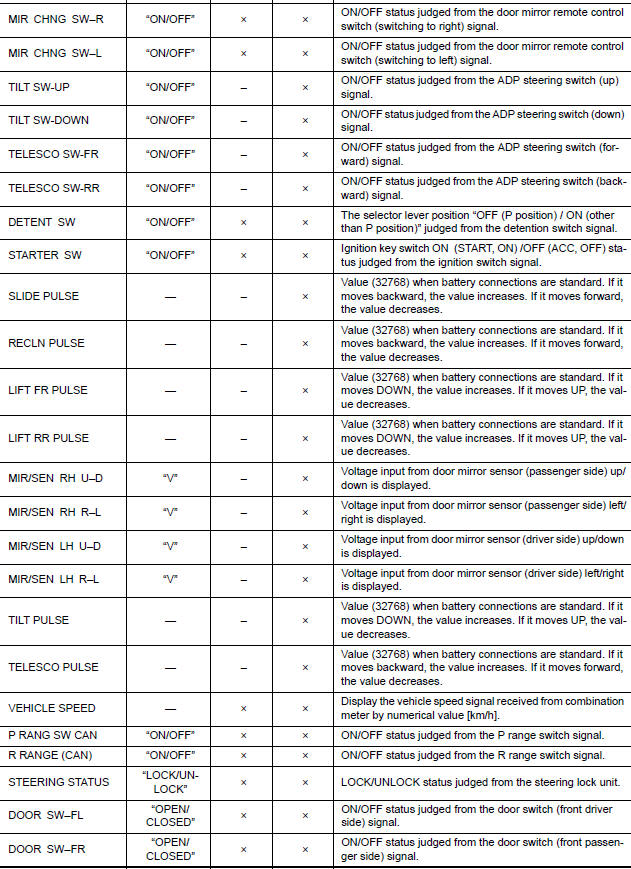
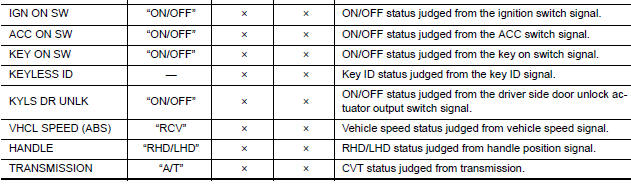
ACTIVE TEST
CAUTION: When driving vehicle, do not perform active test.
| Test item | Description |
| SEAT SLIDE | Activates/deactivates the sliding motor. |
| SEAT RECLINING | Activates/deactivates the reclining motor |
| SEAT LIFTER FR | Activates/deactivates the lifting motor (front). |
| SEAT LIFTER RR | Activates/deactivates the lifting motor (rear |
| TILT MOTOR | Activates/deactivates the tilt motor |
| TELESCO MOTOR | Activates/deactivates the telescopic motor |
| MIRROR MOTOR RH | Activates/deactivates the mirror motor (passenger side). |
| MIRROR MOTOR LH | Activates/deactivates the mirror motor (driver side |
| MEMORY SW INDCTR | Turns ON/OFF the memory indicator |
WORK SUPPORT
| Work item | Content | Item |
| SEAT SLIDE VOLUME SET | The amount of seat sliding for entry/exit assist can be selected from 3 items. | 40 mm (1.6 in) |
| 80 mm (3.1 in) | ||
| 150 mm (6 in) | ||
| EXIT TILT SETTING | Entry/exit assist (steering column) can be selected: ON (operated) - OFF (not operated) | ON |
| OFF | ||
| EXIT SEAT SLIDE SETTING | Entry/exit assist (seat) can be selected: ON (operated) - OFF (not operated) | ON |
| OFF |
 Intelligent key interlock function
INTELLIGENT KEY INTERLOCK FUNCTION : System
INTELLIGENT KEY INTERLOCK FUNCTION : System Description
OUTLINE
When unlocking doors by using Intelligent Key or door request switch (driver
side), ...

Other materials:
Rear window defogger system
System Diagram
System Description
Operation Description
When rear window defogger switch is turned ON while ignition
switch is ON, the A/C auto amp. (rear window
defogger switch) transmits rear window defogger switch signal to BCM.
BCM turns rear window defogger relay ON when rear ...
Opening windows
The Intelligent Key allows you to simultaneously
open windows equipped with automatic operation.
To open the windows, press and hold
the button on the Intelligent
Key for
longer than 3 seconds.
The door windows will lower while holding down
the button on the Intelligent Key.
NOTE: ...
Predictive Forward Collision Warning (PFCW) (if so equipped)
WARNING
Failure to follow the warnings and instructions
for proper use of the PFCW system
could result in serious injury or death.
The PFCW system can help warn the
driver before a collision occurs but will
not avoid a collision. It is the driver's
responsibility to stay alert, drive sa ...
Nissan Maxima Owners Manual
- Illustrated table of contents
- Safety-Seats, seat belts and supplemental restraint system
- Instruments and controls
- Pre-driving checks and adjustments
- Monitor, climate, audio, phone and voice recognition systems
- Starting and driving
- In case of emergency
- Appearance and care
- Do-it-yourself
- Maintenance and schedules
- Technical and consumer information
Nissan Maxima Service and Repair Manual

0.0125