Nissan Maxima Service and Repair Manual: B2604 transmission range switch
Description
BCM confirms the shift position with the following 4 signals.
-
CVT selector lever
-
Transmission range switch
-
P position signal from IPDM E/R (CAN)
-
P position signal from TCM (CAN)
DTC Logic
DTC DETECTION LOGIC
NOTE:
-
If DTC B2604 is displayed with DTC U1000, first perform the trouble diagnosis for DTC U1000. Refer to SEC-29, "DTC Logic".
-
If DTC B2604 is displayed with DTC U1010, first perform the trouble diagnosis for DTC U1010. Refer to SEC-30, "DTC Logic".

DTC CONFIRMATION PROCEDURE
1.PERFORM DTC CONFIRMATION PROCEDURE
-
Start the engine under the following conditions and wait for at least 1 second.
-
CVT selector lever is in the P position
-
Do not depress the brake pedal
-
-
Use CVT selector lever to select each gear one at a time. Wait at each gear for at least 1 second.
-
Check "Self diagnostic result" with CONSULT.
Diagnosis Procedure
Regarding Wiring Diagram information, refer to SEC-147, "Wiring Diagram" or SEC-128, "Wiring Diagram".
1.CHECK DTC WITH TCM
Check "Self diagnostic result" with CONSULT. Refer to PCS-27, "DTC Index".
2.CHECK TRANSMISSION RANGE SWITCH CIRCUIT
-
Turn ignition switch OFF.
-
Disconnect TCM harness connector and BCM harness connector.
-
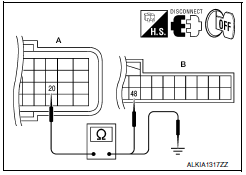
Check continuity between TCM harness connector F15 (A) terminal 20 and BCM harness connector M18 (B) terminal 48.


4. Check continuity between TCM harness connector F15 (A) terminal 20 and ground.

3.CHECK INTERMITTENT INCIDENT
Refer to GI-41, "Intermittent Incident".
Inspection End.
 B2603 shift position status
Description
BCM confirms the shift position with the following 2
signals.
CVT selector lever
P/N position switch
DTC Logic
DTC DETECTION LOGIC
NOTE:
If DTC ...
 B2605 transmission range switch
Description
BCM confirms the shift position with the following 4
signals.
CVT selector lever
Transmission range switch
P position signal from IPDM E/R (CAN) ...
Other materials:
P0181 FTT sensor
Description
The fuel tank temperature sensor is used to detect the fuel temperature
inside the fuel tank. The sensor modifies a voltage signal from
the ECM. The modified signal returns to the ECM as the fuel temperature
input. The sensor uses a thermistor which is sensitive to the
chang ...
Sunroof does not operate properly
Diagnosis Procedure
1.CHECK SUNROOF MECHANISM
Check the following.
Operation malfunction caused by sunroof mechanism deformation,
pinched harness or other foreign materials
Operation malfunction and interference with other parts by poor
installation
2.CHECK SUNROOF MOTOR ASSEMBLY PO ...
Sound signal circuit
SATELLITE RADIO TUNER
SATELLITE RADIO TUNER : Description
Left and right channel audio signals are supplied from the satellite radio
tuner to the AV control unit through
the sound signal circuits.
SATELLITE RADIO TUNER : Diagnosis Procedure
LEFT CHANNEL
1.CHECK HARNESS
Turn ignition ...
Nissan Maxima Owners Manual
- Illustrated table of contents
- Safety-Seats, seat belts and supplemental restraint system
- Instruments and controls
- Pre-driving checks and adjustments
- Monitor, climate, audio, phone and voice recognition systems
- Starting and driving
- In case of emergency
- Appearance and care
- Do-it-yourself
- Maintenance and schedules
- Technical and consumer information
Nissan Maxima Service and Repair Manual
0.0062
