
Nissan Maxima Service and Repair Manual: Daytime running light system
System Diagram
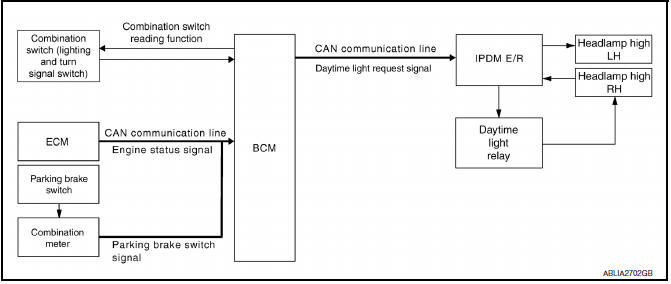
System Description
The headlamp system for Canada vehicles is equipped with a daytime light relay that activates the high beam headlamps at approximately half illumination whenever the engine is running. If the parking brake is depressed before the engine is started, the daytime lights will not be illuminated. The daytime lights will illuminate once the parking brake is released. Thereafter, the daytime lights will continue to operate when the parking brake is depressed.
Component Parts Location
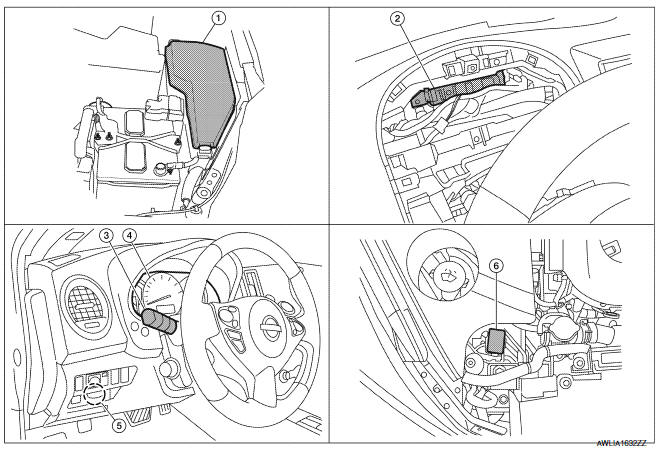
- IPDM E/R E17, E18, E200, E201
- BCM M16,M17, M18, M19 (view with combination meter removed)
- Combination switch (lighting and turn signal switch) M28
- Combination meter M24
- Parking brake switch E35
- Daytime light relay E228
Component Description
After starting the engine with the parking brake released and the lighting switch in the OFF or 1ST position, the headlamp high beam automatically turns on. With the lighting switch in the 2nd position or with autolamps ON, the headlamps function the same as conventional light systems.
OPERATION
The BCM monitors inputs from the parking brake switch and the combination switch (lighting and turn signal switch) to determine when to activate the daytime light system. The BCM sends a daytime light request to the IPDM E/R via the CAN communication lines. The IPDM E/R grounds the daytime light relay which in turn, provides power to the ground side of the RH high beam lamp. Power flows backward through the RH high beam lamp to the IPDM E/R, through the high beam fuses, through the LH high beam lamp circuit to the LH high beam lamp and on to ground. The high beam lamps are wired in series which causes them to illuminate at a reduced intensity.
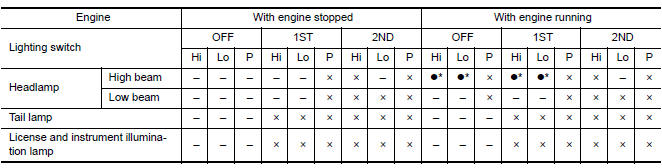
- Hi: "HIGH BEAM" position
- Lo: "LOW BEAM" position
- P: "FLASH TO PASS" position
- ×: Lamp "ON"
- -: Lamp "OFF"
 : Lamp dims. (Added functions)
- *: When starting the engine with the parking brake released, the
daytime lights will operate.
When starting the engine with the parking brake depressed, the daytime lights will not operate.
 Headlamp
System Diagram
System Description
Control of the headlamp system is dependent upon the position of the
combination switch (lighting and turn signal switch). When the lighting
switch is placed ...
 Auto light system
System Diagram
System Description
BCM (Body Control Module) controls auto light operation according to
signals from optical sensor, lighting switch and ignition switch.
IPDM E/R (Intellige ...
Other materials:
P1211 TCS control unit
Description
The malfunction information related to TCS is transferred via the CAN
communication line from "ABS actuator
and electric unit (control unit)" to ECM.
Be sure to erase the malfunction information such as DTC not only for "ABS
actuator and electric unit
(control unit)" but also ...
B1113 - B1115 satellite sensor RH
Description
DTC B1113 - B1115 SATELLITE SENSOR RH
The satellite sensor RH is wired to the air bag diagnosis sensor unit. The
air bag diagnosis sensor unit willmonitor the satellite sensor RH for
internal failures and its circuits for communication errors.
PART LOCATION
DTC Logic
DTC DETECTI ...
Basic inspection
DIAGNOSIS AND REPAIR WORKFLOW
Work Flow
OVERALL SEQUENCE
DETAILED FLOW
1. GET INFORMATION FOR SYMPTOM
Get the detailed information from the customer about the symptom (the
condition and the environment whenthe incident/malfunction occurred).
2. CHECK DTC
Check DTC.
Perform the follow ...
Nissan Maxima Owners Manual
- Illustrated table of contents
- Safety-Seats, seat belts and supplemental restraint system
- Instruments and controls
- Pre-driving checks and adjustments
- Monitor, climate, audio, phone and voice recognition systems
- Starting and driving
- In case of emergency
- Appearance and care
- Do-it-yourself
- Maintenance and schedules
- Technical and consumer information
Nissan Maxima Service and Repair Manual

0.0161