
Nissan Maxima Service and Repair Manual: Optical sensor
Description
The optical sensor converts the outside brightness (lux) to voltage and transmits the optical sensor signal to the BCM.
Component Function Check
1.CHECK OPTICAL SENSOR SIGNAL BY CONSULT
CONSULT
- Turn the ignition switch ON.
- Select "OPTICAL SENSOR" of BCM (HEAD LAMP) DATA MONITOR item.
- Turn the lighting switch to AUTO.
- While the auto light system is operating, check the monitor status.

*: Illuminates the optical sensor. The value may be less than the standard value if brightness is weak.
Diagnosis Procedure
1.CHECK OPTICAL SENSOR POWER SUPPLY INPUT
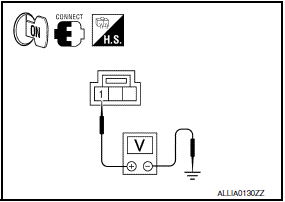
- Turn the ignition switch ON.
- Turn the lighting switch to AUTO.
- Check the voltage between the optical sensor harness connector and ground.

2.CHECK OPTICAL SENSOR GROUND INPUT
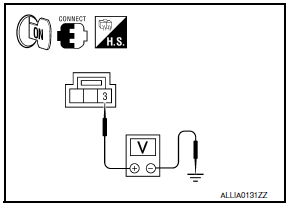
Check the voltage between the optical sensor harness connector and ground.

3.CHECK OPTICAL SENSOR SIGNAL OUTPUT
With the auto light system operating, check voltage between the optical sensor harness connector and ground.
*: Illuminate the optical sensor. The value may be less than the standard if brightness is weak.
4.CHECK OPTICAL SENSOR POWER SUPPLY FOR OPEN CIRCUIT
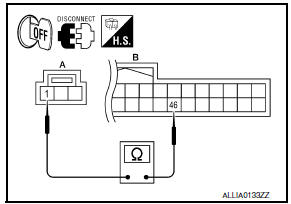
- Turn the ignition switch OFF.
- Disconnect the optical sensor connector and BCM connector M18.
- Check continuity between the optical sensor harness connector (A) and the BCM harness connector (B

5.CHECK OPTICAL SENSOR POWER SUPPLY FOR SHORT CIRCUIT
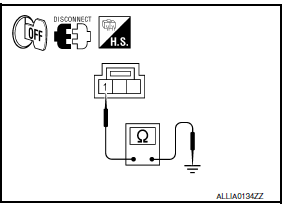
Check the continuity between the optical sensor harness connector and the ground.

6.CHECK OPTICAL SENSOR GROUND FOR OPEN CIRCUIT
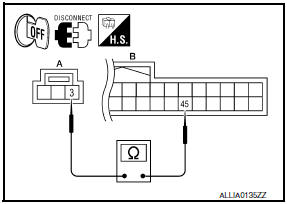
- Turn the ignition switch OFF.
- Disconnect the optical sensor connector and BCM connector M18.
- Check continuity between the optical sensor harness connector (A) and the BCM harness connector (B).

7.CHECK OPTICAL SENSOR SIGNAL FOR OPEN CIRCUIT
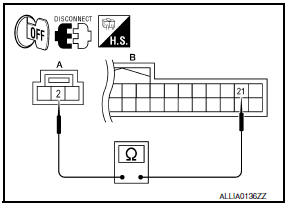
- Turn the ignition switch OFF.
- Disconnect the optical sensor connector and BCM connector M18.
- Check continuity between the optical sensor harness connector (A) and the BCM harness connector (B).

8.CHECK OPTICAL SENSOR SIGNAL FOR SHORT CIRCUIT
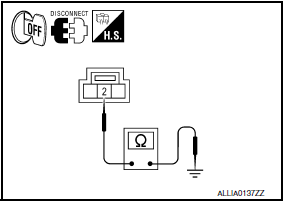
Check the continuity between the optical sensor harness connector and ground.

 Turn signal lamp circuit
Description
The BCM monitors inputs from the combination switch to determine when to
activate the turn signals. The BCM outputs voltage direction to the left and
right turn signals during turn si ...
 Hazard switch
Component Function Check
1.CHECK HAZARD SWITCH SIGNAL BY CONSULT
CONSULT DATA MONITOR
Turn ignition switch ON.
Select "HAZARD SW" of BCM (FLASHER) DATA MONITOR item.
With operating the hazar ...
Other materials:
Clip list
Descriptions for Clips
Replace any clips which are damaged during removal or installation.
...
B2112 sliding motor
Description
The seat sliding motor is installed to the seat frame.
The seat sliding motor is activated with the driver seat control unit.
Slides the seat forward/backward by changing the rotation direction of
sliding motor.
DTC Logic
DTC DETECTION LOGIC
DTC No.
Trouble diag ...
Blower unit
BLOWER UNIT
BLOWER UNIT : Removal and Installation
COMPONENTS
Heater and cooling unit
Blower unit Front
REMOVAL
Remove the heater and cooling unit assembly. Refer to HA-47,
"HEATER & COOLING UNIT ASSEMBLY : Removal and Installation".
Disconnect the harness connector from ...
Nissan Maxima Owners Manual
- Illustrated table of contents
- Safety-Seats, seat belts and supplemental restraint system
- Instruments and controls
- Pre-driving checks and adjustments
- Monitor, climate, audio, phone and voice recognition systems
- Starting and driving
- In case of emergency
- Appearance and care
- Do-it-yourself
- Maintenance and schedules
- Technical and consumer information
Nissan Maxima Service and Repair Manual

0.0204