
Nissan Maxima Service and Repair Manual: Basic inspection
DIAGNOSIS AND REPAIR WORKFLOW
Work Flow
OVERALL SEQUENCE
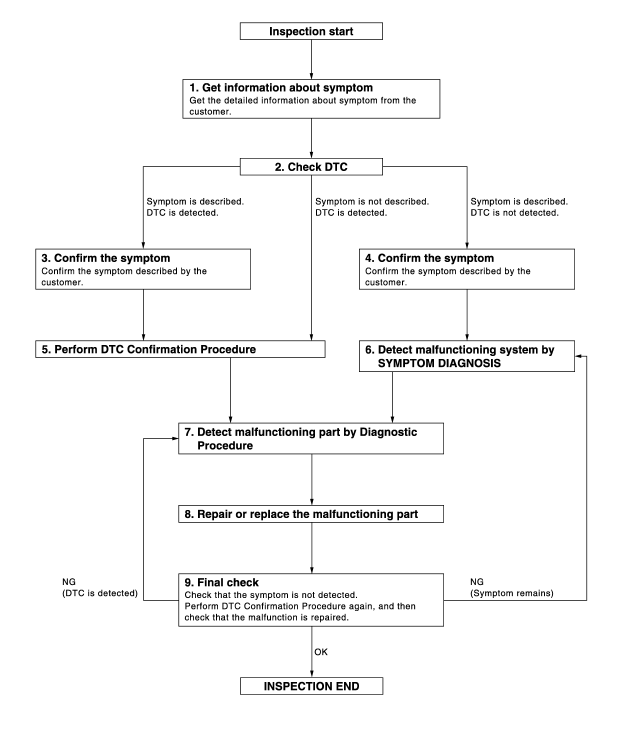
DETAILED FLOW
1. GET INFORMATION FOR SYMPTOM
Get the detailed information from the customer about the symptom (the condition and the environment when the incident/malfunction occurred).
2. CHECK DTC
- Check DTC for BCM and IPDM E/R.
- Perform the following procedure if DTC is displayed.
- Record DTC and freeze frame data (Print them out with CONSULT.)
- Erase DTC.
- Study the relationship between the cause detected by DTC and the symptom described by the customer.
- Check related service bulletins for information.
3. CONFIRM THE SYMPTOM
Confirm the symptom described by the customer.
Connect CONSULT to the vehicle in "DATA MONITOR" mode and check real time diagnosis results.
Verify relation ship between the symptom and the condition when the symptom is detected.
4. CONFIRM THE SYMPTOM
Confirm the symptom described by the customer.
Connect CONSULT to the vehicle in "DATA MONITOR " mode and check real time diagnosis results.
Verify relation between the symptom and the condition when the symptom is detected.
5. PERFORM DTC CONFIRMATION PROCEDURE
Perform DTC Confirmation Procedure for the displayed DTC, and then check that DTC is detected again.
At this time, always connect CONSULT to the vehicle, and check diagnostic results in real time.
If two or more BCM DTCs are detected, refer to BCS-63, "DTC Inspection Priority Chart" and determine trouble diagnosis order.
NOTE:
- Freeze frame data is useful if the DTC is not detected.
- Perform Component Function Check if DTC Confirmation Procedure
is not included in Service Manual. This
simplified check procedure is an effective alternative though DTC cannot be
detected during this check.
If the result of Component Function Check is NG, it is the same as the detection of DTC by DTC Confirmation Procedure.
6. DETECT MALFUNCTIONING SYSTEM BY SYMPTOM DIAGNOSIS
Detect malfunctioning system according to symptom diagnosis based on the confirmed symptom in step 4, and determine the trouble diagnosis order based on possible causes and symptom.
7. DETECT MALFUNCTIONING PART BY DIAGNOSTIC PROCEDURE
Inspect according to Diagnostic Procedure of the system.
NOTE: The Diagnostic Procedure described based on open circuit inspection. A short circuit inspection is also required for the circuit check in the Diagnostic Procedure.
8. REPAIR OR REPLACE THE MALFUNCTIONING PART
- Repair or replace the malfunctioning part.
- Reconnect parts or connectors disconnected during Diagnostic Procedure again after repair and replacement.
- Check DTC. If DTC is displayed, erase it.
9. FINAL CHECK
When DTC was detected in step 2, perform DTC Confirmation Procedure or Component Function Check again, and then check that the malfunction have been fully repaired.
When symptom was described from the customer, refer to confirmed symptom in step 3 or 4 and check that the symptom is not detected.
Pre-Inspection for Multi-System Diagnostic
The engine start function, door lock function, power distribution system and NATS-IVIS/NVIS are closely related to each other. Narrow down the system in question by performing this inspection to identify which system is malfunctioning. For example, the vehicle security system can operate only when the door lock and power distribution system are operating normally.
1.CHECK DOOR LOCK OPERATION
Check the door lock for normal operation with the Intelligent Key and door request switch.
Successful door lock operation with the Intelligent Key and request switch indicates that the remote keyless entry receiver and inside key antenna required for engine start are functioning normally.
2.CHECK ENGINE STARTING
Check that the engine starts when the Intelligent Key is inserted into the key slot.
3.CHECK POWER SUPPLY INDICATOR SWITCHING
Press push-button ignition switch and check that the position indicator switches from LOCK, through ACC to ON.
4.CHECK VEHICLE SECURITY SYSTEM
Check the vehicle security system for normal operation
 Removal and installation
IPDM E/R (INTELLIGENT POWER DISTRIBUTION MODULE ENGINE
ROOM)
Removal and Installation
CAUTION:
Do not remove the relays from the IPDM E/R. Tampering with the relays may cause
additional incide ...

Other materials:
The door open warning continues displaying, or does not display
Description
The door ajar warning is displayed even though
all of the doors and the trunk are closed.
The door ajar warning is not displayed even
though a door or the trunk is ajar.
Diagnosis Procedure
1.CHECK BCM INPUT SIGNAL
Connect CONSULT and check the BC ...
Rear combination lamp
Disassembly and Assembly
Rear combination lamp
Rear side marker lamp socket
Rear side marker lamp bulb
Rear turn signal lamp socket
Rear turn signal lamp bulb
Back-up lamp socket
Back-up lamp bulb
DISASSEMBLY
Rotate the rear side marker lamp socket counterclockwise and ...
Homelink universal transceiver
Description
Homelink universal transceiver can store and transmit a maximum of 3 radio
signals.
Allows operation of garage doors, gates, home and office lighting, entry door
locks and security system, etc.
Homelink universal transceiver power supply uses vehicle battery, which enables
...
Nissan Maxima Owners Manual
- Illustrated table of contents
- Safety-Seats, seat belts and supplemental restraint system
- Instruments and controls
- Pre-driving checks and adjustments
- Monitor, climate, audio, phone and voice recognition systems
- Starting and driving
- In case of emergency
- Appearance and care
- Do-it-yourself
- Maintenance and schedules
- Technical and consumer information
Nissan Maxima Service and Repair Manual

0.0642