
Nissan Maxima Service and Repair Manual: Power supply and ground circuit
COMBINATION METER
COMBINATION METER : Diagnosis Procedure
Regarding Wiring Diagram information, refer to MWI-87, "Wiring Diagram".
1.CHECK FUSES
Check for blown combination meter fuses.

2.POWER SUPPLY CIRCUIT CHECK
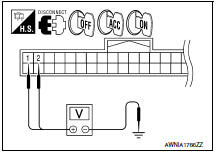
- Disconnect combination meter connector.
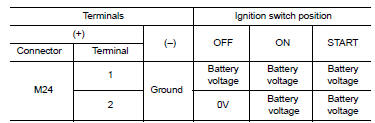
- Check voltage between combination meter harness connector M24 terminals 1, 2, and ground.
3.GROUND CIRCUIT CHECK
-
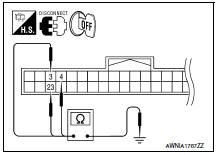
Turn ignition switch OFF.
-
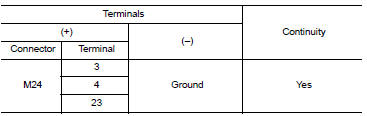
Check continuity between combination meter harness connector terminals 3, 4, 23 and ground.
BCM (BODY CONTROL MODULE)
BCM (BODY CONTROL MODULE) : Diagnosis Procedure
Regarding Wiring Diagram information, refer to BCS-67, "Wiring Diagram".
1. CHECK FUSE AND FUSIBLE LINK
Check if the following BCM fuses or fusible link are blown.

2. CHECK POWER SUPPLY CIRCUIT
-
Turn ignition switch OFF.
-
Disconnect BCM.
-
Check voltage between BCM harness connector and ground.
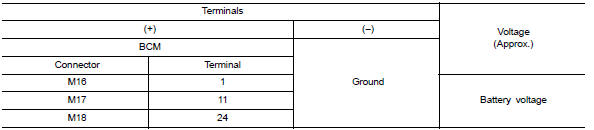
3. CHECK GROUND CIRCUIT
Check continuity between BCM harness connector and ground.

IPDM E/R (INTELLIGENT POWER DISTRIBUTION MODULE ENGINE ROOM)
IPDM E/R (INTELLIGENT POWER DISTRIBUTION MODULE ENGINE ROOM) : Diagnosis Procedure
Regarding Wiring Diagram information, refer to PCS-28, "Wiring Diagram".
1. CHECK FUSES AND FUSIBLE LINK
Check that the following IPDM E/R fuses or fusible link are not blown.

2. CHECK POWER SUPPLY CIRCUIT
-
Turn ignition switch OFF.
-
Disconnect IPDM E/R connectors.
-
Check voltage between IPDM E/R harness connector and ground.
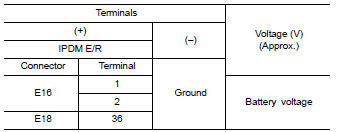
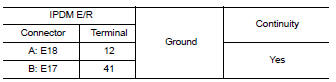
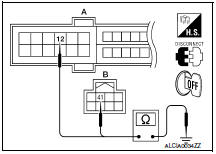
3. CHECK GROUND CIRCUIT
Check continuity between IPDM E/R harness connectors and ground.
 B2268 water temp
Description
The engine coolant temperature signal is transmitted from ECM to the
combination meter via CAN communication.
DTC Logic
DTC DETECTION LOGIC
Diagnosis Procedure
1.PERFORM SELF-DIAG ...
 Fuel level sensor signal circuit
Description
The fuel level sensor unit and fuel pump (fuel level
sensor) detects the approximate fuel level in the fuel tank
and transmits the fuel level signal to the combination meter.
Compone ...
Other materials:
B2099 ignition relay off stuck
DTC Logic
DTC DETECTION LOGIC
DTC CONFIRMATION PROCEDURE
1.PERFORM DTC CONFIRMATION PROCEDURE
Turn the power supply position to start under the following
conditions and wait for at least 1 second.
CVT selector lever is in the P (Park) or N (Neutral) position.
Depress the brake ...
Diagnosis and repair work flow
Work Flow
OVERALL SEQUENCE
DETAILED WORK FLOW
1.CUSTOMER INFORMATION
Get detailed information from the customer about the symptom.
2.PRELIMINARY CHECK
Perform preliminary check.
3.TECHNICAL SERVICE BULLETINS
Check for technical service bulletins.
4.USER MODE
Perform self-diagnosis usin ...
Rear view camera
Removal and Installation
REMOVAL
Remove the license plate finisher. Refer to EXL-166, "Removal and
Installation".
Remove trunk lid finisher. Refer to INT-36, "Exploded View".
Disconnect the rear view camera connector (B), press the rear
view camera tab (A) and remove the rear view c ...
Nissan Maxima Owners Manual
- Illustrated table of contents
- Safety-Seats, seat belts and supplemental restraint system
- Instruments and controls
- Pre-driving checks and adjustments
- Monitor, climate, audio, phone and voice recognition systems
- Starting and driving
- In case of emergency
- Appearance and care
- Do-it-yourself
- Maintenance and schedules
- Technical and consumer information
Nissan Maxima Service and Repair Manual

0.012