
Nissan Maxima Service and Repair Manual: Diagnosis system (audio unit)
Diagnosis Description
Self-diagnosis mode can perform the following items.
- Versions display
- Channel check diagnosis
- Key check diagnosis
- AV communication diagnosis
VERSIONS DISPLAY FUNCTION
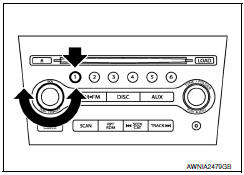
- Turn ignition switch ON.
- Turn the audio unit off.
- While pressing "1" button, turn volume control dial clockwise or counterclockwise for 30 clicks or more.
- Diagnosis default screen of audio display unit is displayed. NOTE: Diagnosis default screen = All icons and segments of the audio display unit are turned on.
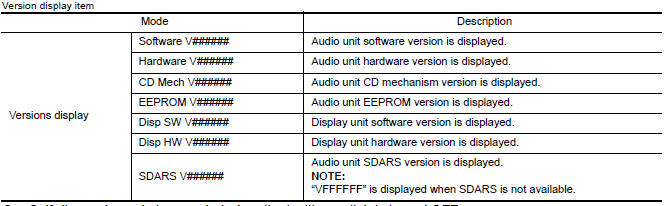
- Pressing the AUDIO switch briefly displays the version display mode. Pressing the AUDIO switch briefly switches to each version display. Pressing and holding the AUDIO switch when displaying each software version returns to the diagnosis default screen.
- Self-diagnosis mode is canceled when the ignition switch is turned OFF.
CHANNEL CHECK DIAGNOSIS FUNCTION
- Turn ignition switch ON.
- Turn the audio unit off.
- While pressing the "1" button, turn the volume control dial clockwise or counterclockwise for 30 clicks or more.
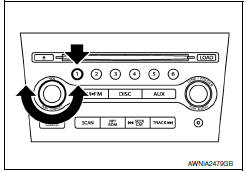
- The diagnosis default screen of audio display unit is displayed. NOTE: Diagnosis default screen = All icons and segments of the audio display unit are turned on.
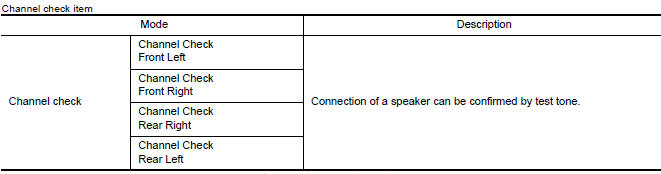
- Turning the TUNE/FOLDER dial clockwise displays the channel check mode. Pressing and holding the AUDIO switch during each channel check or waiting approximately 1 second after finishing all channel checks returns to the diagnosis default screen.
- Self-diagnosis mode is canceled when the ignition switch is turned OFF.
KEY CHECK DIAGNOSIS FUNCTION
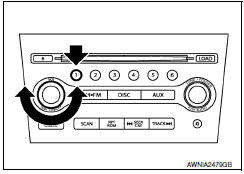
- Turn ignition switch ON.
- Turn the audio unit off.
- While pressing the "1" button, turn the volume control dial clockwise or counterclockwise for 30 clicks or more.
- The diagnosis default screen of audio display unit is displayed. NOTE: Diagnosis default screen = All icons and segments of the audio display unit are turned on.
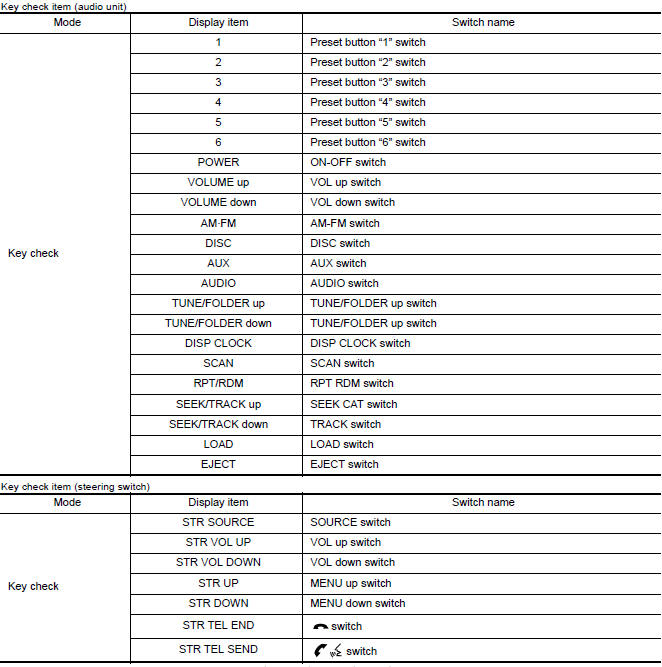
- Turning the TUNE/FOLDER dial counterclockwise displays the key check mode, and the pressed switch name is shown. Pressing and holding the AUDIO switch during the key check mode returns to the diagnosis default screen.
- Self-diagnosis mode is canceled when the ignition switch is turned OFF.
AV COMMUNICATION DIAGNOSIS FUNCTION
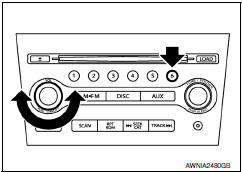
- Turn ignition switch ON.
- Turn the audio unit off.
- While pressing the "6" button, turn the volume control dial clockwise or counterclockwise for 30 clicks or more.
- Returns to diagnosis default screen and displays "AV DIAGNOSIS".
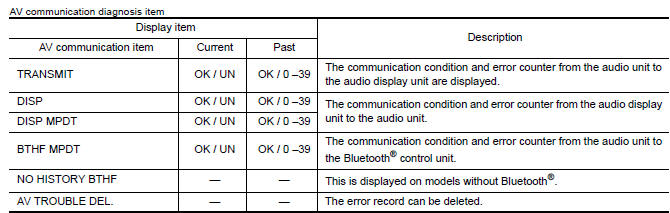
- Pressing the AUDIO switch briefly displays the AV communication diagnosis mode. Pressing the AUDIO switch briefly again switches to each AV communication display
- Pressing the SEEK up switch displays the confirmation screen of "delete error record". Press the SEEK down switch if returning from RECORD DEL YES? to RECORD DEL NO? The item is automatically determined approximately 6 seconds after it is displayed. Then the display returns to AV TROUBLE DEL display item.
- Self-diagnosis mode is canceled when the ignition switch is turned OFF.

 Hands-free phone system
System Diagram
System Description
Refer to the Owner's Manual for Bluetooth telephone system operating
instructions.
NOTE: Cellular telephones must have their
wireless connection set up (pair ...
 Diagnosis system (bluetooth control unit)
Diagnosis Description
The Bluetooth control unit has two diagnostic checks. The first diagnostic
check is performed automatically every ignition cycle during control unit
initialization. The seco ...
Other materials:
Refrigerant pressure sensor
Removal and Installation
REMOVAL
Discharge the refrigerant. Refer to HA-28, "Recycle Refrigerant".
Remove the core support upper cover.
Disconnect the harness connector from the refrigerant pressure
sensor.
Remove the refrigerant pressure sensor.
CAUTION:
Cap or wrap the ...
Inspection and adjustment
Preliminary Check
1. FOREIGN OBJECTS
Check the following:
objects on or behind the seats that could cause binding
objects under the seats that may be interfering with the seat's
moving parts
objects under pedals that may interfere with movement
Are there any foreign objects that coul ...
EVAP canister vent control valve
Removal and Installation
REMOVAL
Remove rear stabilizer bar clamps and position rear stabilizer bar
aside. Refer to RSU-13, "Removal and Installation".
Disconnect breather hose from EVAP canister.
Disconnect EVAP canister vent control valve.
Turn EVAP canister v ...
Nissan Maxima Owners Manual
- Illustrated table of contents
- Safety-Seats, seat belts and supplemental restraint system
- Instruments and controls
- Pre-driving checks and adjustments
- Monitor, climate, audio, phone and voice recognition systems
- Starting and driving
- In case of emergency
- Appearance and care
- Do-it-yourself
- Maintenance and schedules
- Technical and consumer information
Nissan Maxima Service and Repair Manual

0.0237