
Nissan Maxima Service and Repair Manual: Antenna AMP
Removal and Installation
REMOVAL
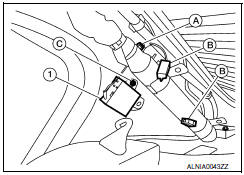
- Remove the rear pillar finisher RH. Refer to INT-23, "Exploded View".
- Detach the antenna amp. harness clip (A).
- Disconnect the harness connectors (B) from the antenna amp. (1).
- Remove the antenna amp. screw (C) and the antenna amp. (1).
INSTALLATION
Installation is in the reverse order of removal.
 Audio antenna
Location of Antenna
AV control unit
AV control unit antenna feeder
In-line connectors M103, M501
Antenna amp.
Window antenna
Satellite radio antenna feeder
Satellite radio antenn ...
 Microphone
Removal and Installation
REMOVAL
Remove the map lamp assembly. Refer to INL-84, "Removal and
Installation".
Detach the microphone connector (A).
Remove the map lamp covers (1), the ...
Other materials:
U1010 control unit (CAN)
Description
CAN (Controller Area Network) is a serial communication line for real time
application. It is an on-vehicle multiplex
communication line with high data communication speed and excellent malfunction
detection ability.
Many electronic control units are equipped onto a vehicle, an ...
P0461 fuel level sensor
Description
The fuel level sensor is mounted in the fuel level sensor unit.
The sensor detects a fuel level in the fuel tank and transmits a signal to the
combination meter. The combination
meter sends the fuel level sensor signal to the ECM via the CAN communication
line.
It consists o ...
TPMS
System Diagram
System Description
DESCRIPTION
During driving, the tire pressure monitoring system receives the signal
transmitted from the transmitter installed in each wheel, and turns on the
low tire pressure warning lamp when the tire pressure becomes low.
The
control unit (BCM) for t ...
Nissan Maxima Owners Manual
- Illustrated table of contents
- Safety-Seats, seat belts and supplemental restraint system
- Instruments and controls
- Pre-driving checks and adjustments
- Monitor, climate, audio, phone and voice recognition systems
- Starting and driving
- In case of emergency
- Appearance and care
- Do-it-yourself
- Maintenance and schedules
- Technical and consumer information
Nissan Maxima Service and Repair Manual

0.0085