Nissan Maxima Owners Manual: Three-point type seat belt with retractor
WARNING
- Every person who drives or rides in this vehicle should use a seat belt at all times. Children should be in the rear seats and in an appropriate restraint.
- Do not ride in a moving vehicle when the seatback is reclined. This can be dangerous. The shoulder belt will not be against your body. In an accident, you could be thrown into it and receive neck or other serious injuries. You could also slide under the lap belt and receive serious internal injuries.
- For the most effective protection when the vehicle is in motion, the seat should be upright. Always sit well back and upright in the seat with both feet on the floor and adjust the seat belt properly.
- Do not allow children to play with the seat belts. Most seating positions are equipped with Automatic Locking Retractor (ALR) mode seat belts. If the seat belt becomes wrapped around a child's neck with the ALR mode activated, the child can be seriously injured or killed if the seat belt retracts and becomes tight. This can occur even if the vehicle is parked. Unbuckle the seat belt to release the child. If the seat belt cannot be unbuckled or is already unbuckled, release the child by cutting the seat belt with a suitable tool (such as a knife or scissors) to release the seat belt.
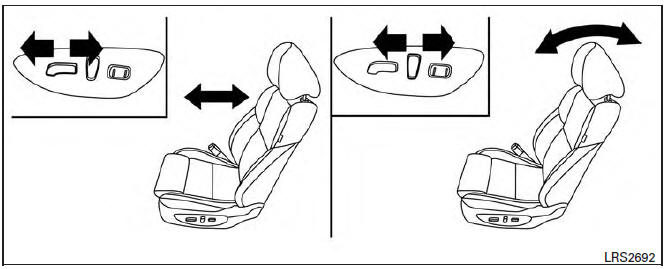
Front seat shown
Fastening the seat belts
1. Adjust the seat. For additional information, refer to "Seats" in this section.
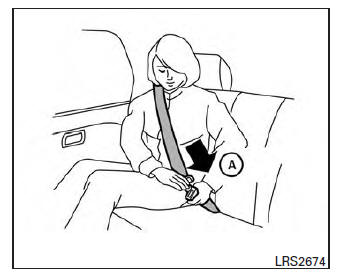
2. Slowly pull the seat belt out of the retractor and insert the tongue into the buckle A until you hear and feel the latch engage.
- The retractor is designed to lock during a sudden stop or on impact. A slow pulling motion permits the seat belt to move, and allows you some freedom of movement in the seat.
- If the seat belt cannot be pulled from its fully retracted position, firmly pull the belt and release it. Then smoothly pull the belt out of the retractor.
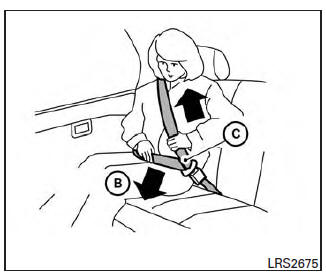
3. Position the lap belt portion low and snug on the hips B as shown.
4. Pull the shoulder belt portion toward the retractor to take up extra slack C . Be sure the shoulder belt is routed over your shoulder and across your chest.
The front passenger seat and the rear seating positions three-point seat belts have two modes of operation:
- Emergency Locking Retractor (ELR)
- Automatic Locking Retractor (ALR)
The ELR mode allows the seat belt to extend and retract to allow the driver and passengers some freedom of movement in the seat. The ELR locks the seat belt when the vehicle slows down rapidly or during certain impacts.
The ALR mode (child restraint mode) locks the seat belt for child restraint installation.
When the ALR mode is activated, the seat belt cannot be extended again until the seat belt tongue is detached from the buckle and fully retracted. The seat belt returns to the ELR mode after the seat belt fully retracts. For additional information, refer to "Child restraints" in this section.
The ALR mode should be used only for child restraint installation. During normal seat belt use by an occupant, the ALR mode should not be activated. If it is activated, it may cause uncomfortable seat belt tension.
It can also change the operation of the front passenger air bag. For additional information, refer to "Front passenger air bag and status light" in this section.
WARNING
When fastening the seat belts, be certain that the seatbacks are completely secured in the latched position. If they are not completely secured, passengers may be injured in an accident or sudden stop.
 Seat belt warning light
Both the driver's and passenger's front seats are
equipped with a seat belt warning light. The
warning light, located on the instrument panel,
will show the status of the driver and passenger
...
 Unfastening the seat belts
To unfasten the seat belt, press the button on the
buckle 1 . The seat belt automatically retracts.
Checking seat belt operation
Seat belt retractors are designed to lock seat belt
movement by ...
Other materials:
Front combination lamp
Exploded View
Front combination lamp
Removal and Installation
FRONT COMBINATION LAMP
Removal
CAUTION: Disconnect the battery negative terminal or
remove the fuse.
Remove the front bumper fascia. Refer to EXT-16, "Removal and
Installation".
Remove the front ...
B2634, B2635 air mix door motor (passenger side)
Description
COMPONENT DESCRIPTION
Air Mix Door Motor (passenger side)
The air mix door motor (passenger side) (1) is attached to the
heater & cooling unit assembly.
It rotates so that the air mix door is opened or closed to a
position
set by the A/C auto amp.
Motor rotation is t ...
AV branch line circuit
Diagnosis Procedure
1.CHECK CONNECTOR
Turn the ignition switch OFF.
Disconnect the battery cable from the negative terminal.
Check the terminals and connectors of the AV control unit for
damage, bend and loose connection (unit
side and connector side).
2.CHECK HARNESS FOR OPEN CIRC ...
Nissan Maxima Owners Manual
- Illustrated table of contents
- Safety-Seats, seat belts and supplemental restraint system
- Instruments and controls
- Pre-driving checks and adjustments
- Monitor, climate, audio, phone and voice recognition systems
- Starting and driving
- In case of emergency
- Appearance and care
- Do-it-yourself
- Maintenance and schedules
- Technical and consumer information
Nissan Maxima Service and Repair Manual

0.0073