Nissan Maxima Service and Repair Manual: On board refueling vapor recovery (ORVR)
Description
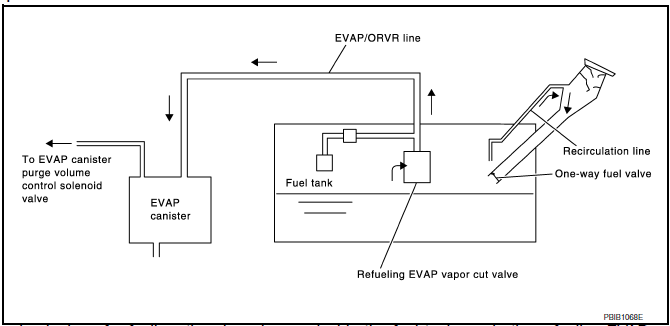
From the beginning of refueling, the air and vapor inside the fuel tank go via the refueling EVAP vapor cut valve and EVAP/ORVR line to the EVAP canister. The vapor is absorbed by the EVAP canister and the air is released to the atmosphere.
When the refueling has reached the full level of the fuel tank, the refueling EVAP vapor cut valve is closed and refueling is stopped because of auto shut-off. The vapor which was absorbed by the EVAP canister is purged during driving.
WARNING: When conducting inspections below, be sure to observe the following:
- Put a "CAUTION: FLAMMABLE" sign in workshop.
- Never smoke while servicing fuel system. Keep open flames and sparks away from work area.
- Always to furnish the workshop with a CO2 fire extinguisher.
CAUTION:
- Before removing fuel line parts, carry out the following procedures:
- Put drained fuel in an explosion-proof container and put lid on securely.
- Release fuel pressure from fuel line. Refer to EC-592, "Inspection".
- Disconnect battery ground cable.
- Always replace O-ring when the fuel gauge retainer is removed.
- Never kink or twist hose and tube when they are installed.
- Never tighten hose and clamps excessively to avoid damaging hoses.
- After installation, run engine and check for fuel leakage at connections.
- Never attempt to top off the fuel tank after the fuel pump
nozzle shuts off automatically.
Continued refueling may cause fuel overflow, resulting in fuel spray and possibly a fire.
Component Function Check
1.CHECK ORVR FUNCTION
Check whether the following symptoms are present.
- Fuel odor from EVAP canister is strong.
- Cannot refuel/Fuel odor from the fuel filler opening is strong while refueling.
Diagnosis Procedure
1.INSPECTION START
Check whether the following symptoms are present.
- Fuel odor from EVAP canister is strong.
- Cannot refuel/Fuel odor from the fuel filler opening is strong while refueling.
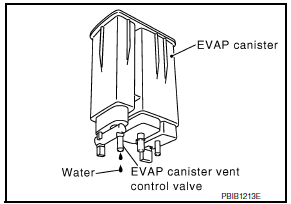
2.CHECK EVAP CANISTER
- Remove EVAP canister with EVAP canister vent control valve and EVAP control system pressure sensor attached. Refer to FL-14, "Removal and Installation (EVAP Canister)".
- Weigh the EVAP canister with EVAP canister vent control valve and EVAP control system pressure sensor attached.
The weight should be less than 2.1 kg (4.6 lb).
3.CHECK IF EVAP CANISTER IS SATURATED WITH WATER

Check if water will drain from EVAP canister
4.REPLACE EVAP CANISTER
Replace EVAP canister with a new one.
5.CHECK DRAIN FILTER
6.DETECT MALFUNCTIONING PART
Check the EVAP hose between EVAP canister and drain filter for clogging or poor connection.
7.CHECK REFUELING EVAP VAPOR CUT VALVE
8.CHECK EVAP CANISTER
- Remove EVAP canister with EVAP canister vent control valve and EVAP control system pressure sensor attached. Refer to FL-14, "Removal and Installation (EVAP Canister)".
- Weigh the EVAP canister with EVAP canister vent control valve and
EVAP control system pressure sensor
attached.
The weight should be less than 2.1 kg (4.6 lb).
9.CHECK IF EVAP CANISTER IS SATURATED WITH WATER
Check if water will drain from EVAP canister.
10.REPLACE EVAP CANISTER
Replace EVAP canister with a new one.
11.DETECT MALFUNCTIONING PART
Check the EVAP hose between EVAP canister and drain filter for clogging or poor connection.
12.CHECK VENT HOSES AND VENT TUBES
Check hoses and tubes between EVAP canister and refueling control valve for clogging, kinks, looseness and improper connection.
13.CHECK FILLER NECK TUBE
Check recirculation line for clogging, dents and cracks.
14.CHECK REFUELING EVAP VAPOR CUT VALVE
15.CHECK FUEL FILLER TUBE
Check filler neck tube and hose connected to the fuel tank for clogging, dents and cracks.
16.CHECK ONE-WAY FUEL VALVE-I
Check one-way valve for clogging.
17.CHECK ONE-WAY FUEL VALVE-II
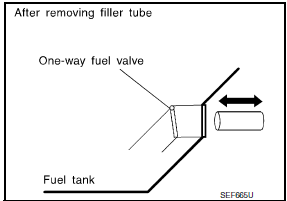
- Check that fuel is drained from the tank.
- Remove fuel filler tube and hose. Refer to EM-43, "Exploded View".
- Check one-way fuel valve for operation as per the following.
When a stick is inserted, the valve should open, when removing stick it should close.
Do not drop any material into the tank.
Component Inspection
REFUELING EVAP VAPOR CUT VALVE
1.INSPECTION START
2.CHECK REFUELING EVAP VAPOR CUT VALVE
With CONSULT
- Turn ignition switch OFF.
- Remove fuel tank. Refer to FL-10, "Removal and Installation".
- Drain fuel from the tank as per the following:
- Remove fuel feed hose located on the fuel gauge retainer.
- Connect a spare fuel hose, one side to fuel gauge retainer where the hose was removed and the other side to a fuel container.
- Drain fuel using "FUEL PUMP RELAY" in "ACTIVE TEST" mode with CONSULT.
- Check refueling EVAP vapor cut valve for being stuck to close as
per the following.
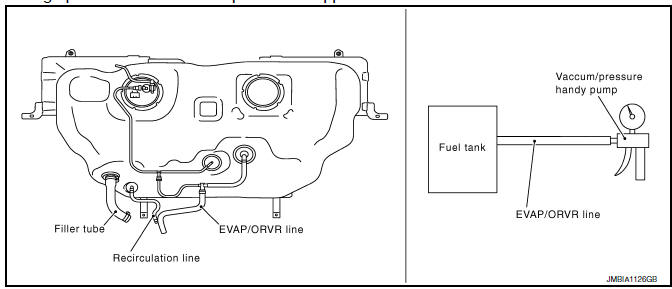
Blow air into the refueling EVAP vapor cut valve (from the end of EVAP/ORVR line hose), and check that the air flows freely into the tank.
- Check refueling EVAP vapor cut valve for being stuck to open as per the following.
- Connect vacuum pump to hose end.
- Remove fuel gauge retainer with fuel gauge unit.
Always replace O-ring with new one.
- Turn fuel tank upside down.
- Apply vacuum pressure to hose end [−13.3 kPa (−0.136 kg/cm3, −1.93 psi)] with fuel gauge retainer remaining open and check that the pressure is applicable.

3.CHECK REFUELING EVAP VAPOR CUT VALVE
Without CONSULT
- Turn ignition switch OFF.
- Remove fuel tank. Refer to FL-10, "Removal and Installation".
- Drain fuel from the tank as per the following:
- Remove fuel gauge retainer.
- Drain fuel from the tank using a handy pump into a fuel container.
- Check refueling EVAP vapor cut valve for being stuck to close as
per the following.
Blow air into the refueling EVAP vapor cut valve (from the end of EVAP/ORVR line hose), and check that the air flows freely into the tank.
- Check refueling EVAP vapor cut valve for being stuck to open as per the following.
- Connect vacuum pump to hose end.
- Remove fuel gauge retainer with fuel gauge unit.
Always replace O-ring with new one.
- Turn fuel tank upside down.
- Apply vacuum pressure to hose end [−13.3 kPa (−0.136 kg/cm3, −1.93 psi)] with fuel gauge retainer remaining open and check that the pressure is applicable.
DRAIN FILTER
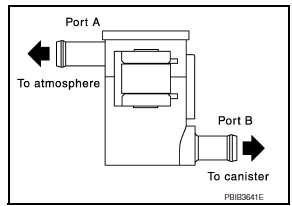
- Check visually for insect nests in the drain filter air inlet.
- Check visually for cracks or flaws in the appearance.
- Check visually for cracks or flaws in the hose.
- Blow air into port A and check that it flows freely out of port B.
- Block port B.
- Blow air into port A and check that there is no leakage.
- If NG, replace drain filter.
 Malfunction indicator lamp
Description
The Malfunction Indicator Lamp (MIL) is located on the combination
meter.
The MIL will illuminate when the ignition switch is turned ON without
the engine running. This is a bu ...
 Positive crankcase ventilation
Description
This system returns blow-by gas to the intake manifold.
The positive crankcase ventilation (PCV) valve is provided to conduct crankcase
blow-by gas to the intake
manifold.
D ...
Other materials:
Normal operating condition
Description
The majority of the audio concerns are the result of outside causes (bad CD,
electromagnetic interference,
etc.).
NOISE
The following noise results from variations in field strength, such as fading
noise and multi-path noise, or
external noise from trains and other sources. I ...
Unit disassembly and assembly
DOOR MIRROR
Exploded View
Door mirror glass
Actuator assembly
Door mirror assembly
Disassembly
Turn the door mirror glass surface upward.
Pull from the bottom to disengage lower clips
Lift to disengage the upper mirror hooks (A).
Disconnect the harness connect ...
Cowl top
Exploded View
Cowl top side trim cover (RH)
Cowl top grille
Lower cowl top extension brace
Lower cowl top extension (RH)
Lower cowl top extension seal (RH)
Lower cowl top extension seal (LH)
Lower cowl top extension (LH)
Front wiper drive assembly
Cowl top side trim cover ...
Nissan Maxima Owners Manual
- Illustrated table of contents
- Safety-Seats, seat belts and supplemental restraint system
- Instruments and controls
- Pre-driving checks and adjustments
- Monitor, climate, audio, phone and voice recognition systems
- Starting and driving
- In case of emergency
- Appearance and care
- Do-it-yourself
- Maintenance and schedules
- Technical and consumer information
Nissan Maxima Service and Repair Manual

0.0065