
Nissan Maxima Service and Repair Manual: P0840 transmission fluid pressure SEN/SW A
The secondary pressure sensor detects secondary pressure of CVT and sends a signal to the TCM.
DTC Logic
DTC DETECTION LOGIC

DTC CONFIRMATION PROCEDURE
NOTE: Immediately after performing any "DTC CONFIRMATION PROCEDURE", always turn ignition switch OFF.
Then wait at least 10 seconds before performing the next test.
1.CHECK DTC DETECTION
 With CONSULT
- Turn ignition switch ON.
- Select "Data Monitor" in "TRANSMISSION".
- Check that output voltage of CVT fluid temperature sensor is within the range below.
ATF TEMP SEN : 1.0 - 2.0 V
If it is out of range, drive the vehicle to decrease the voltage (warm up the fluid) or stop engine to increase the voltage (cool down the fluid)
4. Start engine and wait for at least 5 consecutive seconds.
 With GST
Follow the procedure "With CONSULT".
Diagnosis Procedure
Regarding Wiring Diagram information, refer to TM-126, "Wiring Diagram".
1.CHECK INPUT SIGNAL
- Start engine.
- Check voltage between TCM connector terminal and ground.

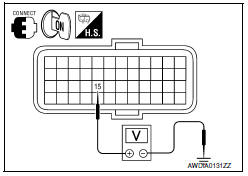
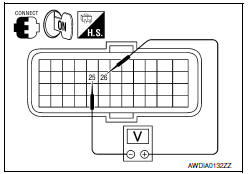
2.CHECK POWER AND SENSOR GROUND
Check voltage between TCM terminals.

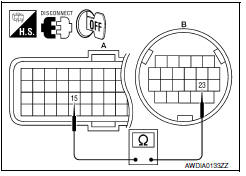
3.CHECK HARNESS BETWEEN TCM AND CVT UNIT (SECONDARY PRESSURE SENSOR) (PART 1)
- Turn ignition switch OFF.
- Disconnect TCM connector and CVT unit connector.
- Check continuity between TCM vehicle side harness connector terminal and CVT unit vehicle side harness connector terminal.

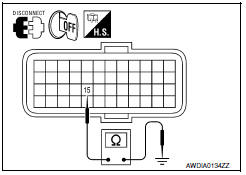
4.CHECK HARNESS BETWEEN TCM AND CVT UNIT (SECONDARY PRESSURE SENSOR) (PART 2)
Check continuity between TCM vehicle side harness connector terminal and ground.

5.CHECK HARNESS BETWEEN TCM AND CVT UNIT (SENSOR POWER AND SENSOR GROUND) (PART 1)
- Turn ignition switch OFF.
- Disconnect TCM connector and CVT unit connector.
- Check continuity between TCM vehicle side harness connector terminals and CVT unit vehicle side harness connector terminals.
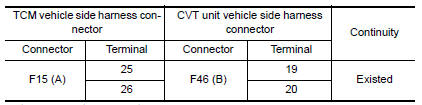
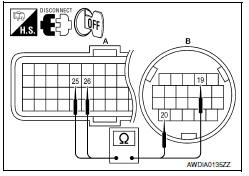
6.CHECK HARNESS BETWEEN TCM AND CVT UNIT (SENSOR POWER AND SENSOR GROUND) (PART 2)
Check continuity between TCM vehicle side harness connector terminals and ground.
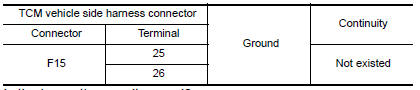
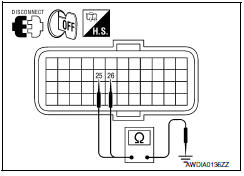
7.CHECK TCM
- Replace with the same type of TCM. Refer to TM-168, "Exploded View".
- Connect each connector.
- Perform "DTC CONFIRMATION PROCEDURE". Refer to TM-85, "DTC Logic".
8.DETECT MALFUNCTIONING ITEMS
Check TCM connector pin terminals for damage or loose connection with harness connector.
 P0826 up and down shift SW
Description
Manual mode switch transmits signals (manual mode, not manual mode, shift up
and shift down) to combination
meter.
Paddle shifter transmits signals (shift up and shift down) to combi ...
 P0841 transmission fluid pressure SEN/SW A
Description
Using the engine load (throttle position), the primary pulley revolution
speed, and the secondary pulley revolution
speed as input signals, TCM changes the operating pressure of the p ...
Other materials:
Power supply and ground circuit
AUDIO UNIT
AUDIO UNIT : Diagnosis Procedure
1.CHECK FUSES
2.POWER SUPPLY CIRCUIT CHECK
Disconnect audio unit connector M132.
Check voltage between the audio unit connector M132 and ground.
3.GROUND CIRCUIT CHECK
Inspect audio unit case ground.
DISPLAY UNIT
DISPLAY UNIT : Dia ...
Optical sensor
Description
The optical sensor converts the outside brightness (lux) to voltage and
transmits the optical sensor signal to the BCM.
Component Function Check
1.CHECK OPTICAL SENSOR SIGNAL BY CONSULT
CONSULT
Turn the ignition switch ON.
Select "OPTICAL SENSOR" of BCM (HEAD LAMP ...
B2110 transmission range switch
Description
IPDM E/R confirms the shift position with the following
signals.
Transmission range switch
Shift position signal from BCM (CAN)
DTC Logic
DTC DETECTION LOGIC
NOTE:
If DTC B2110 is displayed with DTC
U1000, first perform the trouble diagnosi ...
Nissan Maxima Owners Manual
- Illustrated table of contents
- Safety-Seats, seat belts and supplemental restraint system
- Instruments and controls
- Pre-driving checks and adjustments
- Monitor, climate, audio, phone and voice recognition systems
- Starting and driving
- In case of emergency
- Appearance and care
- Do-it-yourself
- Maintenance and schedules
- Technical and consumer information
Nissan Maxima Service and Repair Manual

0.0087