
Nissan Maxima Service and Repair Manual: TPMS
System Diagram
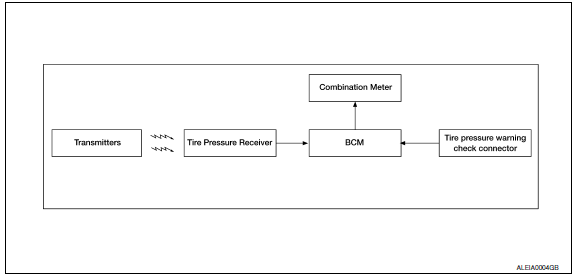
System Description
DESCRIPTION
During driving, the tire pressure monitoring system receives the signal transmitted from the transmitter installed in each wheel, and turns on the low tire pressure warning lamp when the tire pressure becomes low.
The control unit (BCM) for this system has pressure judgement and self-diagnosis functions.
FUNCTION
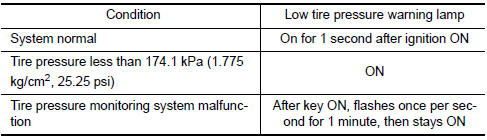
When the tire pressure monitoring system detects low inflation pressure or an internal malfunction, the low tire pressure warning lamp in the combination meter comes on. The malfunction is indicated by the low tire pressure warning lamp flashing.
BODY CONTROL MODULE (BCM)
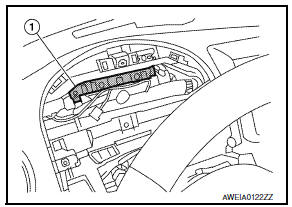
The BCM (1) is shown with the combination meter removed. The BCM reads the air pressure signal received by the tire pressure receiver, and controls the low tire pressure warning lamp as shown below. It also has a self-diagnosis function to detect a system malfunction.
TRANSMITTER
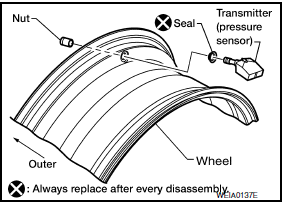
A sensor-transmitter integrated with a valve is installed in each wheel. It transmits a detected air pressure signal in the form of a radio wave when the vehicle is moving. The radio signal is received by the tire pressure receiver.
TIRE PRESSURE RECEIVER
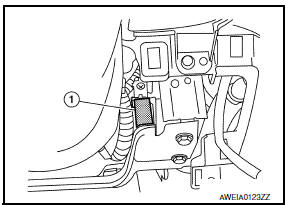
The tire pressure receiver (1) is located on the RH side of the steering column, and is shown with the lower instrument panel LH removed. The tire pressure receiver receives the air pressure signal transmitted by the transmitter in each wheel.
COMBINATION METER
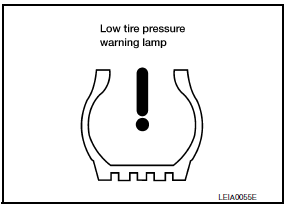
The combination meter receives tire pressure status from the BCM using CAN communication. When a low tire pressure condition is sensed by the BCM, the combination meter low tire pressure warning lamp is activated. A CHECK TIRE PRESSURE warning message will also be displayed in the vehicle information display. Refer to the Owner's Manual for additional information.
TIRE PRESSURE WARNING CHECK CONNECTOR
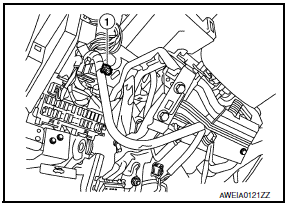
The tire pressure warning check connector can be grounded in order to initiate self-diagnosis without a CONSULT. Refer to WT-44, "Self- Diagnosis (Without CONSULT)". The tire pressure warning check connector (1) is located behind the lower portion of the instrument panel LH, above the hood release handle.
System Components
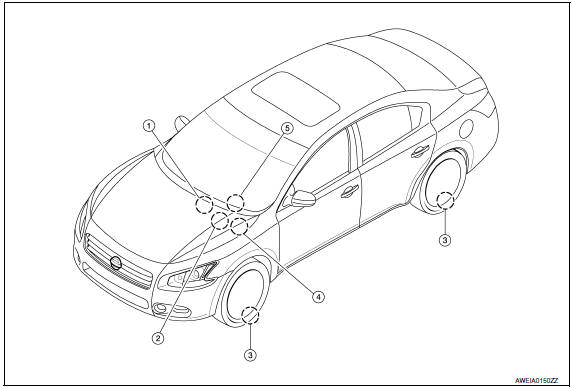
- Tire pressure receiver M70
- BCM M16, M17, M18, M19
- Transmitters
- Tire pressure warning check connector M62
- Combination meter M24

 Diagnosis system (BCM)
CONSULT Function (BCM - COMMON ITEM)
APPLICATION ITEM
CONSULT performs the following functions via CAN communication with BCM.
SYSTEM APPLICATION
BCM can perform the following functions.
CONS ...
Other materials:
Front door finisher
Exploded View
Mirror cover
Front door finisher
Step lamp
Arm rest finisher
Main power window and door lock/ unlock switch finisher
Front door grip cover
Seat memory switch (if equipped)
Inside release handle escutcheon
Inside release handle
Flat head screws
&nbs ...
Headlamp aiming adjustment
Description
PREPARATION BEFORE ADJUSTING
CAUTION: Do not use organic solvent
(thinner, gasoline etc.)
NOTE:
For details, refer to the regulations in your own country.
Perform aiming adjustment if the vehicle front body has been
repaired and/or the front combination lamp assembly has be ...
Seat belts
The seat belts can be cleaned by wiping them
with a sponge dampened in a mild soap solution.
Allow the belts to dry completely in the shade
before using them. For additional information,
refer to "Seat belt maintenance" in the "Safety-
-Seats, seat belts and supplemental restraint
system" se ...
Nissan Maxima Owners Manual
- Illustrated table of contents
- Safety-Seats, seat belts and supplemental restraint system
- Instruments and controls
- Pre-driving checks and adjustments
- Monitor, climate, audio, phone and voice recognition systems
- Starting and driving
- In case of emergency
- Appearance and care
- Do-it-yourself
- Maintenance and schedules
- Technical and consumer information
Nissan Maxima Service and Repair Manual

0.01