Nissan Maxima Service and Repair Manual: Front seat belt
Exploded View
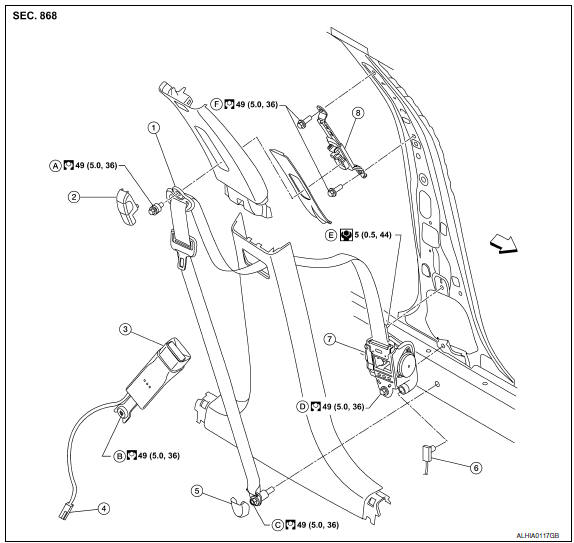
- D-ring anchor
- Adjustable upper anchor cover
- Seat belt buckle
- Seat belt buckle connector
- Lower anchor bolt cover
- Seat belt pre-tensioner connector
- Seat belt retractor assembly
- Adjustable upper anchor
- D-ring anchor bolt
- Seat belt buckle anchor bolt
- Lower anchor bolt
- Seat belt retractor anchor bolt
- Seat belt retractor screw
- Adjustable upper anchor bolt
 Front
Front
Removal and Installation
REMOVAL OF SEAT BELT RETRACTOR
CAUTION: Before servicing SRS, turn the ignition switch off, disconnect both negative and positive battery terminals, then wait at least 3 minutes.
- Disconnect both negative and positive battery terminals, then wait at least 3 minutes. Refer to PG-67, "Removal and Installation (Battery)".
- Release the pawl, then remove lower anchor bolt cover and lower anchor bolt.
- Remove center pillar lower finisher. Refer to INT-23, "Exploded View".
- Remove D-ring anchor bolt from adjustable upper anchor.
- Remove seat belt retractor assembly.
- Disconnect the harness connector from the seat belt pre-tensioner.
CAUTION:
- For installing/removing seat belt pre-tensioner harness connector, insert a thin screwdriver wrapped with tape into the notch; lift locking tab then remove connector.
- Install connector with lock raised, then push locking tab into connector.
- Remove seat belt retractor screw and anchor bolt, then remove seat belt retractor assembly from center pillar.
INSTALLATION OF SEAT BELT RETRACTOR
Installation is in the reverse order of removal.
- Always perform an inspection after repair to be sure the system is functioning within specifications. Refer to SB-3, "Inspection".
REMOVAL OF SEAT BELT BUCKLE
CAUTION: Before servicing SRS, turn the ignition switch off, disconnect both negative and positive battery terminals, then wait at least 3 minutes.
- Disconnect both negative and positive battery terminals, then wait at least 3 minutes. Refer to PG-67, "Removal and Installation (Battery)".
- Remove the front seat from the vehicle. Refer to SE-68, "Removal and Installation" (WITH CLIMATE CONTROL), or SE-126, "Removal and Installation" (W/O CLIMATE CONTROL).
- Disconnect the harness connector (3) from the seat belt buckle, then release harness clip from the seat rail.
- Remove seat belt buckle anchor bolt (1), then remove seat belt buckle (2) from front seat.
INSTALLATION OF SEAT BELT BUCKLE
Installation is in the reverse order of removal.
- Always perform an inspection after repair to be sure the system is functioning within specifications. Refer to SB-3, "Inspection".

 Rear seat belt
Exploded View
Seat belt retractor assembly (RH)
Seat belt buckle (RH)
Seat belt buckle center
Seat belt buckle (LH)
Seat belt retractor assembly center
Seat belt retractor assembly ...
Other materials:
Precaution
Precaution for Supplemental Restraint System (SRS) "AIR BAG" and "SEAT
BELT
PRE-TENSIONER"
The Supplemental Restraint System such as "AIR BAG" and "SEAT BELT PRE-TENSIONER",
used along
with a front seat belt, helps to reduce the risk or severity of injury to the
driver ...
ECU diagnosis information
ABS ACTUATOR AND ELECTRIC UNIT (CONTROL UNIT)
Reference Value
VALUES ON THE DIAGNOSIS TOOL
CAUTION:
The display shows the control unit calculation data, so a normal value might be
displayed even in the
event the output circuit (harness) is open or short-circuited.
Note 1: C ...
B260A ignition relay
Description
BCM turns ON the following relays to ignition power supply to each ECU when
the ignition switch is turned
ON.
Ignition relay-1 (inside IPDM E/R)
Ignition relay-2 (inside fuse block (J/B))
Front blower motor relay
BCM checks any ignition relay ON request for consistency wi ...
Nissan Maxima Owners Manual
- Illustrated table of contents
- Safety-Seats, seat belts and supplemental restraint system
- Instruments and controls
- Pre-driving checks and adjustments
- Monitor, climate, audio, phone and voice recognition systems
- Starting and driving
- In case of emergency
- Appearance and care
- Do-it-yourself
- Maintenance and schedules
- Technical and consumer information
Nissan Maxima Service and Repair Manual

0.0056