Nissan Maxima Service and Repair Manual: Rear seat belt
Exploded View
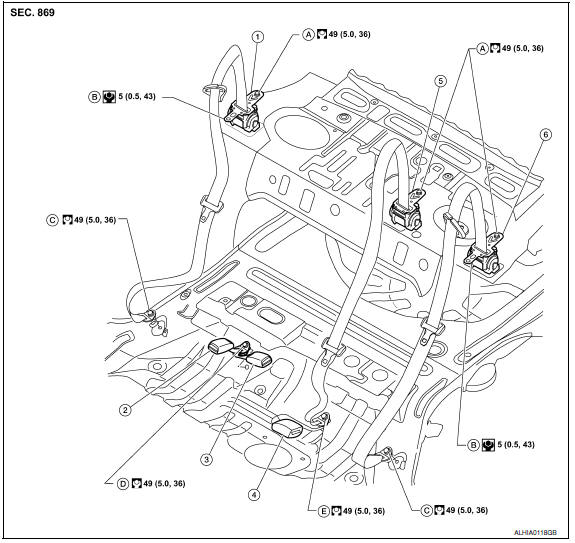
- Seat belt retractor assembly (RH)
- Seat belt buckle (RH)
- Seat belt buckle center
- Seat belt buckle (LH)
- Seat belt retractor assembly center
- Seat belt retractor assembly (LH)
- Retractor anchor bolt
- Retractor anti-rotation screw
- Lower anchor bolt outer
- Seat belt buckle anchor bolt
- Lower anchor bolt center
Removal and Installation
REMOVAL OF SEAT BELT RETRACTOR - OUTER
- Remove the rear seat cushion. Refer to SE-128, "Exploded View - Fixed Seatback" (with fixed seatback, W/O CLIMATE CONTROLLED SEATS), or SE-130, "Exploded View - 60:40 Split Seatback" (with split seatback, W/O CLIMATE CONTROL CONTROLLED SEATS), or SE-70, "Exploded View - Fixed Seatback" (with fixed seatback, WITH CLIMATE CONTROLLED SEATS) SE-72, "Exploded View - 60:40 Split Seatback" (with split seatback, WITH CLIMATE CONTROLLED SEATS).
- Remove the lower anchor bolt outer.
- Lower the rear seatback assembly.
- Remove the rear parcel shelf finisher.
- Remove retractor anchor bolt and retractor anti-rotation screw, then remove seat belt retractor assembly (LH/RH).
INSTALLATION OF SEAT BELT RETRACTOR - OUTER
Installation is in the reverse order of removal.
- Always perform an inspection after repair to be sure the system in functioning within specifications. Refer to SB-3, "Inspection".
REMOVAL OF SEAT BELT RETRACTOR - CENTER
- Remove the rear seat cushion. Refer to SE-128, "Removal and Installation" (W/O CLIMATE CONTROL - BUCKET SEAT), or SE-131, "Removal and Installation" (W/O CLIMATE CONTROL - BENCH SEAT), or SE-70, "Removal and Installation" (WITH CLIMATE CONTROL - BUCKET SEAT).
- Remove the lower anchor bolt center.
- Lower the rear seatback assembly.
- Remove the rear parcel shelf finisher. Refer to INT-28, "Removal and Installation".
- Remove retractor anchor bolt, then remove seat belt retractor assembly center.
INSTALLATION OF SEAT BELT RETRACTOR - CENTER
Installation is in the reverse order of removal.
- Always perform an inspection after repair to be sure the system in functioning within specifications. Refer to SB-3, "Inspection".
REMOVAL OF SEAT BELT BUCKLE
- Remove the rear seat cushion. Refer to SE-128, "Removal and Installation" (with fixed seatback, W/O CLIMATE CONTROLLED SEATS), or SE-131, "Removal and Installation" (with split seatback, W/O CLIMATE CONTROL CONTROLLED SEATS), or SE-70, "Removal and Installation" (with fixed seatback, WITH CLIMATE CONTROLLED SEATS) SE-73, "Removal and Installation" (with split seatback, WITH CLIMATE CONTROLLED SEATS).
- Remove seat belt buckle anchor bolt, then remove the seat belt buckle. Refer to SB-8, "Exploded View".
INSTALLATION OF SEAT BELT BUCKLE
Installation is in the reverse order of removal.
- Always perform an inspection after repair to be sure the system is functioning within specifications. R
 Front seat belt
Exploded View
D-ring anchor
Adjustable upper anchor cover
Seat belt buckle
Seat belt buckle connector
Lower anchor bolt cover
Seat belt pre-tensioner connector
Seat belt retracto ...
 Latch system for children
Removal and Installation
NOTE: The LATCH (Lower Anchors and Tether for
Children) system is a built-in part of the vehicle structure, and is not
servicable. : Front ...
Other materials:
Seat memory indicator lamp
Description
Memory switch is equipped on the seat memory switch installed to the
driver side door trim. The operation signal is input to the driver seat
control unit when the memory switch is operated.
The status of automatic drive positioner system can be checked according
to the ill ...
Power supply and ground circuit
BCM
BCM : Diagnosis Procedure
Regarding Wiring Diagram information, refer to BCS-67, "Wiring Diagram".
1. CHECK FUSE AND FUSIBLE LINK
Check if the following BCM fuses or fusible link are blown.
Is the fuse or fusible link blown?
2. CHECK POWER SUPPLY CIRCUIT
Turn ignition switch OFF.
...
Precaution
Precaution for Supplemental Restraint System (SRS) "AIR BAG" and
"SEAT BELT PRE-TENSIONER"
The Supplemental Restraint System such as "AIR BAG" and "SEAT BELT
PRE-TENSIONER", used along with a front seat belt, helps to reduce the risk
or severity of injury to the driver and front passenger for ...
Nissan Maxima Owners Manual
- Illustrated table of contents
- Safety-Seats, seat belts and supplemental restraint system
- Instruments and controls
- Pre-driving checks and adjustments
- Monitor, climate, audio, phone and voice recognition systems
- Starting and driving
- In case of emergency
- Appearance and care
- Do-it-yourself
- Maintenance and schedules
- Technical and consumer information
Nissan Maxima Service and Repair Manual

0.0169