Nissan Maxima Service and Repair Manual: Condenser
CONDENSER
CONDENSER : Removal and Installation
REMOVAL
- Discharge the refrigerant. Refer to HA-28, "Recycle Refrigerant".
- Remove the RH hoodledge cover.
- Remove the front bumper fascia. Refer to EXT-16, "Removal and Installation".
- Disconnect the high-pressure pipe from the condenser pipe assembly.
CAUTION: Cap or wrap the joint of the pipe with suitable material such as vinyl tape to avoid the entry of air.
- Disconnect the high-pressure flexible hose from the condenser pipe assembly.
- Disconnect the harness connector from the refrigerant pressure sensor.
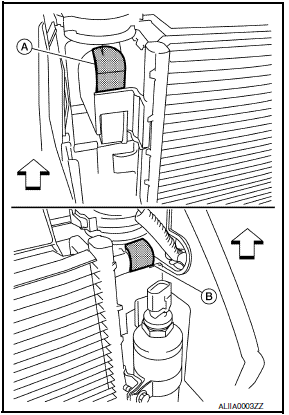
- Depress the top RH clip (A) and the top LH clip (B) to release the top condenser brackets as shown.
- Slide the condenser up to release the condenser from the clips.
- Remove the condenser and liquid tank assembly.
CAUTION:
- Do not damage the condenser fins
INSTALLATION
Installation is in the reverse order of removal.
CAUTION:
- Do not damage the condenser fins.
- Do not reuse O-rings.
- Apply A/C oil to the new O-rings for installation.
- After charging refrigerant, check for leaks. Refer to HA-26, "Leak Test".
CONDENSER PIPE ASSEMBLY
CONDENSER PIPE ASSEMBLY : Removal and Installation
The condenser pipe assembly is serviced with the condenser and liquid tank assembly. Refer to HA-45, "CONDENSER : Removal and Installation".
REFRIGERANT PRESSURE SENSOR
REFRIGERANT PRESSURE SENSOR : Removal and Installation
REMOVAL
- Discharge the refrigerant. Refer to HA-28, "Recycle Refrigerant".
- Remove the core support upper cover.
- Disconnect the harness connector from the refrigerant pressure sensor.
- Remove the refrigerant pressure sensor.
CAUTION: Cap or wrap the opening of the refrigerant pressure sensor with suitable material such as vinyl tape to avoid the entry of air.
INSTALLATION
Installation is in the reverse order of removal.
CAUTION:
- Do not reuse O-ring.
- Apply A/C oil to the O-ring of the refrigerant pressure sensor for installation.
- After charging refrigerant, check for leaks. Refer to HA-26, "Leak Test".
 Cooler pipe and hose
Exploded View
Heater and cooling unit assembly
High-pressure pipe
High-pressure A/C service valve
High-pressure flexible hose
Air deflector (RH)
Junction pipe
Condenser
Liquid ...
 Heater & cooling unit assembly
Exploded View
Wiring harness
Mode door motor
Upper floor connecting duct (LH)
Air mix door motor (driver side)
Heater core pipes cover
Heater core
In-cabin microfilter
Filter c ...
Other materials:
Lifting sensor (rear)
Description
The lifting sensor (rear) is installed to the seat frame.
The pulse signal is input to the driver seat control unit when the
lifting (rear) is operated.
The driver seat control unit counts the pulse and calculates the lifting
(rear) amount of the seat.
Component Function ...
Booster seat installation
WARNING
To avoid injury to child, do not use the
lap/shoulder belt in the Automatic Locking
Retractor (ALR) mode when using a
booster seat with the seat belts.
For additional information, refer to all Warnings
and Cautions in the "Child safety," "Child restraint"
and "Booster seats" sections ...
Answer back horn feature
If desired, the answer back horn feature can be
deactivated using the Intelligent Key. When it is
deactivated and the LOCK
button is
pushed, the hazard indicator lights flash twice.
When the UNLOCK button is pushed,
neither
the hazard indicator lights nor the horn operates.
NO ...
Nissan Maxima Owners Manual
- Illustrated table of contents
- Safety-Seats, seat belts and supplemental restraint system
- Instruments and controls
- Pre-driving checks and adjustments
- Monitor, climate, audio, phone and voice recognition systems
- Starting and driving
- In case of emergency
- Appearance and care
- Do-it-yourself
- Maintenance and schedules
- Technical and consumer information
Nissan Maxima Service and Repair Manual

0.0171