Nissan Maxima Service and Repair Manual: Door outside molding
Exploded View
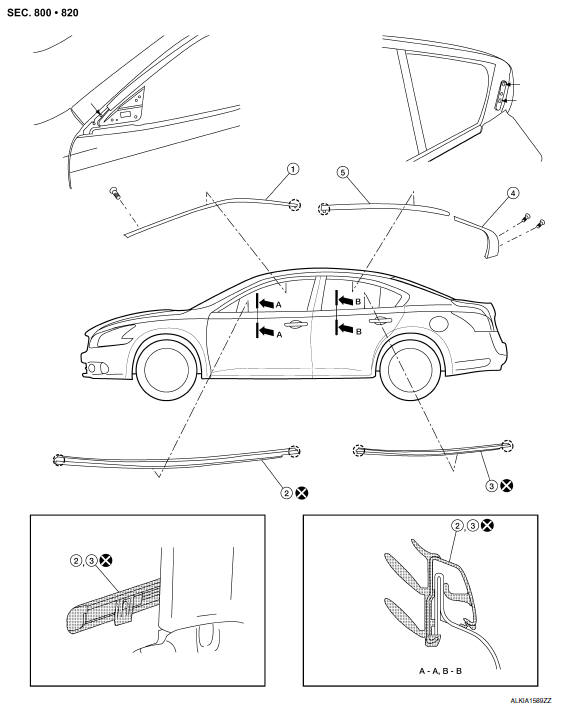
- Front door sash molding
- Front door outside molding
- Rear door outside molding
- Rear door sash molding (lower)
- Rear door sash molding (upper)
 Pawl
Pawl
Removal and Installation
FRONT DOOR OUTSIDE MOLDING
Removal
- Open the front door window fully.
- Remove the side view mirror. Refer to MIR-19, "Removal and Installation".
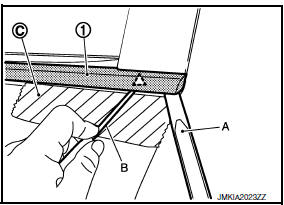
- Using a suitable trim tool (A), lift front door outside molding
(1) enough to carefully insert a suitable release tool (B) beneath.
 : Clip
CAUTION: Apply protection tape (C) around entire work area. - Release the clip from rear of front door panel flange.
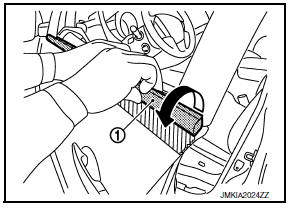
- Lift and twist front door outside molding (1) upward, then out from door panel flange.
- Release the clip from the front of door panel flange. CAUTION: Use care not to damage body surfaces.
- Remove front door outside molding.
Installation
Installation is in the reverse order of removal.
REAR DOOR OUTSIDE MOLDING
Removal
- Open the rear door window fully.
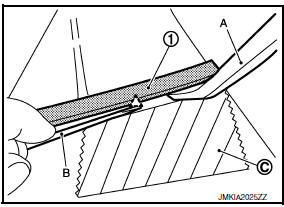
- Using a suitable trim tool (A), lift rear door outside molding (1)
enough to carefully insert a suitable release tool (B) beneath.
 : Clip CAUTION:
Apply protection tape (C) around entire work area.
: Clip CAUTION:
Apply protection tape (C) around entire work area. - Release the clip from the rear of door panel flange.
- Lift and twist rear door outside molding (1) up, then outward from door panel flange
- Release the clip from the front of door panel flange. CAUTION: Use care not to damage body surfaces.
- Remove rear door outside molding.
Installation
Installation is in the reverse order of removal.
FRONT DOOR SASH MOLDING
Removal
- Open the front door window fully.
- Remove front edge of front door weatherstrip, then remove front door sash molding screw.
- Using a suitable tool, beginning at the front edge, release the front door sash molding working rearward.
- Release the front door sash molding rear clip, then remove molding.
Installation is in the reverse order of removal.
REAR DOOR SASH MOLDING
Removal
- Open the rear door window fully.
- Release the upper half of rear door weatherstrip.
- Release the rear door sash molding (upper) front clip, then pull molding forward in vehicle to disengage from rear door sash molding (lower).
- Remove the rear door sash molding (lower) screws, then with a suitable tool release the adhesive tape.
- Remove rear door sash molding (lower) from rear door.
Installation
Installation is in the reverse order of removal.
 Mudguard
Exploded View
Mudguard
Clip C205
Clip CF118
Front
Removal and Installation
REMOVAL
Remove the clips located on the underbody.
Remove the center mudguard front and rear screws ...
 Roof side molding
Exploded View
Roof side molding
Roof panel
Body side panel
Roof side molding clip
Removal and Installation
REMOVAL
Using suitable tool, lift and twist the roof side molding ...
Other materials:
Condenser
CONDENSER
CONDENSER : Removal and Installation
REMOVAL
Discharge the refrigerant. Refer to HA-28, "Recycle Refrigerant".
Remove the RH hoodledge cover.
Remove the front bumper fascia. Refer to EXT-16, "Removal and
Installation".
Disconnect the high-pressure pipe from the condenser pip ...
Center speaker
Removal and Installation
REMOVAL
Remove the center speaker grille, using a suitable tool.
Remove the center speaker screws (A).
Pull out the center speaker (1), disconnect the harness connector
from the center speaker and remove.
INSTALLATION
Installation is in the reverse order of ...
Symptom diagnosis
SQUEAK AND RATTLE TROUBLE DIAGNOSES
Work Flow
CUSTOMER INTERVIEW
Interview the customer if possible, to determine the conditions that exist
when the noise occurs. Use the Diagnostic Worksheet during the interview to
document the facts and conditions when the noise occurs and any customer' ...
Nissan Maxima Owners Manual
- Illustrated table of contents
- Safety-Seats, seat belts and supplemental restraint system
- Instruments and controls
- Pre-driving checks and adjustments
- Monitor, climate, audio, phone and voice recognition systems
- Starting and driving
- In case of emergency
- Appearance and care
- Do-it-yourself
- Maintenance and schedules
- Technical and consumer information
Nissan Maxima Service and Repair Manual

0.007