Nissan Maxima Service and Repair Manual: Roof side molding
Exploded View
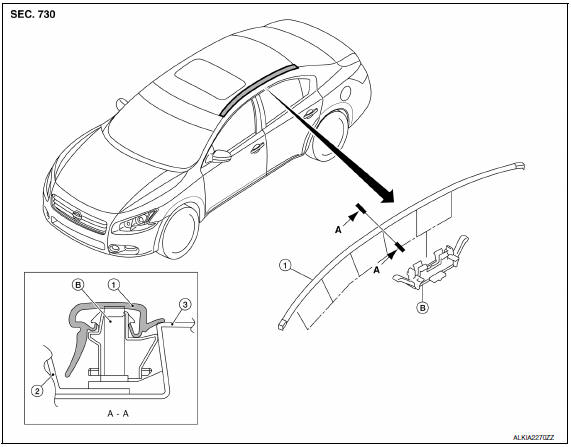
- Roof side molding
- Roof panel
- Body side panel
- Roof side molding clip
Removal and Installation
REMOVAL
- Using suitable tool, lift and twist the roof side molding up from the rear edge, working forward.
- Disengage each roof side molding clip, then remove the roof side molding.
INSTALLATION
Installation is in the reverse order of removal.
- Begin with aligning rear end of the roof molding with top edge of rear window glass molding. Refer to GW- 14, "Removal and Installation".
Clip Replacement
REMOVAL
- Remove roof side molding.
- Heat adhesive tape interface using a suitable tool (heat gun), then peel roof side molding clips (body side) using long-nose pliers.
CAUTION: Be careful not to damage the body.
INSTALLATION
- Clean tape removed surface with a shop cloth soaked in white gasoline or IPA.
- Use two-part epoxy adhesive.
Adhesive : 3M-weld DP-100 or equivalent
- Apply adhesive evenly to clip tape surface.
Thickness : Approximately 0.5 mm (0.020 in)
- Position applied parts to the proper location, and then sufficiently press-fit until the adhesive protrudes to tape side.
Press-fit limit : 19.6 N× 2 seconds
- Tape clips after press fit, and temporarily hold it for specified time based on the following.
5 to 10C (41 to 50F) : 1 hour or more
11 to 23C (52 to 73F) : 30
minutes or more
24C or more (75F or more) : 15 minutes or more
Install roof side molding rear edge first, working toward front after temporarily holding.
CAUTION:
- Securely insert molding rear end cap onto roof rear end cutout (installation standard).
- When installing roof side molding, check that molding fastener is securely inserted and then press in.
- Do not wash the vehicle within 24 hours after repair.
 Door outside molding
Exploded View
Front door sash molding
Front door outside molding
Rear door outside molding
Rear door sash molding (lower)
Rear door sash molding (upper)
Pawl
Removal and Insta ...
 License lamp finisher
Exploded View
License lamp finisher
Trunk request switch connector
Grommet Clip
Removal and Installat
REMOVAL
Remove the trunk lid finisher. Refer to INT-36, "Removal and
I ...
Other materials:
P0117, P0118 ECT sensor
Description
The engine coolant temperature sensor is used to detect the engine
coolant temperature. The sensor modifies a voltage signal from the
ECM. The modified signal returns to the ECM as the engine coolant
temperature input. The sensor uses a thermistor which is sensitive to
the c ...
Air mix door control system
System Diagram
System Description
The air mix doors are automatically controlled so that in-vehicle temperature
is maintained at a predetermined
value by the temperature setting, ambient temperature, intake temperature and
amount of sunload.
SYSTEM OPERATION
The A/C auto amp. receiv ...
Moonroof (if so equipped)
Power moonroo
The moonroof will only operate when the ignition
switch is placed in the ON position. The power
moonroof is operational for a period of time, even
if the ignition switch is placed in the ACC or OFF
position. If the driver's door or the front passenger's
door is opened during ...
Nissan Maxima Owners Manual
- Illustrated table of contents
- Safety-Seats, seat belts and supplemental restraint system
- Instruments and controls
- Pre-driving checks and adjustments
- Monitor, climate, audio, phone and voice recognition systems
- Starting and driving
- In case of emergency
- Appearance and care
- Do-it-yourself
- Maintenance and schedules
- Technical and consumer information
Nissan Maxima Service and Repair Manual

0.0065