
Nissan Maxima Service and Repair Manual: Fuel filler cap warning system
System Diagram
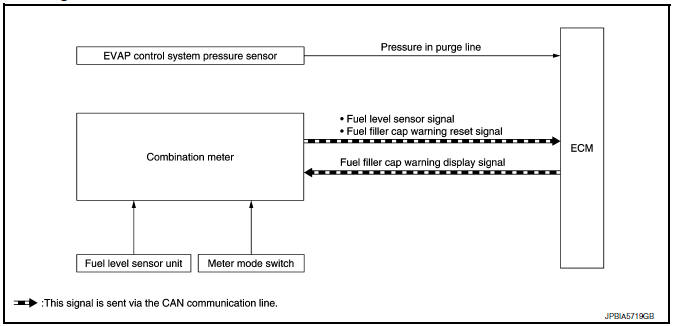
System Description
INPUT/OUTPUT SIGNAL CHART
Input

*: This signal is sent to the ECM via the CAN communication line.
Output

*: This signal is sent to the combination meter via the CAN communication line.
SYSTEM DESCRIPTION
The fuel filler cap warning system alerts the driver to the prevention of the fuel filler being left uncapped and malfunction occurrences after refueling, by turning ON the fuel filler cap warning display on the combination meter.
ECM judges a refueled state, based on a fuel level signal transmitted from the combination meter.
When a very small leak is detected through the EVAP leak diagnosis performed after judging the refueled state, ECM transmits a fuel filler cap warning display signal (request for display ON) to the combination meter via CAN communication.
When receiving the signal, the combination meter turns ON the fuel filler cap warning display.
CAUTION: Check fuel filler cap installation condition when the fuel filler cap warning display turns ON.
Reset Operation
The fuel filler cap warning lamp tunes OFF, according to any condition listed below:
- Reset operation is performed by operating the meter mode switch on the combination meter.
- When the reset operation is performed, the combination meter transmits a fuel filler cap warning reset signal to ECM via CAN communication. ECM transmits a fuel filler cap warning display signal (request for display OFF) to the combination meter via CAN communication. When receiving the signal, the combination meter turns OFF the fuel filler cap warning display.
- EVAP leak diagnosis result is normal.
- Fuel refilled.
- DTC erased by using CONSULT-III.
NOTE: MIL turns ON if a malfunction is detected in leak diagnosis results again at the trip after the fuel filler cap warning display turns ON/OFF.
 Variable induction air system
System Diagram
System Description
INPUT/OUTPUT SIGNAL CHART
*: ECM determines the start signal status by the signals of engine speed and
battery voltage.
SYSTEM DESCRIPTION
In the m ...
 On board diagnostic (OBD) system
Diagnosis Description
This system is an on board diagnostic system that records exhaust
emission-related diagnostic information
and detects a sensors/actuator-related malfunction. A malfunction i ...
Other materials:
Low tire pressure warning lamp blinks
Low Tire Pressure Warning Lamp Flashes When Ignition Switch Is Turned
On
NOTE: If low tire pressure warning lamp flashes as
shown, the system is normal.
Flash Mode A
This mode shows transmitter status is OFF-mode.Carry out
transmitter wake up operation.
DIAGNOSTIC PROCEDURE ...
Auto light system
Wiring Diagram
...
Checking lights
Anti-lock Braking System (ABS)
warning light
Brake warning light (parking brake)
Brake warning light
Charge warning light
Engine oil pressure warning light
Forward Emergency Braking (FEB) system warning
light (if so eq ...
Nissan Maxima Owners Manual
- Illustrated table of contents
- Safety-Seats, seat belts and supplemental restraint system
- Instruments and controls
- Pre-driving checks and adjustments
- Monitor, climate, audio, phone and voice recognition systems
- Starting and driving
- In case of emergency
- Appearance and care
- Do-it-yourself
- Maintenance and schedules
- Technical and consumer information
Nissan Maxima Service and Repair Manual

0.0104