
Nissan Maxima Service and Repair Manual: P0014, P0024 EVT control
DTC Logic
DTC DETECTION LOGIC
NOTE:
- If DTC P0014 or P0024 is displayed with DTC P0078, P0084 first perform trouble diagnosis for DTC P0078, P0084. Refer to EC-180, "DTC Logic".
- If DTC P0014 or P0024 is displayed with DTC P1078, P1084 first perform trouble diagnosis for DTC P1078, P1084
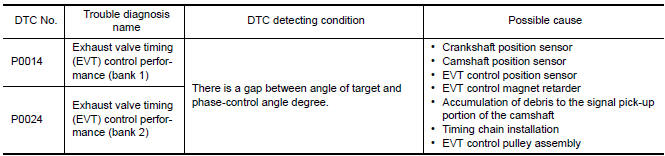
DTC CONFIRMATION PROCEDURE
1.PRECONDITIONING
If DTC Confirmation Procedure has been previously conducted, always perform the following procedure before conducting the next test.
- Turn ignition switch OFF and wait at least 10 seconds.
- Turn ignition switch ON
- Turn ignition switch OFF and wait at least 10 seconds.
TESTING CONDITION: Before performing the following procedure, confirm that battery voltage is between 10 V and 16 V at idle.
2.PERFORM DTC CONFIRMATION PROCEDURE-I
With CONSULT
- Turn ignition switch ON and select "DATA MONITOR" mode with CONSULT.
- Start engine and warm it up to the normal operating temperature.
- Maintain the following conditions for at least 6 consecutive seconds.Hold the accelerator pedal as steady as possible.

- Let engine idle for 10 seconds.
- Check 1st trip DTC.
With GST
Follow the procedure "With CONSULT" above.
3.PERFORM DTC CONFIRMATION PROCEDURE-II
With CONSULT
- Select "DATA MONITOR" mode with CONSULT.
- Maintain the following conditions for at least 20 consecutive seconds.
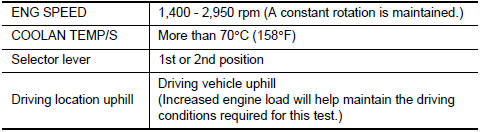
CAUTION: Always drive vehicle at a safe speed.
- Check 1st trip DTC.
With GST
Follow the procedure "With CONSULT" above.
Diagnosis Procedure
Regarding Wiring Diagram information, refer to EC-554, "Wiring Diagram".
1.CHECK FUNCTION OF EXHAUST VALVE TIMING (EVT) CONTROL
With CONSULT
- Turn ignition switch ON.
- Select "EXH V/T ASSIGN ANGLE" in "ACTIVE TEST" mode with CONSULT.
- Start engine and keep the engine speed at 2,500 rpm, then touch "START".
- Check that the values of "EXH/V TIM B1" and "EXH/V TIM B2" change when touching "UP" or "DOWN".
Without CONSULT
- Start engine and rev engine up above 1,500 rpm.
- Read the voltage signal between ECM harness connector terminals as per the following with an oscilloscope.
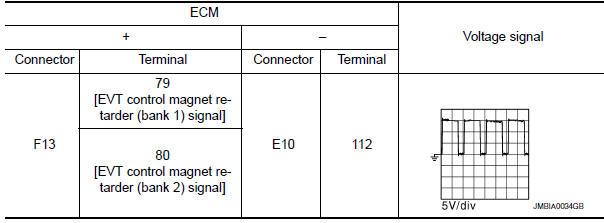
2.CHECK EVT CONTROL MAGNET RETARDER
3.REPLACE EVT CONTROL MAGNET RETARDER
- Replace malfunctioning EVT control magnet retarder.
4.CHECK EVT CONTROL POSITION SENSOR
5.CHECK CRANKSHAFT POSITION SENSOR
6.CHECK CAMSHAFT POSITION SENSOR
7.CHECK CAMSHAFT (EXH)
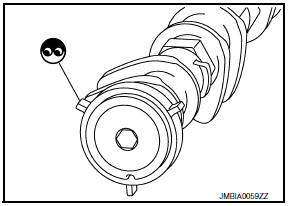
Check the following.
- Accumulation of debris to the signal plate of camshaft rear end
- Chipping signal plate of camshaft rear end
8.CHECK TIMING CHAIN INSTALLATION
Check service records for any recent repairs that may cause timing chain misalignment.
9.REPLACE EVT CONTROL PULLEY ASSEMBLY
- Replace camshaft sprocket (EXH) and EVT control magnet retarder.
10.CHECK INTERMITTENT INCIDENT
Component Inspection
1.CHECK EXHAUST VALVE TIMING CONTROL MAGNET RETARDER
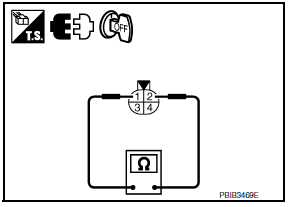
- Turn ignition switch OFF.
- Disconnect exhaust valve timing control magnet retarder harness connector
- Check resistance between exhaust valve timing control magnet retarder terminals as per the following.

2.REPLACE EXHAUST VALVE TIMING CONTROL MAGNET RETARDER
- Replace malfunctioning exhaust valve timing control magnet retarder
 P0011, P0021 IVT control
DTC Logic
DTC DETECTION LOGIC
NOTE:
If DTC P0011 or P0021 is displayed with DTC P0075, P0081, first perform the
trouble diagnosis for DTC
P0075, P0081.
DTC CONFIRMATION PROCEDURE
1.PRECO ...
 P0031, P0032, P0051, P0052 A/F sensor 1 heater
Description
SYSTEM DESCRIPTION
The ECM performs ON/OFF duty control of the A/F sensor 1 heater corresponding
to the engine operating
condition to keep the temperature of A/F sensor 1 element ...
Other materials:
Heater and Air Conditioner (automatic)
Front defroster button
Temperature control dial (driver's side)/
AUTO button
Display screen
Temperature control dial (passenger's
side)/DUAL button
Fresh air intake button
Air recirculation button
(air conditioner) button
(manual air flow control)
button
(fan speed cont ...
Rear view camera
Removal and Installation
REMOVAL
Remove the license plate finisher. Refer to EXL-166, "Removal and
Installation".
Remove trunk lid finisher. Refer to INT-36, "Exploded View".
Disconnect the rear view camera connector (B), press the rear
view camera tab (A) and remo ...
Front door switch (driver side)
Description
Detects front door LH open/close condition.
Component Function Check
1. CHECK FUNCTION
Select "DOOR SW-FL" in "DATA MONITOR" mode with CONSULT.
Check the front door switch signal under the following conditions
Diagnosis Procedure
1. CHECK FRONT DOOR SWITCH LH CIRCUIT
...
Nissan Maxima Owners Manual
- Illustrated table of contents
- Safety-Seats, seat belts and supplemental restraint system
- Instruments and controls
- Pre-driving checks and adjustments
- Monitor, climate, audio, phone and voice recognition systems
- Starting and driving
- In case of emergency
- Appearance and care
- Do-it-yourself
- Maintenance and schedules
- Technical and consumer information
Nissan Maxima Service and Repair Manual

0.0138