Nissan Maxima Service and Repair Manual: Spiral cable
Removal and Installation
CAUTION:
- Before servicing, turn ignition switch OFF, disconnect both battery terminals and wait at least 3 minutes.
- Do not use air tools or electric tools for servicing.
- Do not disassemble the spiral cable.
- Do not allow oil, grease, detergent or water to come in contact with the spiral cable.
- With the steering linkage disconnected, the cable may snap by turning the steering wheel beyond the limited number of turns. The spiral cable can be turned counterclockwise about 2.5 turns from the neutral position.
- Do not cause impact to the spiral cable by dropping etc.
Replace the spiral cable if it has been dropped or sustained an impact.
REMOVAL
- Disconnect the negative and positive battery terminals, then wait at least 3 minutes. Refer to PG-67, "Removal and Installation (Battery)".
- Remove the steering wheel. Refer to ST-17, "Removal and Installation".
- Remove the column cover. Refer to IP-13, "Removal and Installation".
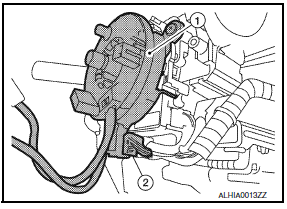
- Disconnect the harness connectors (2) from spiral cable (1).
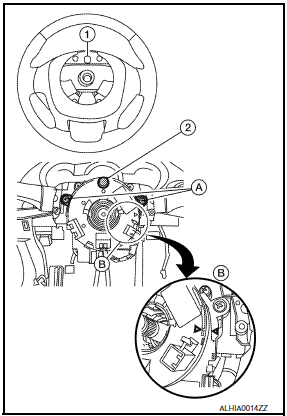
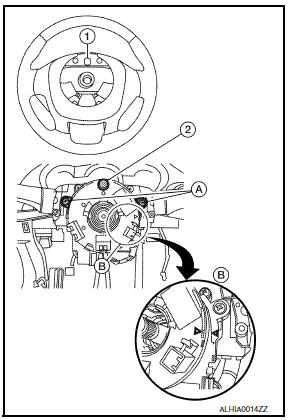
- Rotate the spiral cable slightly so that both the locating pin (2) is positioned at the top and aligned with the locating hole (1) of steering wheel, and the alignment marks (B) are directly across from each other.
- Remove the screws (A), then remove spiral cable from the steering column. CAUTION: Do not turn the spiral cable quickly or beyond the limit number of turns (approximately 2.5 turns from the neutral position), this may cause the cable to snap.
- Remove the steering angle sensor from the spiral cable. Refer to BRC-109, "Removal and Installation".
INSTALLATION
- Install the steering angle sensor to the spiral cable. Refer to BRC-109, "Removal and Installation".
- Set the spiral cable neutral position.
- Slowly turn the spiral cable clockwise to the end position.
- Next, turn it counterclockwise (about 2.5 turns) then stop turning at the point when the alignment arrows (B) are directly across from each other.
- Rotate the spiral cable slightly so the locating pin (2) is positioned at the top.
NOTE: A service part is installed in the neutral position with a stopper clip in place and should not be adjusted after the stopper clip is removed.
- Install the spiral cable in the reverse order of removal.
- Align the locating hole (1) at the top of the steering wheel with the locating pin (2) of spiral cable during installation.
- Install the spiral cable screws (A).
- Adjust the neutral position of the steering angle sensor. Refer to BRC-6, "ADJUSTMENT OF STEERING ANGLE SENSOR NEUTRAL POSITION : Special Repair Requirement".
CAUTION:
- The spiral cable may snap by steering operation if the cable is installed in an improper position.
- Do not turn the spiral cable quickly or beyond the limit number of turns. (This can cause the cable to snap.)
- After the work is completed, make sure no system malfunction is detected by air bag warning lamp.
- In case a malfunction is detected by the air bag warning lamp, reset with the self-diagnosis function and delete the memory with CONSULT.
- If a malfunction is still detected after the above operation,
perform self-diagnosis to repair malfunctions.
Refer to SRC-12, "SRS Operation Check".
 Driver air bag module
Exploded View
Driver air bag module
Side lid
Driver air bag module harness connectors
Steering wheel switch assembly connector
Driver air bag module bolt
Removal and Installation
C ...
 Front passenger air bag module
Removal and Installation
CAUTION:
Before servicing, turn ignition switch OFF, disconnect both
battery terminals and wait at least 3 minutes.
Do not use air tools or electric tools for servic ...
Other materials:
Front disc brake
Exploded View of Brake Pads
Inner shim cover
Inner shim
Inner pad
Outer pad
Outer shim
Outer shim cover
Anti-rattle clips
Pad retainers
Molykote AS-880N grease
Molykote 7439 grease
Removal and Installation of Brake Pads
WARNING:
Clean dust on caliper and b ...
Fuel tank
Exploded View
Fuel filler cap
Grommet
Fuel filler tube
Fuel tank
Fuel filler hose
Fuel tank protector
Fuel tank mounting straps
O-ring
Fuel level sensor, fuel filter and fuel pump assembly
Lock ring Front
Removal and In ...
Front fog lamp aiming adjustment
Description
PREPARATION BEFORE ADJUSTING
CAUTION: Do not use organic solvent
(thinner, gasoline etc.).
NOTE: For
details, refer to the regulations in your own country.
Before performing
aiming adjustment, check the following.
Keep all tires inflated to correct pressure.
Place vehicle ...
Nissan Maxima Owners Manual
- Illustrated table of contents
- Safety-Seats, seat belts and supplemental restraint system
- Instruments and controls
- Pre-driving checks and adjustments
- Monitor, climate, audio, phone and voice recognition systems
- Starting and driving
- In case of emergency
- Appearance and care
- Do-it-yourself
- Maintenance and schedules
- Technical and consumer information
Nissan Maxima Service and Repair Manual

0.0054